All Chests and Puzzles in the House of Chains in Honkai: Star Rail

The House of Chains is a relatively new location in Honkai: Star Rail, added to the game with the release of patch 2.4. It serves as a prison for the most dangerous criminals on Lofu Xianzhou, including the leader of the Borisin clan, the ruthless Hulei. In this article, we will tell you where to find all the chests in the location, as well as how to solve the puzzles associated with them.
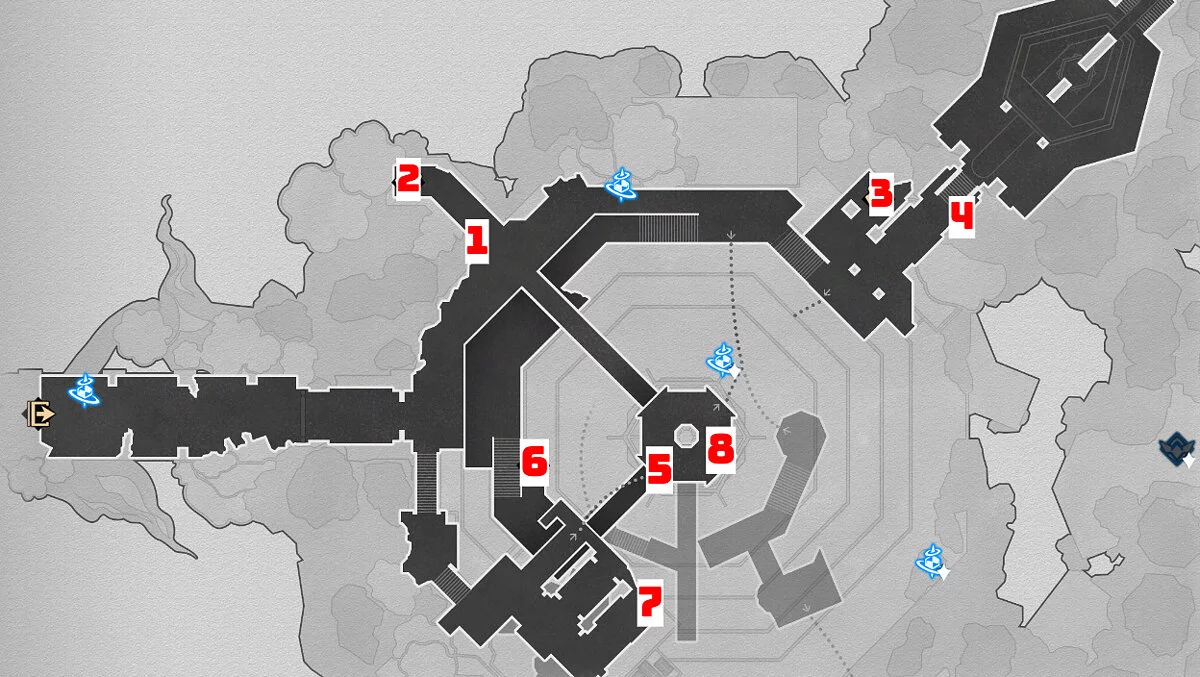
All Chests on the First Floor of the House of Chains
The House of Chains is a large location that is best divided into floors for convenience. Each of them is deeper than the previous one, so the count goes negative. Next, we will tell you how to find the chests on the upper floor of the prison.
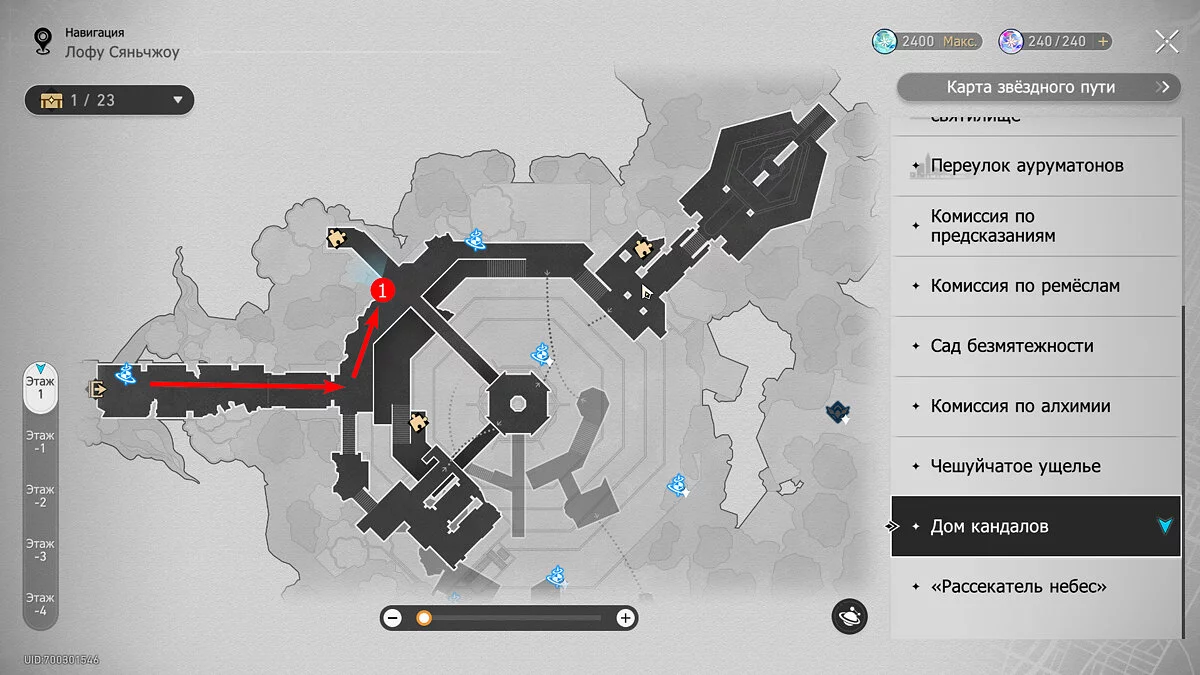
Chest #1
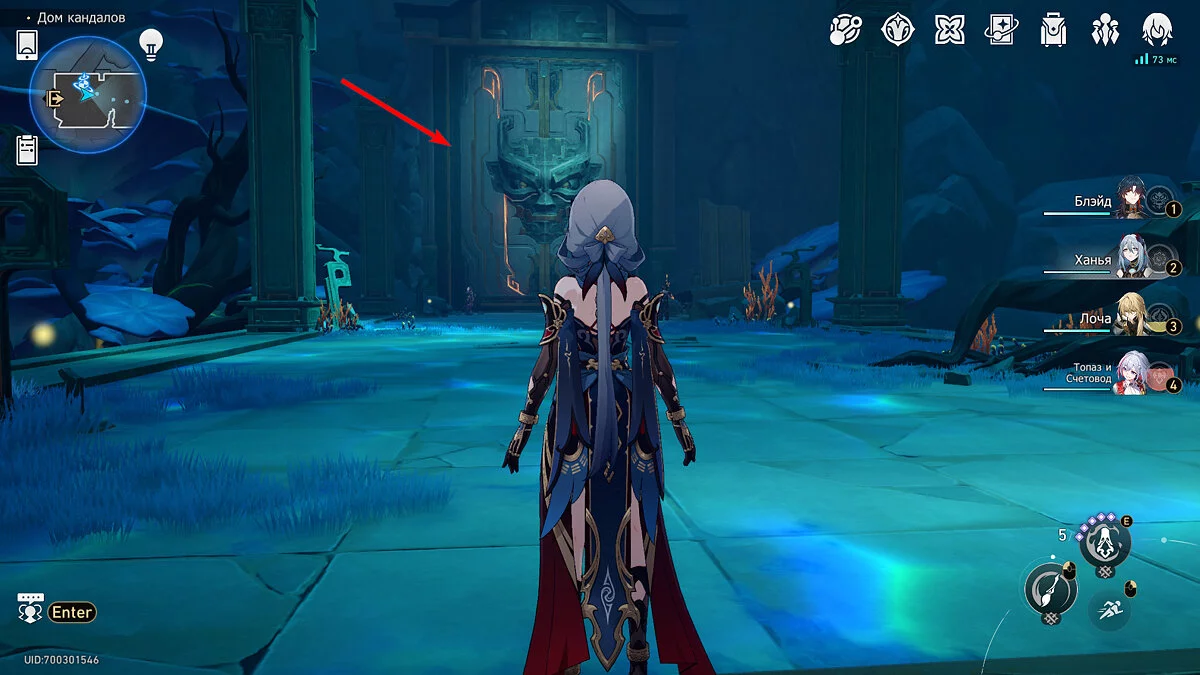
Teleport to the Gates of Evil Pacification and go forward through the large door. Then immediately turn left and run to the NPC standing near one of the corridors. The chest will be right next to her.
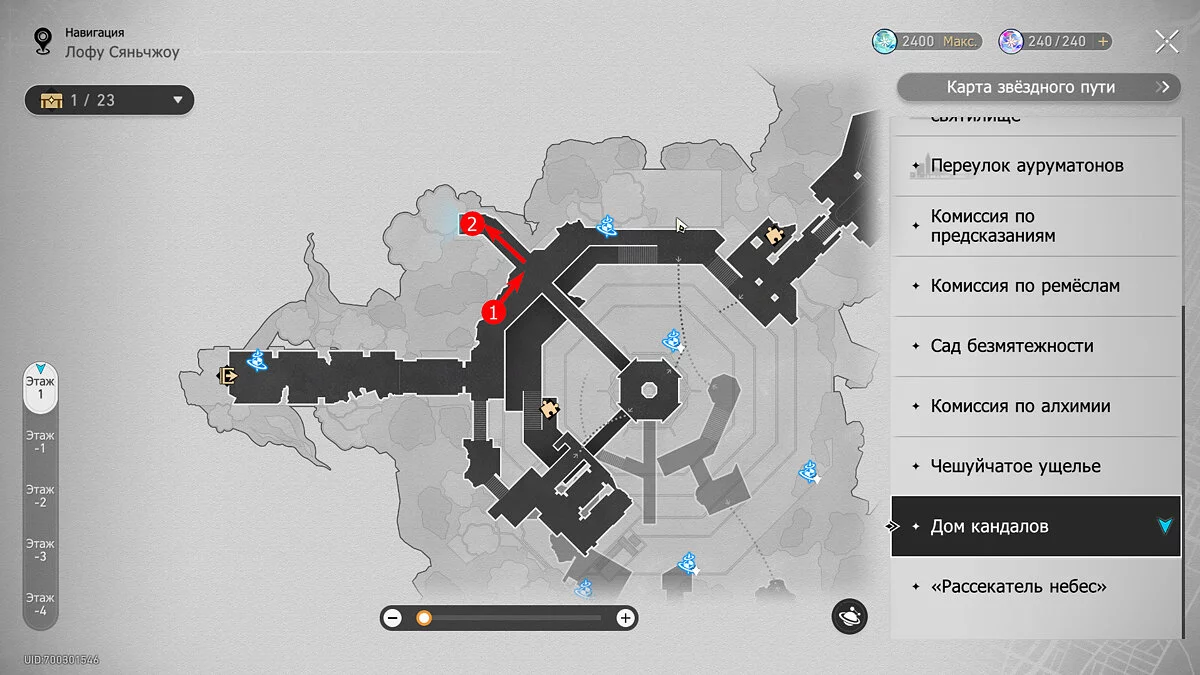
Chest #2
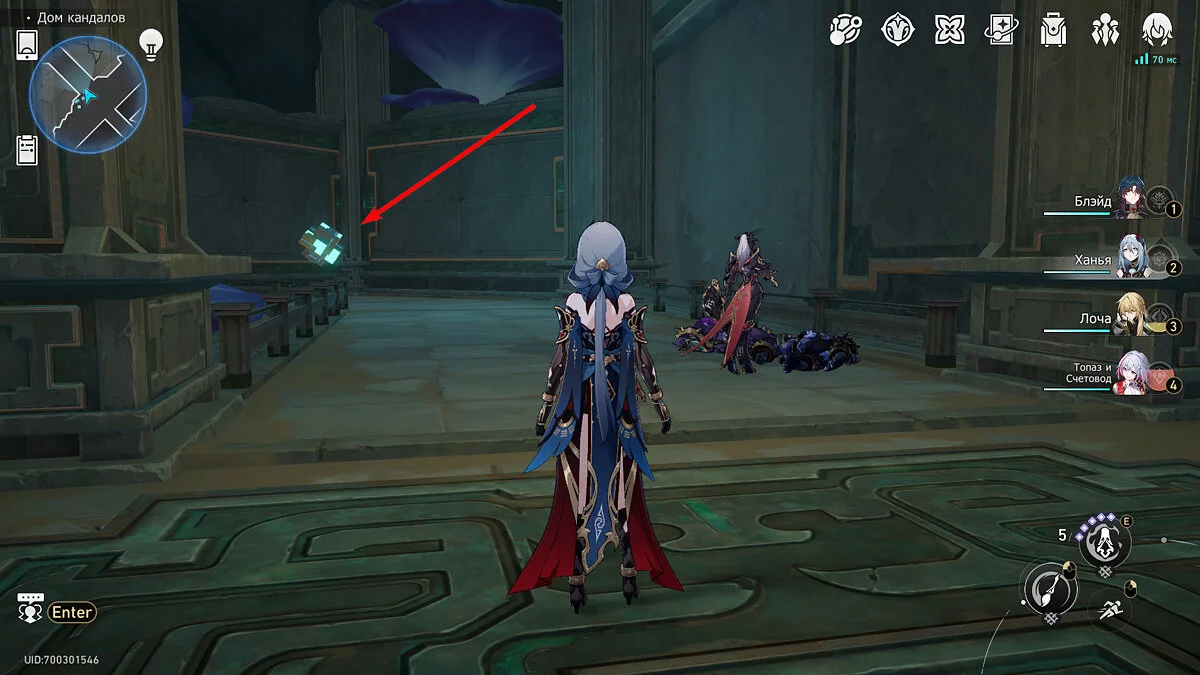
Enter the corridor near the previous chest and you will see a cube that needs to be correctly assembled to solve the puzzle. It is quite easy, but if you have difficulties, use the solution below.
Place the first cube on the corner, above the previous one.
Then place the second square above the first, forming a tower.
If everything is solved correctly, you can take the valuable chest.
Chest #3
Teleport to the Scriptorium and run forward to the end, then go up the stairs. On the left, you will see another cube with a puzzle that is just as easy to solve:
Place the first cube on the near corner of the platform.
Place the other two squares diagonally.
If the puzzle is solved correctly, a valuable chest will appear.
Chest #4
Return to the small platform where the prison workers are on duty and run towards the small staircase. To the right of the steps will be another ordinary chest.
Chest #5
Teleport to the Scriptorium and run down the stairs, then continue until you come across another staircase. Go down it and on your left, you will see a bridge leading to the elevator. Right at the entrance to the tower will be an ordinary chest.
Chest #6
From the previous chest, return to the staircase. Next to it, you will find a robo-bird that needs to be repaired. To do this, perform the following actions:
Switch the scheme to the area that captures the hieroglyph resembling the letter S and rotate it twice to the right so that it fits into the required cell.
Switch the area that captures only the second hieroglyph, then also rotate it twice so that it fits into its place.
After that, inspect the robo-bird and guide it to the location. When it stops, a valuable chest will appear.
Chest #7
Teleport again to the Gates of Evil Pacification, but after passing through the door, run immediately to the right and go up the stairs. After passing two flights, turn to a small waiting area. Pass by two docks and you will find the chest near the last one. It will be standing on a round hatch.
Chest #8
In the same wing, go back a bit and you will see weapon racks, and near them a teleport screen. Interact with it and move to the upper floor of the central prison tower. The treasury will be standing near one of the control screens.
All Chests on the -1 Floor of the House of Chains
Several treasuries can also be found on the first underground floor of the prison. There are six chests in total here, mostly ordinary, but there are also richer ones. Next, we will tell you how to find them all.
Chest #9
Use the spatial anchor in the Ice Prison I on the -1 floor and go forward. Bypassing the column, you will see another puzzle with Hexanexus. To solve it, do the following:
Place the cube exactly in the middle of the platform.
Place another square on it.
Place the last cube in the farthest corner diagonally, on the already standing square above the platform. If the puzzle is completed correctly, you can receive a valuable chest as a reward.
Chest #10
From the platform where the Hexanexus was, turn left and you will see a staircase. On the upper flight sits a Borisin, and to the right of the steps at the very top is a chest. Defeat the enemy or use special character techniques to stealthily take the treasury.
Chest #11
Return to the spatial anchor in Ice Prison I and cross the bridge to the round platform, to the second green lever. Use it to turn the bridge to the desired section, which will be guarded by Borisins. Deal with them and take the ordinary chest standing by the wall.
Chest #12
Return to the lever, but this time do not turn to the bridge, run to the part of the location with chains on the ceiling and containers. Turn left, then right. The chest will be under a cunning robo-bird.
Chest #13
Use the anchor in Ice Prison II and run in the opposite direction from the movable bridge. Climb up twice, bypassing the Borisins, and use the teleport screen. The ordinary chest will be right to the right of it, but at the other end.
Chest #14
From the previous treasury, run forward to the room with spikes on the ceiling, then turn left. The chest will be at the very edge of the platform, and next to it will be another Borisin. Deal with the enemy and take the box.
All Chests on the -2 Floor of the House of Chains
There are few chests on the second underground floor—only four, but getting to this area is not easy, just like finding the treasuries there. Next, we will tell you how to do it.
Chest #15
The best way to get to the -2 floor is to use the transfer screen from the Ice Prison. To do this, you need to teleport to Ice Prison II and cross the movable bridge to the room with spikes on the ceiling, then turn left, go down the stairs, and pass through the screen directly to the Intermediate Prison.
Finding this and subsequent chests is not easy. To do this, talk to the robo-bird Messenger and activate any of the modes. Chest #15 can be found if you climb a little higher above the tower. Adjust the height of the robo-bird and take the chest.
Chest #16
This chest can be found while staying in the body of the bird, but this time you need to change the position of the walls using two regulators, the lower and the upper ones. They are both located near the central tower. To get the chest, the upper regulator must be green, and the lower one must be yellow (they are marked with corresponding numbers in the screenshots). To change the color, simply fly closer to the device and interact with them.
The chest itself is in a recess in the wall, near the teleport screen. Fly to it and take the box.
Chest #17
Staying in the body of the robo-bird, change the same regulators, making both devices green, then fly to the indicated point on the map. The chest will again be in a recess in the wall, but already opposite the station where the robo-bird originally stood—in the game, an active character who launched the creation will be standing there.
Chest #18
Without changing the color of the regulators, fly to the recess in the wall with vases a little lower. When you get to the corner, you will be able to earn an achievement. Another robo-bird will be hovering near the vases, and if you turn left, you will find a luxurious chest.
All Chests on the -3 Floor of the House of Chains
There are ten chests on the third underground floor in total. Mostly, these are ordinary treasuries, but there are also boxes that open after solving puzzles, as well as chests guarded by elite enemies. Below, we will tell you how to find each chest.
Chest #19
Use the spatial anchor in the Molten Prison and climb up the bridge, then head straight to the central elevator tower. Go around it and you will find an ordinary chest.
Chest #20
Use the elevator near the previous chest and go to the Intermediate Prison, then run again to the central tower, more precisely to the screen to the left of it. Pass through the device to find yourself in the Scorching Prison again and run forward, then go down the stairs. The chest will be to the left of the steps, near a pile of boxes.
Chest #21
From the previous chest, go forward across the suspension bridge. Turn left from the red screen, then left again, and in the far corner of the room, you will see an ordinary chest. But be careful: the steam clouds next to it are actually lurking borisyns. Don't let the enemies catch you off guard and strike first before they ambush you.
Chest #22
Return to the fork near the red screen, but now go right. After walking a bit, you will see another puzzle with a hexanexus, which is solved as follows:
Place the square to the right of the tallest and protruding figure.
Place the cube below the previous square.
Place the cube at the very bottom, but in the adjacent row, finishing matching the edges.
If the puzzle is solved correctly, you can get a valuable chest as a reward.
Chest #23
Teleport to Stagnant Shadow: Mechawolf Form and go through the screen. The chest will be standing by the column on the right, but to take it, defeat the borisyns nearby.
Chest #24
Return through the same screen back to Stagnant Shadow, but this time go behind the trial: the chest will be standing near the cave wall.
Chest #25
Use the anchor in the Molten Prison and run across the bridge behind it to the regulator. Inspect the device so that it changes color and part of the bridge rises. Run up the path again and take the ordinary chest ahead.
Chest #26
From the previous chest, turn right and you will see another hexanexus puzzle. Solving it is quite easy if you follow the steps below:
Place two squares on the protruding cubes of the platform.
From the left already installed cube, add another figure to the center of the platform.
From the previous square, grow a cube to the right edge.
If the puzzle is solved correctly, a precious chest will appear.
Chest #27
Use the teleport on the -3 floor again and run to the regulator. Turn the bridge with its help and run to the second hexanexus puzzle. It can be solved as follows.
Place three cubes at the top horizontally, from right to left.
Attach the fourth block at the bottom to cover the second edge.
After solving the puzzle correctly, take the valuable chest.
Chest #28
This chest is opposite the previous one. Defeat the elite enemies and get the treasure chest.
All chests on the -4 floor of the House of Shackles
There are only four chests on the last floor of the prison, but you can only access this part of the location after completing the patch 2.4 mastery mission. Moreover, it is divided into two floors. Below, we will tell you how to get to this location and how to find the chests there.
Chest #29
Use the transport anchor in the Judgment Key and run towards the borisyn. Near it by the wall, there will be another ordinary chest.
Chest #30
Return to the anchor, but this time go in the opposite direction, towards the robobird. Interact with the device and you will be able to enter the force barrier. Fly to the green fire and ascend higher. On the right, you will see another green fire, and above it, an ordinary chest.
Chest #31
Return to the spatial anchor on the floor and run forward until you see the stairs. Go down them and you will reach the deepest floor of the prison, where the leader of the borisyns, Hulei, is held.
Right next to his cell, there will be a piggy bank: defeat it in time and get 60 primogems.
Chest #32
Next to the piggy bank, you can also find an ordinary chest. It will be standing behind one of the lion statues.
Other guides
- How to Get Free Polychrome in Zenless Zone Zero
- Guide for Zenless Zone Zero Beginners: Tips and Tricks
- All chests in the Origami Academy in Honkai: Star Rail — map and routes
- All Origami Birds in the Origami Academy in Honkai Star Rail: How to Find Them
- All Clockwork Mechanisms in Origami Academy in Honkai Star Rail: How to Find and Get Achievements
- All Chests and Puzzles on the Skybreaker in Honkai: Star Rail
- Alle Truhen und Rätsel auf dem Skybreaker in Honkai: Star Rail
- Das kostenlose Actionspiel Zenless Zone Zero von den Machern von Genshin Impact und Honkai: Star Rail wurde veröffentlicht
- Gruppenchat kommt wahrscheinlich zu Honkai: Star Rail
-
How to Get Free Polychrome in Zenless Zone Zero
-
All chests in the Origami Academy in Honkai: Star Rail — map and routes
-
All Origami Birds in the Origami Academy in Honkai Star Rail: How to Find Them
-
Guide for Zenless Zone Zero Beginners: Tips and Tricks
-
All Chests and Puzzles on the Skybreaker in Honkai: Star Rail
