Guide to the Ashlands Update for Valheim

Survival game Valheim continues to receive fresh updates. After the misty location (Mistlands), a fiery biome has been added to the game, designed for the most advanced characters. In this guide, we have gathered all the necessary information about the Ashlands expansion.
Valheim Guides
- Guide to the Ashlands Update for Valheim
- Co-op in Valheim: How to Play with Friends
- Where to Find Trophies and How to Hang Them on the Wall in Valheim
- Where to find the world save files in Valheim: how to transfer world files to another PC and a dedicated server
- How to Upgrade the Workbench in Valheim to Level 5
- How to Find Save Files in Valheim
- All Bosses in Valheim: How to Find and Defeat
- Resources in Velheim: How to Get Copper, Tin, Iron, Coal, Flint, Chitin, Leather, Wood and Stone
How to Get to the Ashlands. Where They Are Located
No purchase is required to access the expansion content. You only need the original Valheim. Just update it on Steam.
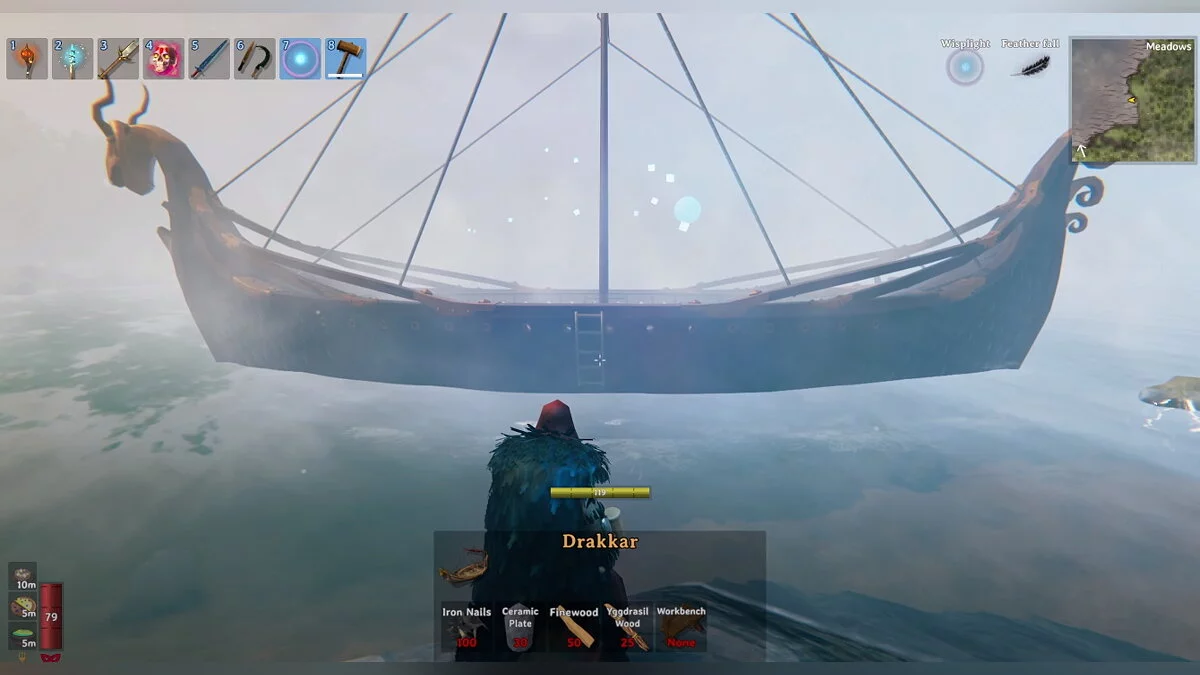
After this, the Ashlands will appear in the south of your map. To get to their territory, you will have to cross boiling waters. None of the boats in the game can withstand such high temperatures. Therefore, you will need a drakkar, a new type of seafaring ship that was added in the Ashlands update.
New Monsters in the Ashlands Expansion
In this section, you will find the names and descriptions of all the new mobs that can be encountered in the Ashlands region.
Bonemaw
Bonemaw is an enhanced version of the Sea Serpent, which can only be found in the waters of the Ashlands. In the early stages of the game, we recommend not fighting it, as you risk losing your drakkar. First, land on the fiery islands, build a base, and then go hunting.
You can spot Bonemaw by its glowing spikes in the water. As with Sea Serpents, it is better to kill them from a distance using a bow and arrows. Or you can pull the giant onto land if you hit it with a harpoon. However, the second option is more difficult, as other monsters may attack you while you are pulling the fish onto land.
Volture
Birds that attack anyone they see. You can arm yourself with a sword, wait for the right moment, and strike the Volture just before it attacks. But it is easier to hit it with an arrow.
Charred Marksman
Like other archers, it is best to kill him in close combat. He will try to run away from you. Chase and hit him with a sword. You can, of course, have a bow duel, but this option is riskier.
Charred Twitcher and Summoned Twitchers
They move quickly and throw fiery stones at you from a great distance. If you get too close, these fighters will punch your hero. One such warrior is not dangerous, but they often move in groups. As with other archers, we recommend killing them in close combat. Charred and Summoned Twitchers act the same way.
Charred Warlock
Attacks with green orbs that explode upon impact. Additionally, the fireball will set you on fire, so you'll need to extinguish the flames. It is recommended to dodge the mages and hit them with a sword or club. Keep in mind that Warlocks can summon Twitchers. Even after the sorcerer is dead, they won't disappear, so you'll have to finish off each one.
Charred Warrior
These fighters are extremely dangerous in close combat. Their attacks are slow but unpredictable, making it hard to anticipate when they will strike with their two-handed weapon. It is recommended to kill Charred Warriors from a distance. If you have to fight them with swords, wait for their attack, dodge or parry, and then strike back.
The Fallen Valkyrie
Rarely encountered but can appear unexpectedly. It has three types of attacks:
- Shooting three magical projectiles that inflict fire and poison damage;
- Melee attack;
- Wing attack.
It is recommended to shoot Fallen Valkyries with a bow and dodge their spells. If you defeat the winged maiden, you can obtain a rare material called Celestial Feather. It is needed to craft some powerful items.
Lava Blob
Analogous to the slimes in the swamps or tar blobs on the plains. The difference is that upon death, the blob explodes, dealing damage and setting you on fire. It is best to deal with this walking bomb from a distance. After that, you can collect the prustite powder that drops from it.
Skugg
Turrets that are set up on fortresses. They shoot from a long distance, but you can easily dodge their attacks. Try to get close to them and destroy them with a mace.
Morgen
The most formidable regular enemy in the Ashlands. This troll-like creature attacks with its hands, jumps long distances, and bites mid-air. You can shoot it with a bow or dodge its attacks and hit its back with a sword. The first tactic is preferable.
Interesting Locations in the Ashlands Biome in Valheim
In each Valheim biome, players can discover unique structures, crypts, fortresses, or other man-made creations. The Ashlands are no exception, and you can find landmarks there. More details are provided below.
Charred Fortress
A new type of dungeon where you can find particularly rare resources. To enter the fortress, you will need siege weapons. Only they can break through the castle walls. Beware of spikes and try to avoid them.
Each fortress is guarded by melee and ranged fighters. Additionally, you will encounter warlocks who can summon new warriors. Beware of Skugg turrets, as they can shoot from long distances.
After clearing the castle of enemies, do not rush to leave it. First, search the area for charred chests. Then approach the altar with the green glow and destroy it. Inspect the shards and take the Vegvisir The Emerald Flame — a resource needed to summon Feider, the boss of the Ashlands biome.
Monument of Torment
A monument that endlessly summons new warriors. It is usually located near valuable resources that you need to progress. First, attack the monument itself, and after destroying it, finish off the remaining fighters.
Sulfur Arch
A small structure that resembles an arch. Destroy its base to obtain sulfur.
Putrid Hole
An analog of the troll cave from the Black Forest, inhabited by Morgens. You need to visit them to find the mysterious Vegvisir location, which will allow you to reach the Dyrnwyn altars or the tomb of Lord Reto.
Dyrnwyn Blade Altar
The first shard of the Dyrnwyn blade can be found at the Altar. Be careful, as there is a Monument of Torment nearby that constantly summons new enemies. However, you can simply steal the fragment and run away.
Dyrnwyn Tip Altar
The second location where you can find a shard of the Dyrnwyn blade. To enter the building, you need to break through the wall with a black metal pickaxe. As with the blade altar, it is protected by a Monument of Torment.
Tomb of Lord Reto
A special place in the Ashlands where you can encounter Lord Reto. Parry his attacks or hit and immediately retreat. He is much stronger than a regular mob but weaker than a full-fledged boss. If you defeat him, you will receive one of the shards of the legendary Dyrnwyn Sword.
Dvergr Camp
An analog of the Dvergr settlement from the Mistlands. These creatures will ignore you until you start destroying or looting the camp. However, you can find valuable Fire Ore in their chests.
The Emerald Flame
The arena where the battle with Feider, the boss of the location, will take place. We will tell you how to summon and defeat him below. Note that during the battle, you may be attacked by regular monsters wandering nearby. We recommend dealing with them first.
How to Get the Legendary Dyrnwyn Sword
Your task is to explore the Putrid Holes. Dangerous Morgens inhabit these areas, so be cautious. You need to find the Vegvisir Mysterious Location. There are three of them in total. If you don't find it in one hole, move on to the next.
This refers to the Tomb of Lord Reto, Dyrnwyn Blade Altar, and Dyrnwyn Tip Altar. We discussed these locations in detail above. In each of these locations, you will find a fragment of the blade.
To forge the Dyrnwyn Sword, you will need 20 units of Fire Ore and 1 Blood Stone. The weapon can be upgraded to level 4. For this, you will need 12 units of Fire Ore and 12 Blood Stones.
The Dyrnwyn Sword deals physical and fire damage.
Ashlands Biome Boss in Valheim
The boss of the fiery lands is Fader. To start the battle with him, you need to fulfill a series of conditions:
- Defeat The Queen.
- Head to the Ashlands and build your base there.
- Construct a siege weapon and storm the Charred Fortresses. In these, you need to find nine bell fragments. You will need to clear at least three such castles. Also, you need to find the Vegvisir The Emerald Flame to locate the path to the boss arena.
- Create three bell shards from the nine fragments. For this, you will need a Black Forge.
- Head to the Emerald Flame and clear the arena of mobs.
- Place the bell shards on the towers near the central altar.
After this, Fader will appear near you.
Tips for defeating the boss:
- Build a small base near the arena so you can respawn and quickly return to the battle;
- Bring healing potions and fire resistance potions;
- Equip the best sword you have. Bows and spears are ineffective against Fader. Additionally, he has high resistance to fire and spirit magic;
- In close combat, the boss can swipe with his paw, bite, and attack with his tail. These attacks can be parried. If you can't parry, dodge and counterattack.
- From a distance, Fader casts magical spells, including a fire rain, and summons allies. Note that your arrows will deal little damage. Therefore, we recommend closing the distance and attacking the giant up close.
After defeating the boss, you will receive Fader's Power, which increases your movement speed by 10% and your carrying capacity by 300 units. Additionally, you will get Fader's Relic, which will be useful after the next update.
Other guides
- Resource Guide in Enshrouded: How to Gather All Resources in the Game
- How to Find Save Files in Valheim
- Where to find the world save files in Valheim: how to transfer world files to another PC and a dedicated server
- Co-op in Valheim: How to Play with Friends
- All Bosses in Valheim: How to Find and Defeat
- How to Upgrade the Workbench in Valheim to Level 5
- Where to Find Trophies and How to Hang Them on the Wall in Valheim
- Resources in Velheim: How to Get Copper, Tin, Iron, Coal, Flint, Chitin, Leather, Wood and Stone
- Ein großes Update für Valheim wurde veröffentlicht, das die Ashlands und Dutzende neuer Gegenstände beinhaltet
- Neuer Valheim-Trailer zeigte das Update mit den Ashlands. Sie können es sich jetzt ansehen
- Ein Minecraft-Fan hat ein echtes neuronales Netzwerk im Spiel erstellt
-
Where to find the world save files in Valheim: how to transfer world files to another PC and a dedicated server
-
Resource Guide in Enshrouded: How to Gather All Resources in the Game
-
How to Upgrade the Workbench in Valheim to Level 5
-
All Bosses in Valheim: How to Find and Defeat
-
How to Find Save Files in Valheim


