Guide to Optimizing Escape from Tarkov for Low-End PCs (2024): How to Increase FPS, Eliminate Lags and Freezes

With the release of update 0.14.0.0 in Escape from Tarkov, many players have encountered optimization issues. We asked ourselves a simple question: how to increase FPS, as well as get rid of freezes and stutters? In this guide, we will describe several effective ways to improve performance, and also tell you how to properly set graphics settings for a more comfortable game.
How to Optimize the Launcher in Escape From Tarkov
The first thing you need to do is to properly configure the launcher. It has many useful features that will help increase the game's performance. Follow the instructions below.
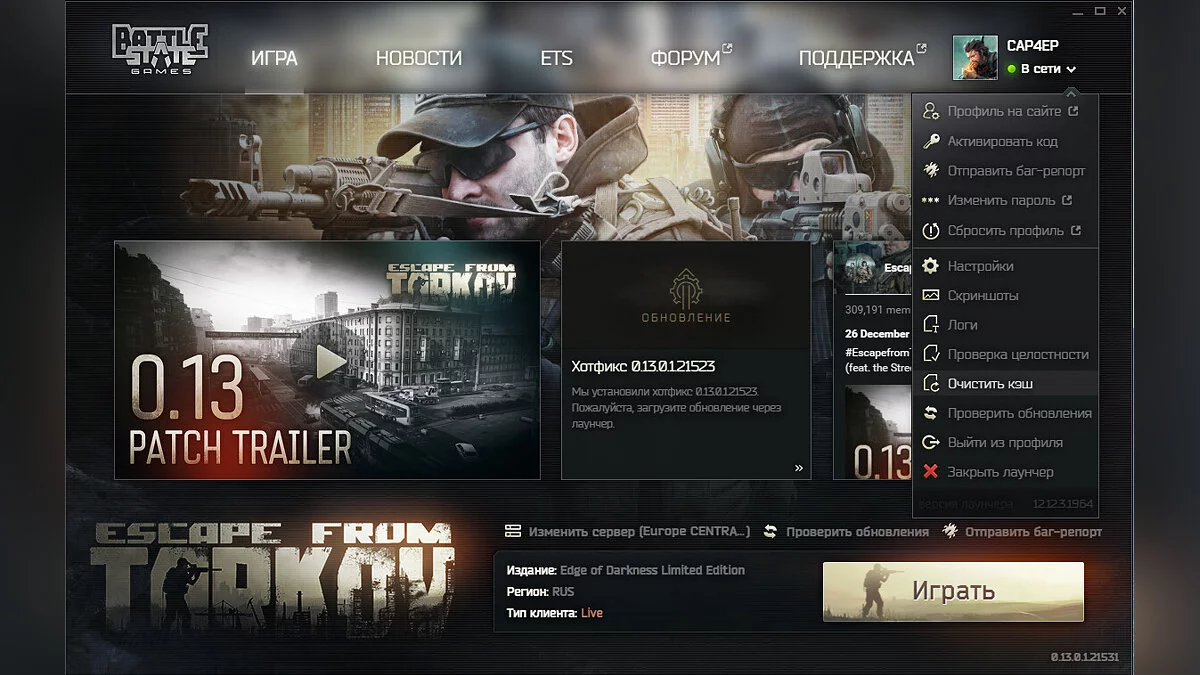
Open the launcher. In the top right corner next to your nickname, click the arrow and click on the Clear cache button. Then go to the Settings section.
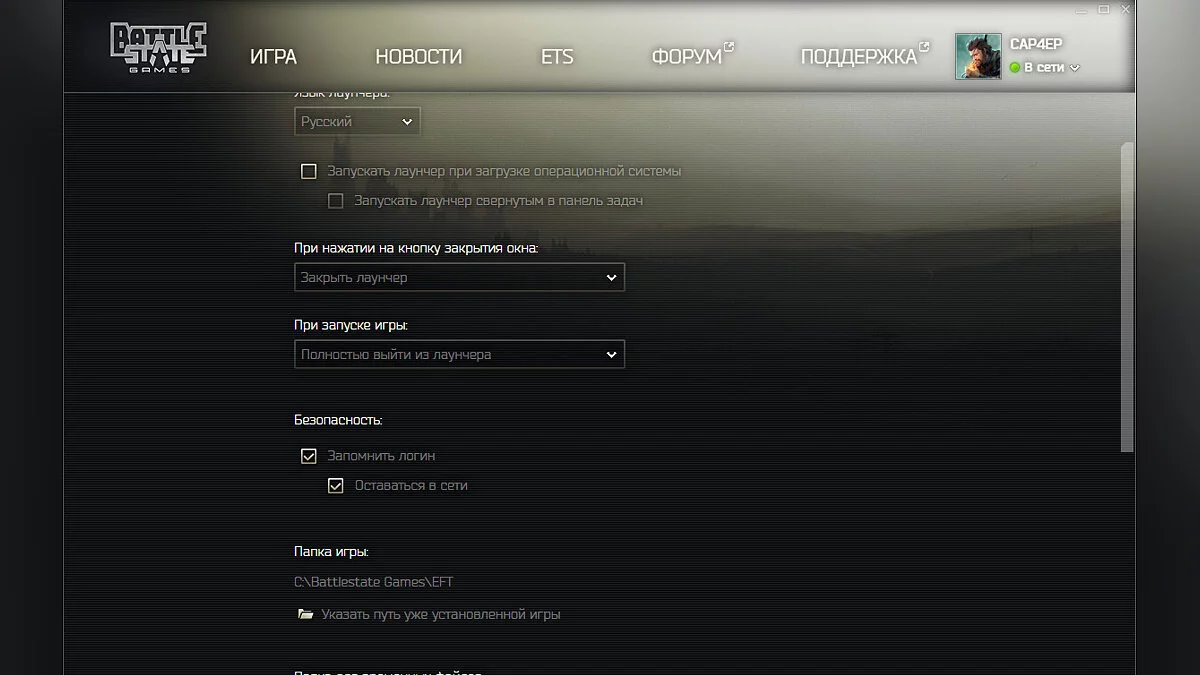
Here we are interested in two lines. In the When clicking the window close button item, set Close launcher. In the When launching the game section, select Fully exit the launcher.
Scroll down the list and find the Temporary files folder section. We recommend clearing it before each game launch.
Such launcher settings will create the minimum load on the system, thus freeing up more resources for the game. Check these settings after updates, as they may reset during the download of the next patch or other minor fixes.
How to Optimize Your System
Escape From Tarkov is quite demanding and not fully optimized yet. Therefore, it is necessary to prepare the system for a more comfortable game.
In the gaming community and among popular streamers, it has long been believed that EFT primarily consumes resources of RAM and CPU. The graphics card also affects the gaming process, but not as significantly. For example, when comparing the graphics cards GTX GeForce 1060 Ti (3GB) and Radeon RX 580 (8GB) on minimum graphics settings, the difference in FPS gain turned out to be just over 10 frames.
Install the Launcher and Game on an SSD Drive
It's no secret that the data transfer speed of SSD drives is significantly higher than that of regular hard drives. If you have several drives at your disposal, try to install the launcher and game on an SSD drive if possible.
Create a Swap File
For those players with no more than 8 GB of RAM installed, we recommend creating a swap file in the Windows system. This will help avoid various hangs and crashes, as they can be quite common in this case:
- Press Win+R to bring up the search bar, enter sysdm.cpl without quotes, and press Enter;
- Go to the Advanced tab, then in the Performance section click Settings;
- In the window that opens, click on the Advanced tab, then Change;
- Uncheck the Automatically manage paging file size for all drives option and click Custom size;
- In the Initial size (MB): field, set the value to — 4096;
- In the Maximum size (MB): field, set it to — 8192;
- Click the Set button and then OK.
Note: You must restart your PC for the changes to take effect.
We have provided optimal values for the swap file. If you still encounter difficulties, developers recommend setting higher values. For the swap file, be sure to specify an SSD drive if available.
Configuring NVIDIA Graphics Card Settings
- Right-click on the desktop and go to NVIDIA Control Panel;
- Find the 3D Settings section. In the Adjust image settings with preview option, select Use the advanced 3D image settings and move the slider to the left;
- Set to Performance and click Apply.
Next, go to the Manage 3D settings tab. In the window that opens, set the optimal values (the order of actions may vary):
- CUDA — GPUs — set to All;
- DSR — Factors — Off;
- Anisotropic filtering — set to Application-controlled;
- Vertical sync — Off;
- OpenGL rendering GPU — select your discrete graphics card;
- Maximum pre-rendered frames — set to 1;
- Ambient Occlusion — Off;
- Shader Cache — On;
- Maximum Frame Rate and Max background application frame rate — turn off;
- Threaded optimization — definitely turn on;
- Low Latency Mode — On;
- Power management mode — set to Prefer maximum performance;
- Antialiasing — FXAA — Off;
- Antialiasing — Gamma correction — On;
- Antialiasing — Transparency — Off;
- Antialiasing — Mode — set to — Application-controlled;
- Monitor Technology — set to Fixed Refresh;
- Triple buffering — On;
- Texture filtering — Anisotropic filter optimization — On;
- Texture filtering — Quality — set to High performance;
- Texture filtering — Negative LOD bias — set to Allow;
- Texture filtering — Trilinear optimization — On;
- Click the Apply button.
Adjusting AMD Graphics Card Settings
Right-click on the desktop and select AMD Software: Adrenaline Edition. In the application that opens, go to settings by clicking the gear icon in the top right corner. Then open the Graphics section and select the following options:
- Radeon Anti-Lag — Off;
- Radeon Chill — Off;
- Radeon Boost — Off;
- Radeon Image Sharpening — Off;
- Radeon Enhanced Sync — Off;
- Wait for Vertical Refresh — set to Always Off.
Next, open the Advanced tab and also set the values:
- Target Frame Rate Control — Off;
- Anti-Aliasing — set to Use application settings;
- Anti-Aliasing Method — Multisampling;
- Morphological Anti-Aliasing — Off;
- Anisotropic Filtering — Off;
- Texture Filtering Quality — Performance;
- Surface Format Optimization — On;
- Tessellation Mode — Override application settings;
- Maximum Tessellation Level — Off;
- OpenGL Triple Buffering — Off;
- 10-bit Pixel Format — Off;
- GPU Workload — Graphics.
In the shader cache section, you need to periodically click Perform Reset to clear the files. This will not affect the performance of your PC.
Terminate All Background Processes
Press Ctrl+Alt+Delete and end all background tasks that are loading your system and are not needed at the moment.
Regularly Clean the Temp Folder
- Press Win+R to bring up the search bar and type %temp% without quotes;
- Completely delete the contents of the folder. Skip the files that cannot be deleted. They are temporary, and you do not have to worry about your system's performance.
How to Optimize Escape from Tarkov. Which Settings to Use for Comfortable Play
Now let's move on to the settings of Escape from Tarkov:
- In the bottom right corner, go to Settings by clicking on the gear icon;
- In the Game section, check the boxes for Auto RAM Cleaner and Use only physical cores.
- Uncheck the box for Preload Hideout — turning this function off will load your hideout only when you want to enter it. If the function is on, the hideout will be loaded upon game startup, which may negatively affect performance.
- Additionally, you can adjust the Field of View slider to your liking, but remember that the wider the picture on your monitor, the more textures and objects the game will need to load.
- In the Head Bobbing item, set the value to 0.2.
Graphics Settings
- In the Screen Mode section, set to Full Screen — this is the only mode in which the game's FPS will be at its highest. Any other screen mode will negatively affect the frame rate;
- Be sure to disable the Vertical Synchronization feature;
- The Overall Graphics Quality slider can be left untouched, as you will be adjusting the picture manually.
- In the Texture Quality section, select the Low value;
- For Shadow Quality, set the value to Medium. There is an opinion that low shadow quality poorly loads them in the game itself, which negatively affects the frame rate;
- Lower the Object Detail slider to the minimum — 2 units;
- In the Overall Visibility item, we recommend setting the value to 400. Shootouts in Tarkov rarely happen at such distances — if you plan to play on a weak machine, this value will suffice;
- In the Antialiasing section, you should set the value to TAA. This feature helps to eliminate the stair-step effect on objects, while not significantly consuming system resources. However, if you are comfortable playing without antialiasing, you can disable this feature. In this case, the picture will take on a more grainy appearance, and the visibility distance will be greatly reduced;
- The default value for the Resampling parameter is set to 1x. You can lower it for better performance, but this will degrade the image quality. If you decide to increase this parameter, you will encounter a significant drop in frames.
The following parameters may differ for different users depending on the manufacturer of their video cards.
- The HBAO parameter is responsible for the quality of lighting and shadows. It is better to turn off the feature completely as it heavily consumes GPU resources;
- The SSR tab is determines the level of detail of reflections, their quality, and smoothness;
- Anisotropic filtering helps to increase the clarity of objects at long distances. We advise turning off this parameter.
It remains to deal with a few separate parameters that are also important for increasing performance in the game. In the Graphics tab, there are a few more separate items:
- High-quality color — responsible for a more saturated picture. Consumes little FPS. We recommend enabling this parameter;
- Z-Blur — responsible for blurring the picture, better to disable it;
- Chromatic Aberrations — turn off;
- Noise — also worth disabling;
- Grass Shadows — this parameter loads the video card, leading to a decrease in performance;
- Mip Streaming — also turn off for more stable operation.
You can simply set the graphics settings in these items as shown in the screenshot below.
Periodically Restart the Game
Even with the Auto RAM Cleanup feature enabled, after several prolonged raids, you may experience freezes and hangs. We recommend re-entering the game from time to time. This will allow you to forcibly clear the RAM.
Change settings in the registry editor
In the Windows operating system registry settings, there is a notable feature that might be disabled for you. It's called LargeSystemCache and is responsible for maintaining the standard size of the file system cache, which in turn can remove minor freezes and lags in Escape from Tarkov. To check its activity, follow the instructions:
- Press Search and enter Registry Editor without quotes;
- Right-click RCM and select Run as administrator;
- Find the line HKEY_LOCAL_MACHINE and press the arrow next to it;
- Then locate the SYSTEM directory, again on the arrow;
- Next, the folder CurrentControlSet — click on the arrow;
- Now find the Control directory and press the arrow again;
- You need the Session Manager folder, click on the downward arrow;
- Locate the Memory Management directory and be sure to click on the folder itself, not the arrow;
- In the list that appears on the right, find the file LargeSystemCache and double-click LCM on it.
- Path: ComputerHKEY_LOCAL_MACHINESYSTEMCurrentControlSetControlSession ManagerMemory Management without quotes.
If you have the value 0, it means the function is turned off, and you need to replace the value with 1. After that, simply close the registry and restart your PC for the changes to take effect.
Note: If changing this parameter causes your system to crash and errors, simply follow the path mentioned above and change the value back to 0.
Disable the Binaural Sound feature
With patch 0.13.0.0, a Binaural Sound feature was added to the game. Ideally, it allows you to determine the direction to the sound source, making the sound perception volumetric. However, many gamers note that activating this parameter significantly drops the overall game performance, usually by 10-15 FPS. We recommend doing the following:
- In the game settings, go to the Sound tab;
- Uncheck the Binaural Sound parameter;
- Press the Save button and re-enter the game.
Change the Overcoming Medium Obstacles setting
In a recent update, developers introduced a feature to the game that allows you to cross over low barriers, called Overcoming Medium Obstacles. By default, this parameter is set to Key Press, however, many players set it to Auto. Some gamers note that this can significantly affect FPS drops during gameplay on large locations, such as Streets of Tarkov. We strongly recommend enabling Key Press.
***
At the moment, these are the most effective tips that both the game itself and the gaming community can offer. Battlestate Games, in turn, is constantly working on optimizing the project.
Other guides
- Mysterious in Tarkov: How to Find the Encrypted Flash Drive, Where to Install the Gyrotachometer and Cameras
- All Exits on the Epicenter Location in Escape from Tarkov
- Guide to the Winter Tales Event in Escape from Tarkov: Where to Find and How to Light Bonfires
- Leitfaden für das Wintermärchen-Event in Escape from Tarkov: Wo man Lagerfeuer findet und wie man sie entzündet
- Die Entwickler von Escape from Tarkov haben aktualisierte Inhalte für die Deluxe-Editionen Edge of Darkness und The Unheard Edition eingeführt.
- Mysteriös in Tarkov: Wie man das verschlüsselte Flash-Laufwerk findet, wo man den Gyrotachometer und die Kameras installiert


