How to find all scenes from the past in Silent Hill 2 Remake

Bloober Team created a remake of Silent Hill 2, which honors the memory of the original. In the game, you can find 26 scenes from the past (Glimpses of the Past). Each one references the original Silent Hill 2. You need to find all 26 in one playthrough to get the Echoes achievement.
Silent Hill 2 Guides
- Full Silent Hill 2 Remake Walkthrough at 100%
- All Riddles and Puzzles in Silent Hill 2 Remake
- All lock and safe codes in Silent Hill 2 Remake
- How to get all weapons in Silent Hill 2 Remake
- How to find all scenes from the past in Silent Hill 2 Remake
- Boss Guide for Silent Hill 2 Remake — How to Win
- How to Find All Strange Photos in Silent Hill 2 Remake
- How to find the flashlight in Silent Hill 2 Remake
- All endings of Silent Hill 2 Remake — how to get the secret endings
What do scenes from the past give?
Exploring the remake version of Silent Hill 2, you can find a number of locations and objects that played an important role in the original game. Together, they are called scenes from the past and are essentially Easter eggs and collectible items.
For example, since James encounters Eddie and Laura in the cinema instead of the bowling alley, the reference is in the bowling alley — a nearly eaten pizza lying on the table. Since the clock was moved, the stripes on the wall serve to indicate that it can be pushed in the original game, demonstrating another reference.
Unlike other collectibles in Silent Hill 2 Remake, you do not track echoes of the past in your inventory. In fact, the game never tells you what they are. If you found a seemingly random interaction point that briefly showed static on the screen while your camera angle changed and some slow music played, but nothing else happened, that was a glimpse of the past.
Finding all these glimpses during one playthrough of the game unlocks the Echoes trophy/achievement. This does not affect the endings or gameplay of Silent Hill 2. It is a completely standalone task.
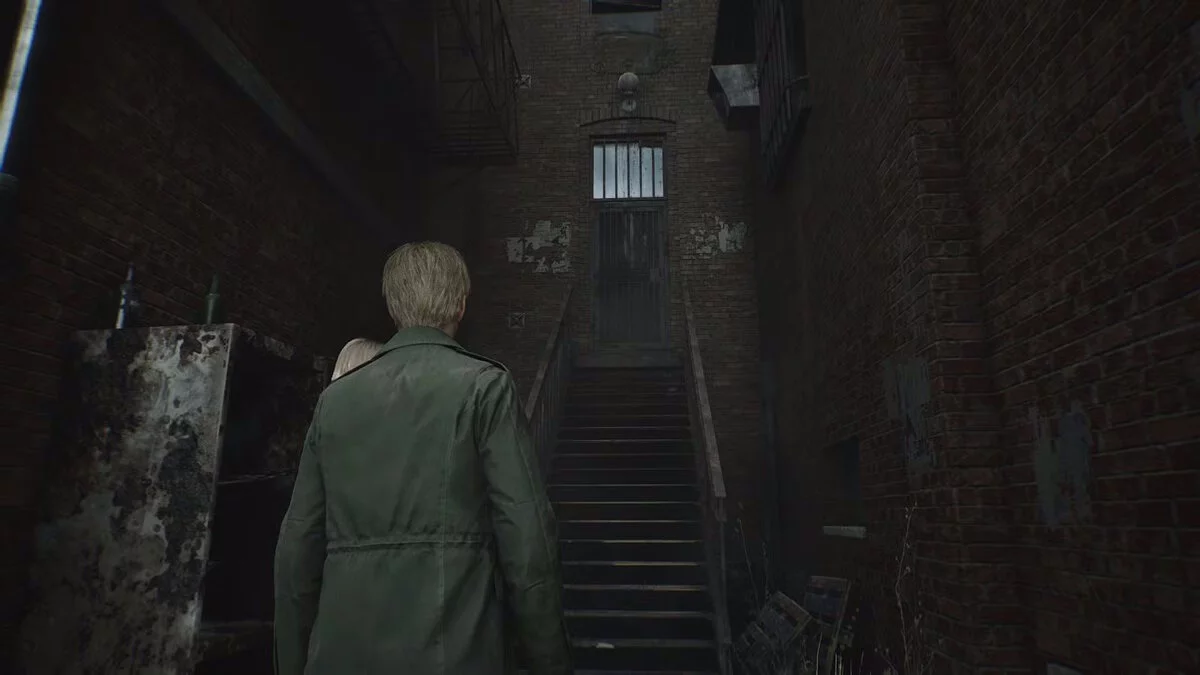
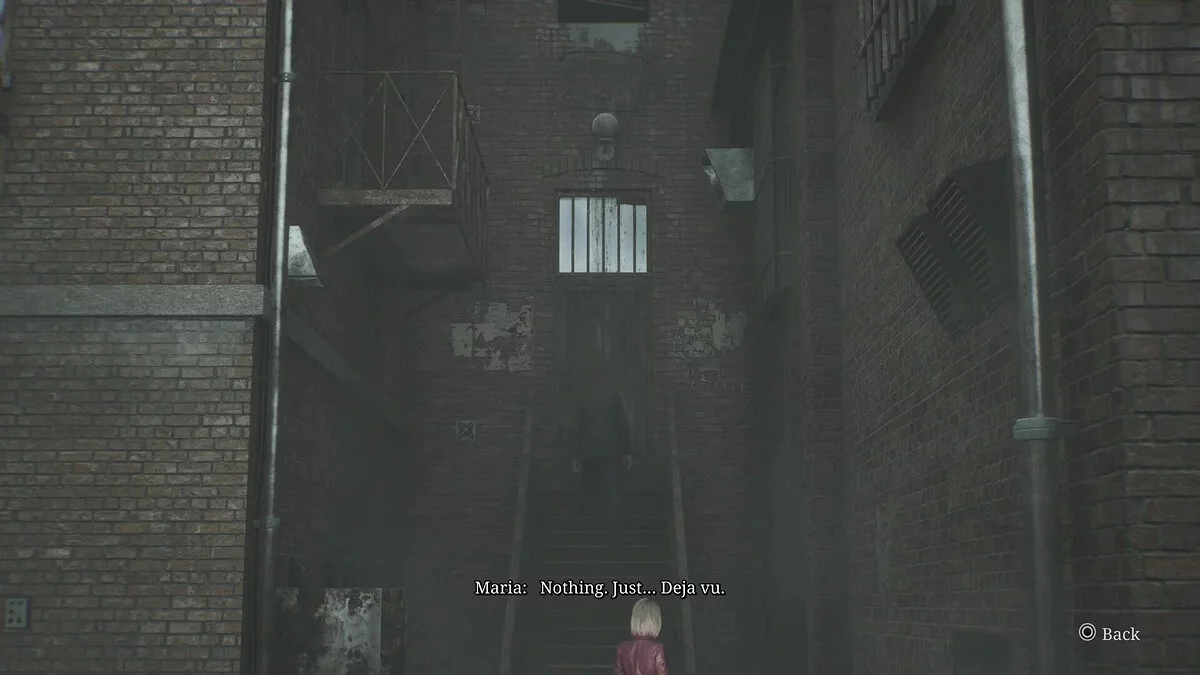
They are hard to notice, especially at the beginning of the game, but they become more obvious once you reach Brookhaven Hospital. If you are looking for them on your own, switching your user interface to Modern mode can help. This way, interaction points in your environment will be highlighted with a real button prompt rather than just a simple white dot, as shown below:
Otherwise, finding the pointer often can be a matter of simply being in the right place at the right time with the camera pointed in the right direction. Some luck is required here.
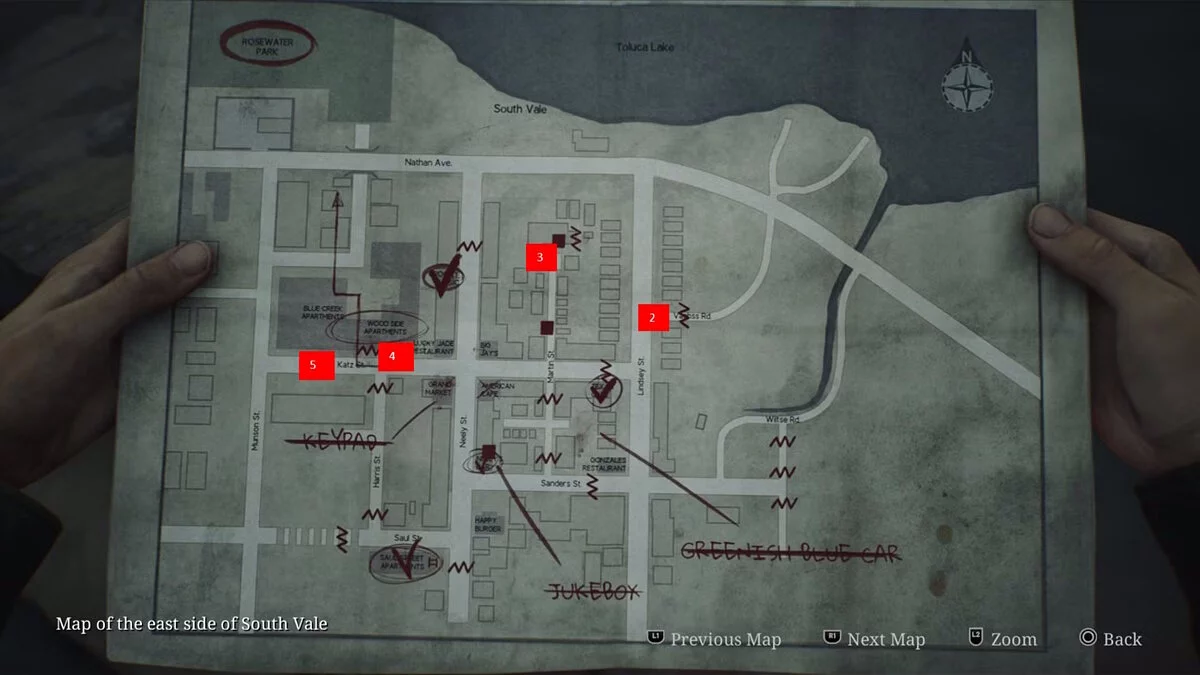
South Vale (East)
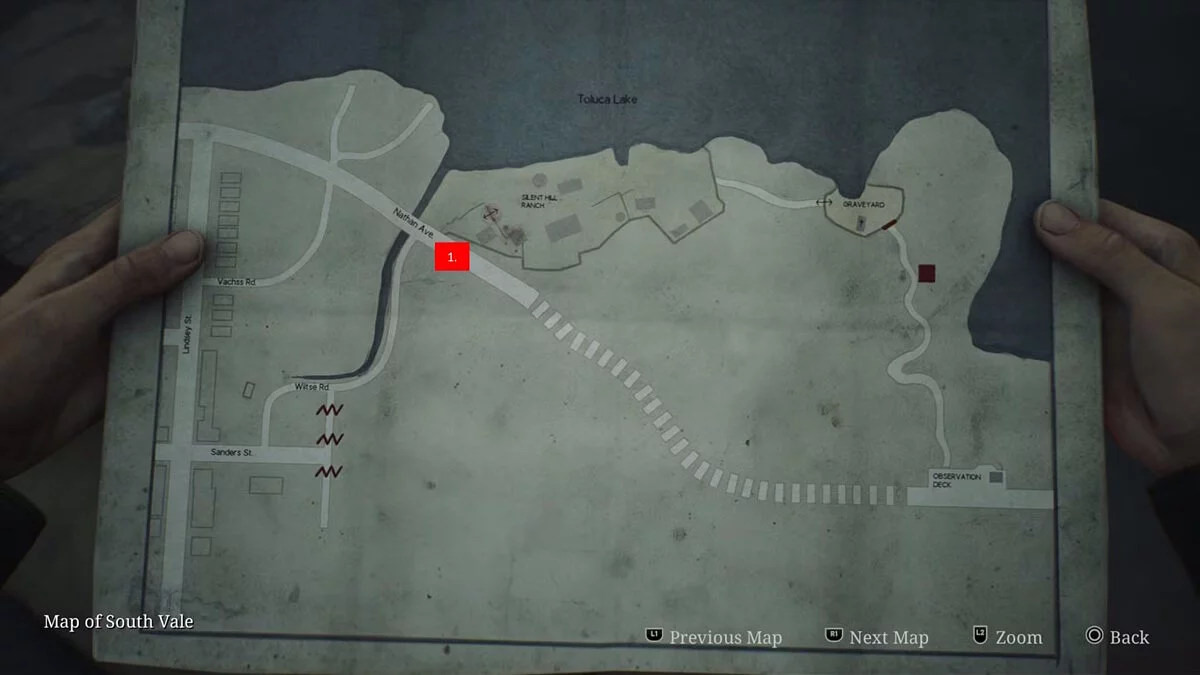
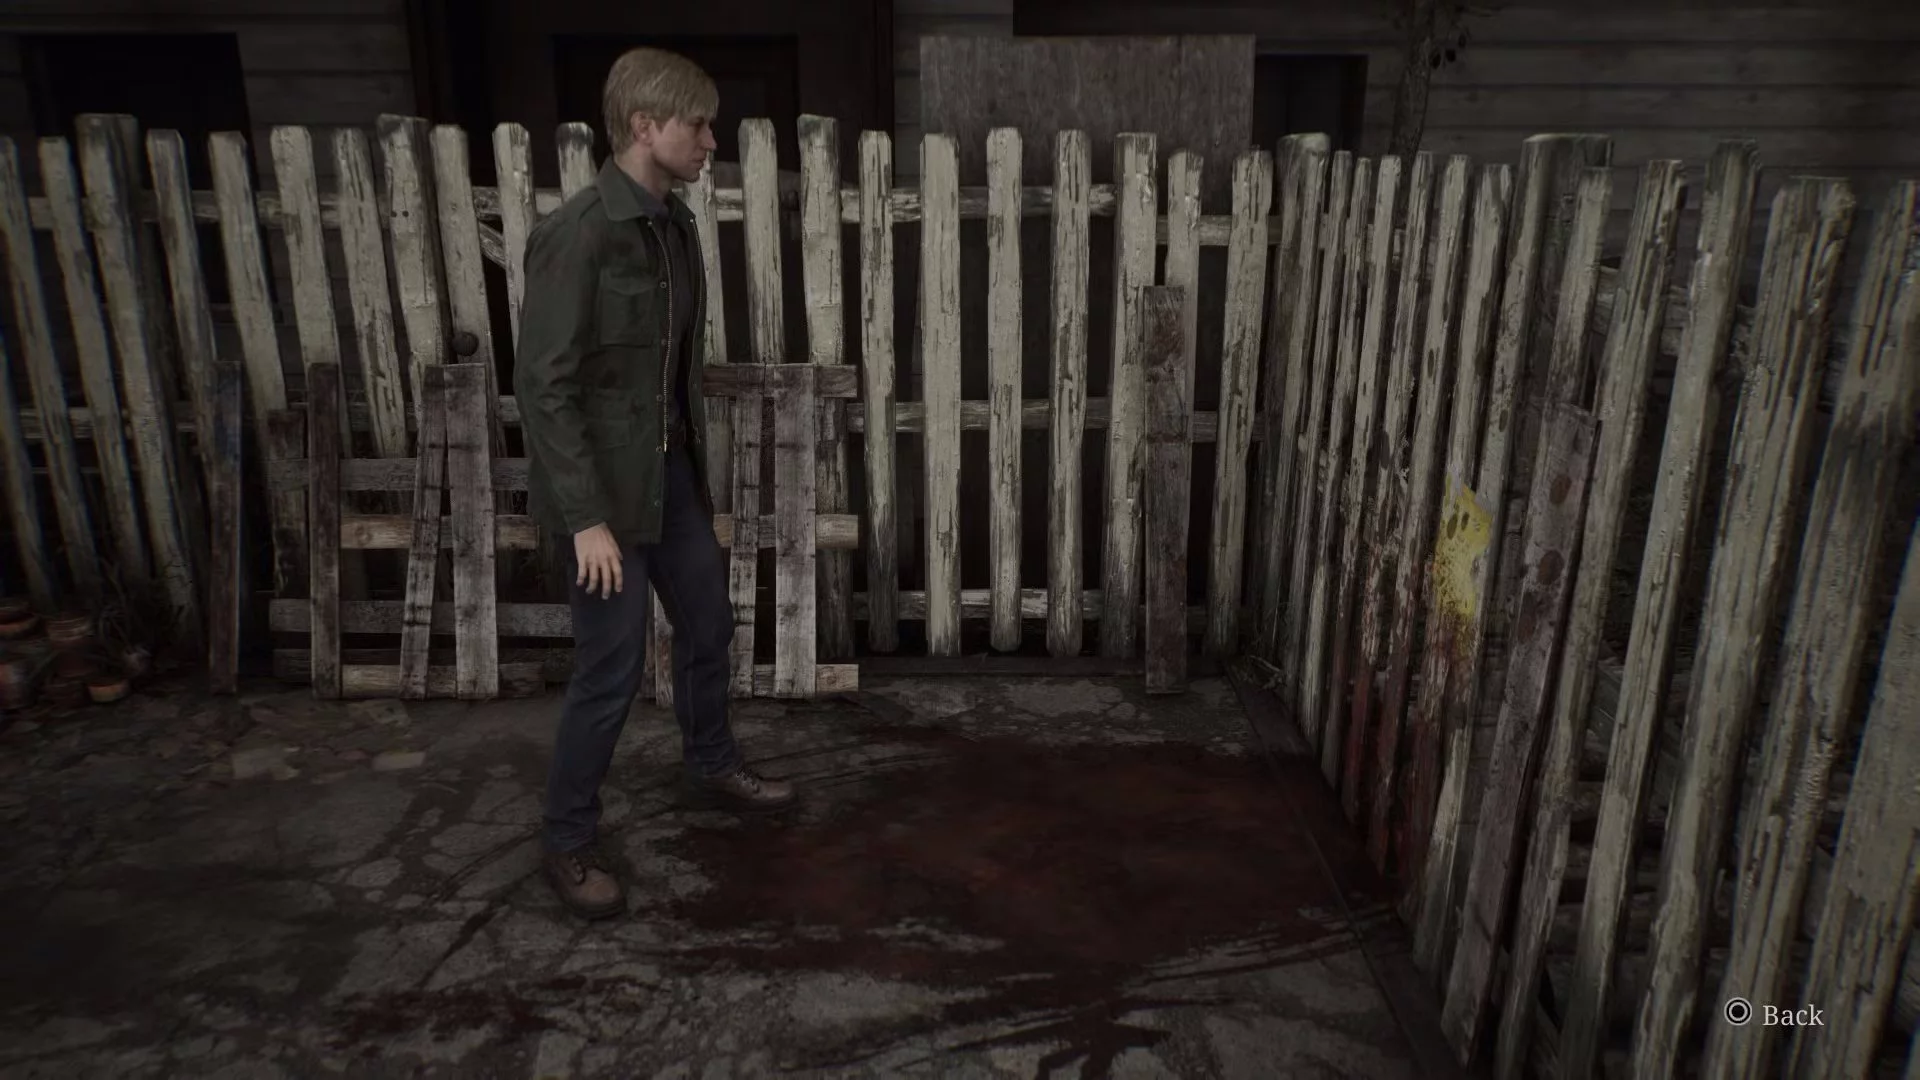
Scene from the past #1

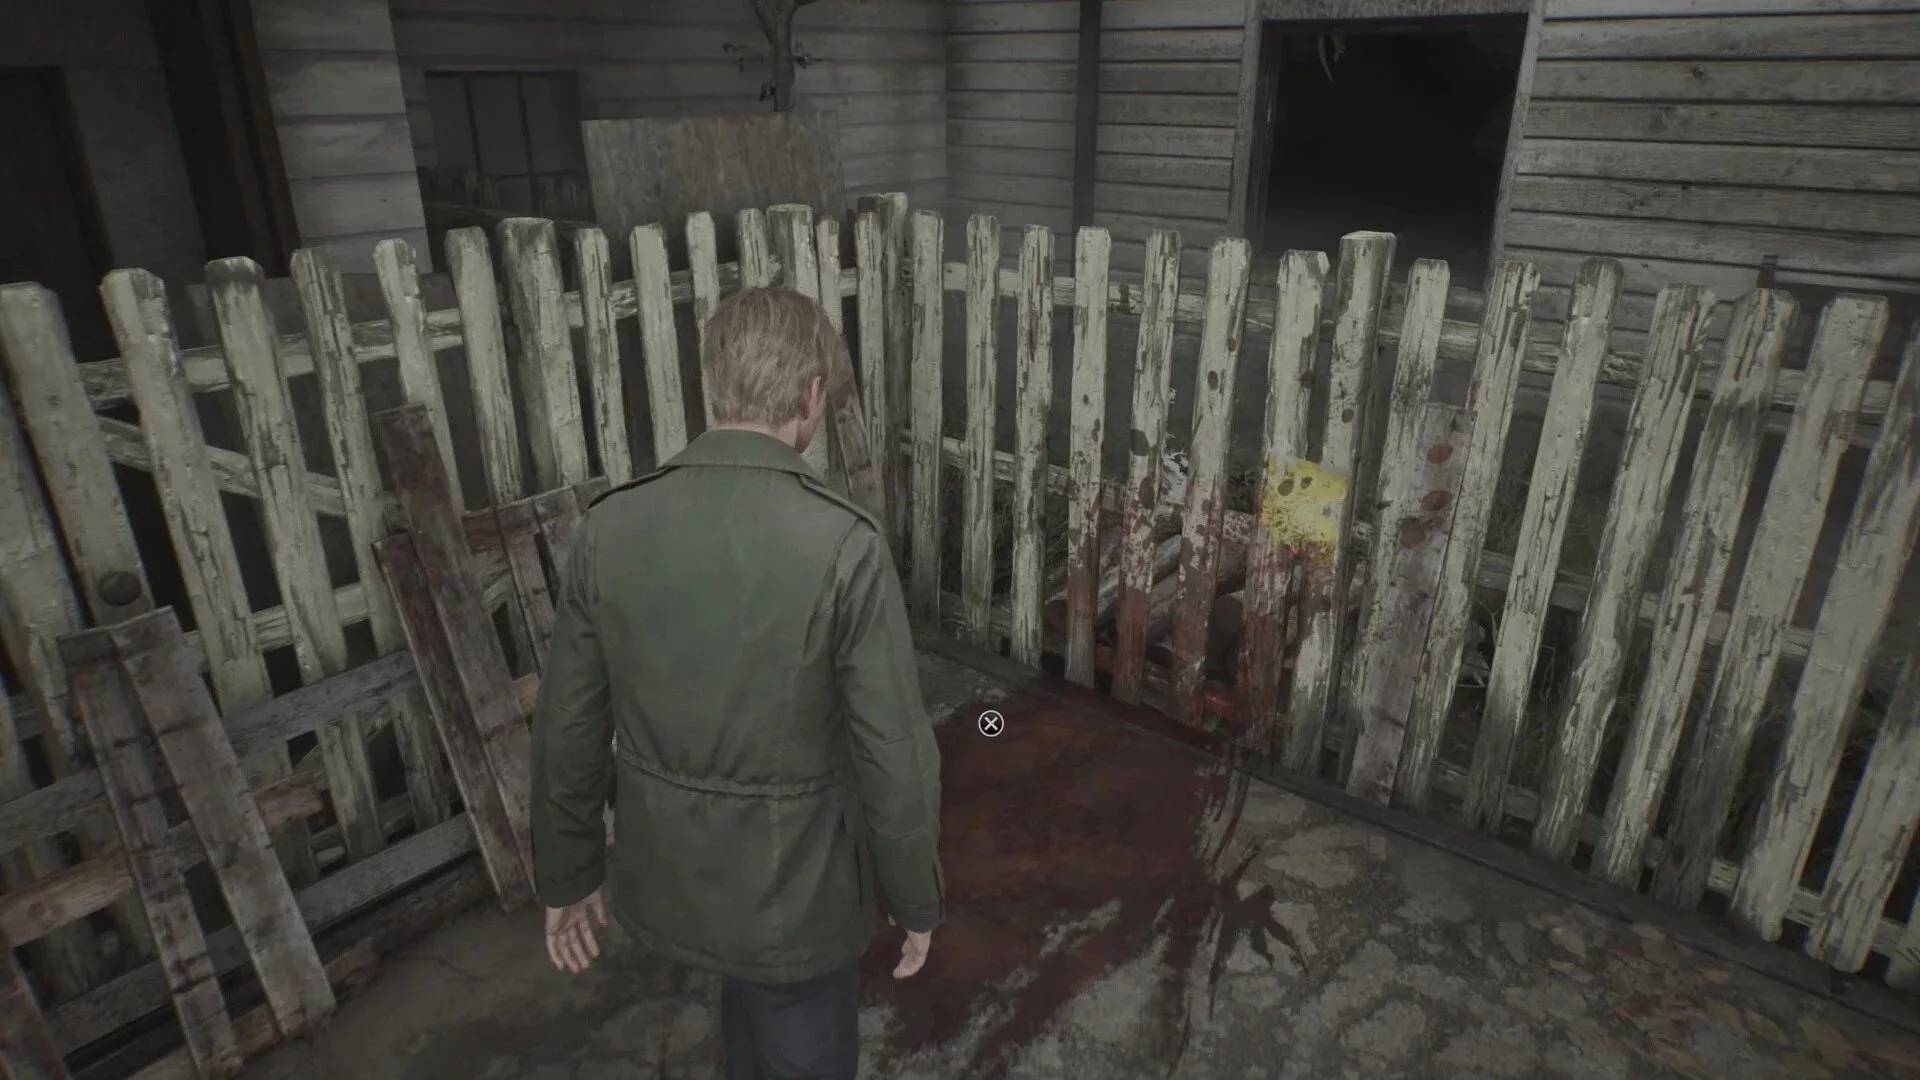
Right after you leave the Silent Hill ranch, inspect the shaky wooden fence opposite the tunnel entrance. This is where James picked up the wooden plank in the original game.
Scene from the past #2
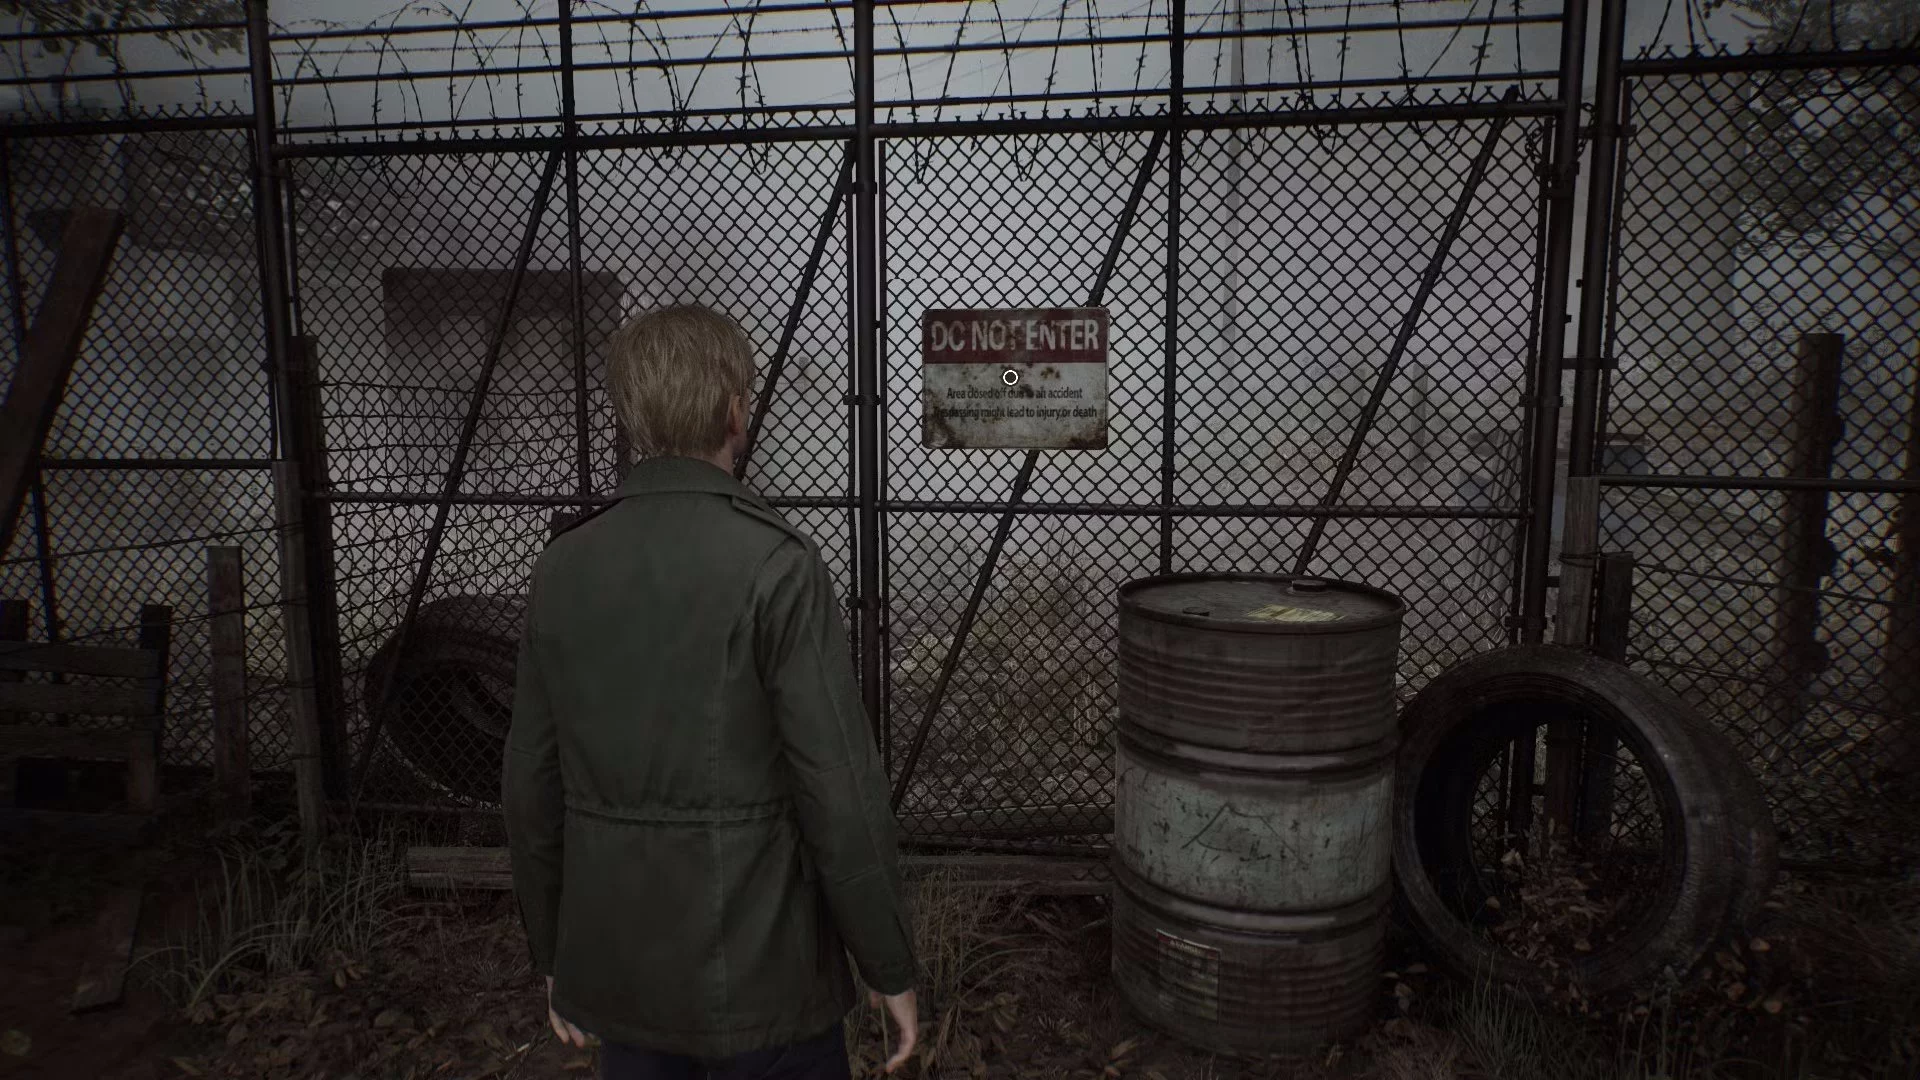
Check the construction area at the north end of Lindsay Street, which blocks Wax Road. It is accessible for a very short period of time, right after you first reach the East part of the valley, and becomes permanently inaccessible once you enter the house on Martin Street.
Scene from the past #3
After you escape from the house on Martin Street in the eastern part of South Vale, go through the open gate, turn right, and inspect the bloodstain by the fence. This was the original location of the apartment key, which was on a corpse.
Scene from the past #4
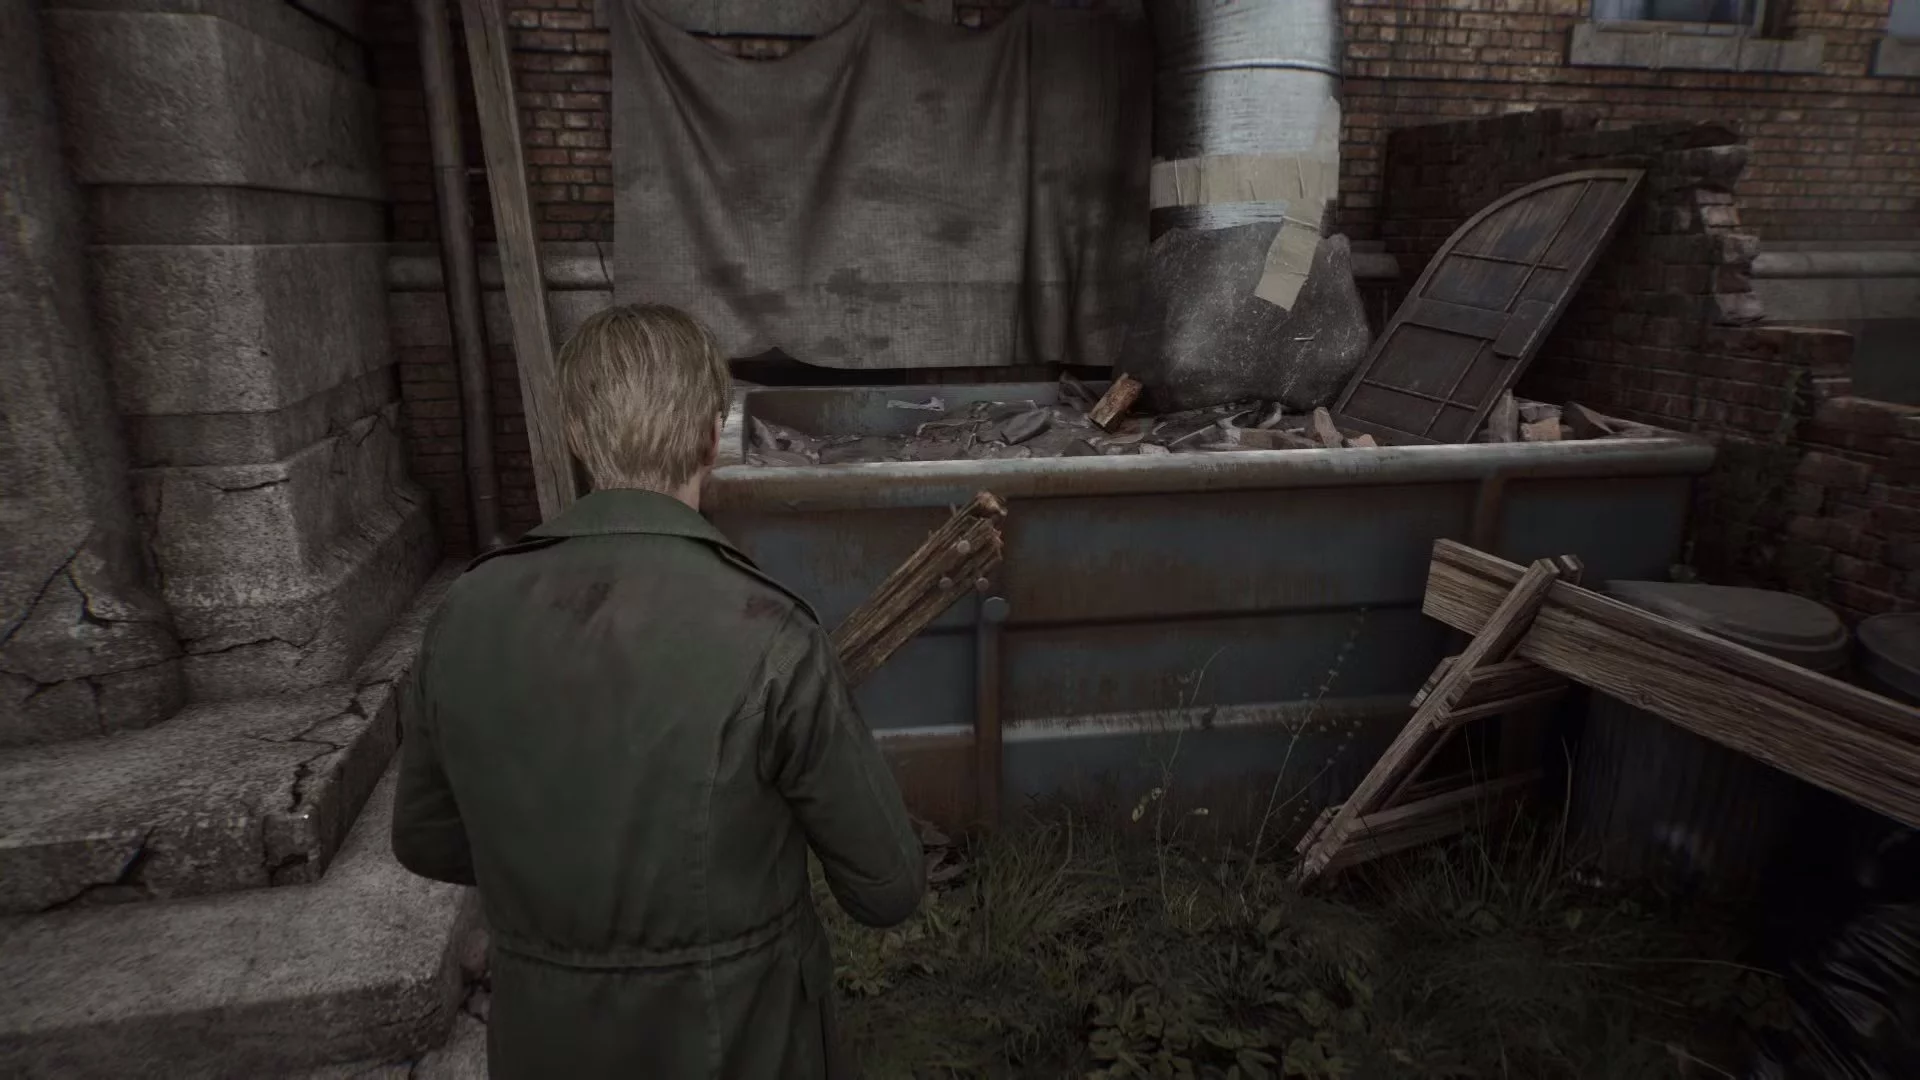
Check the dumpster to the right of the entrance to the Wood Side Apartments on Katz Street. It seems someone threw away an old door from the barricade on the street.
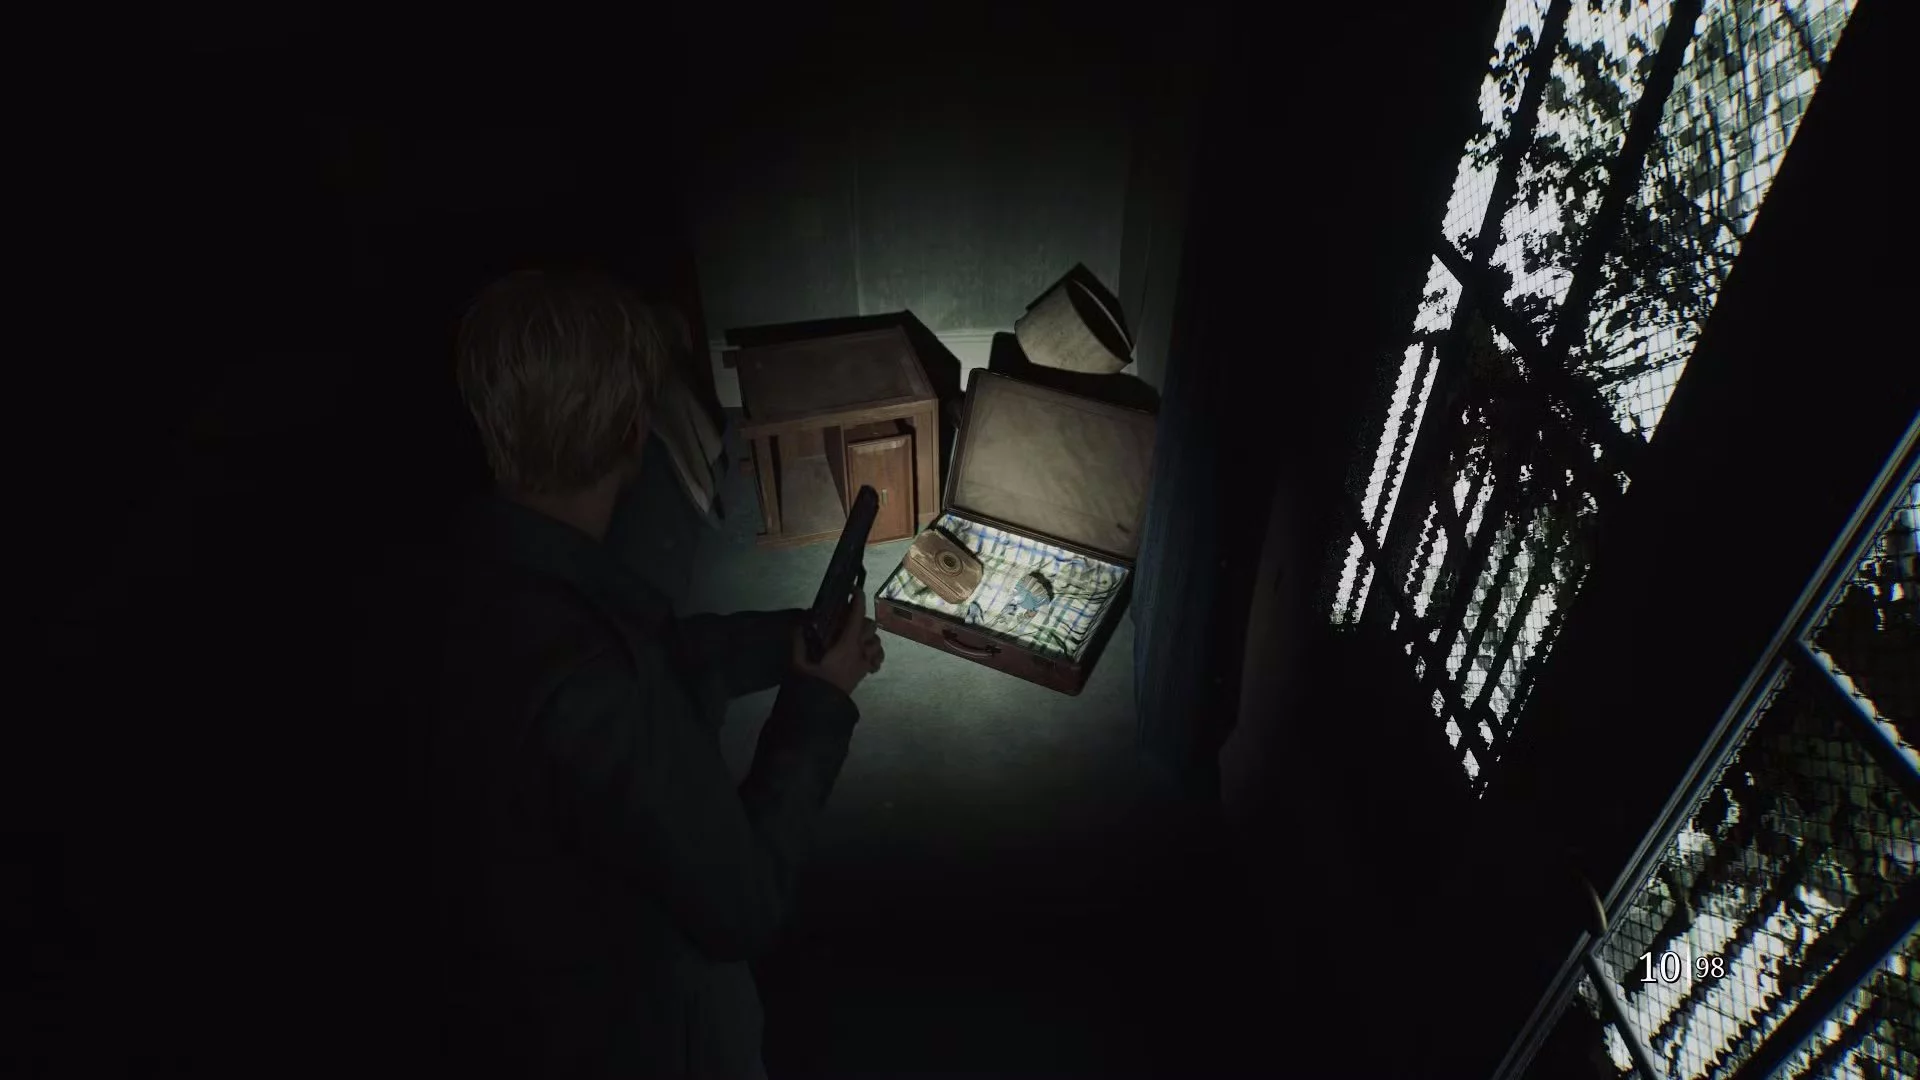
Scene from the past #5
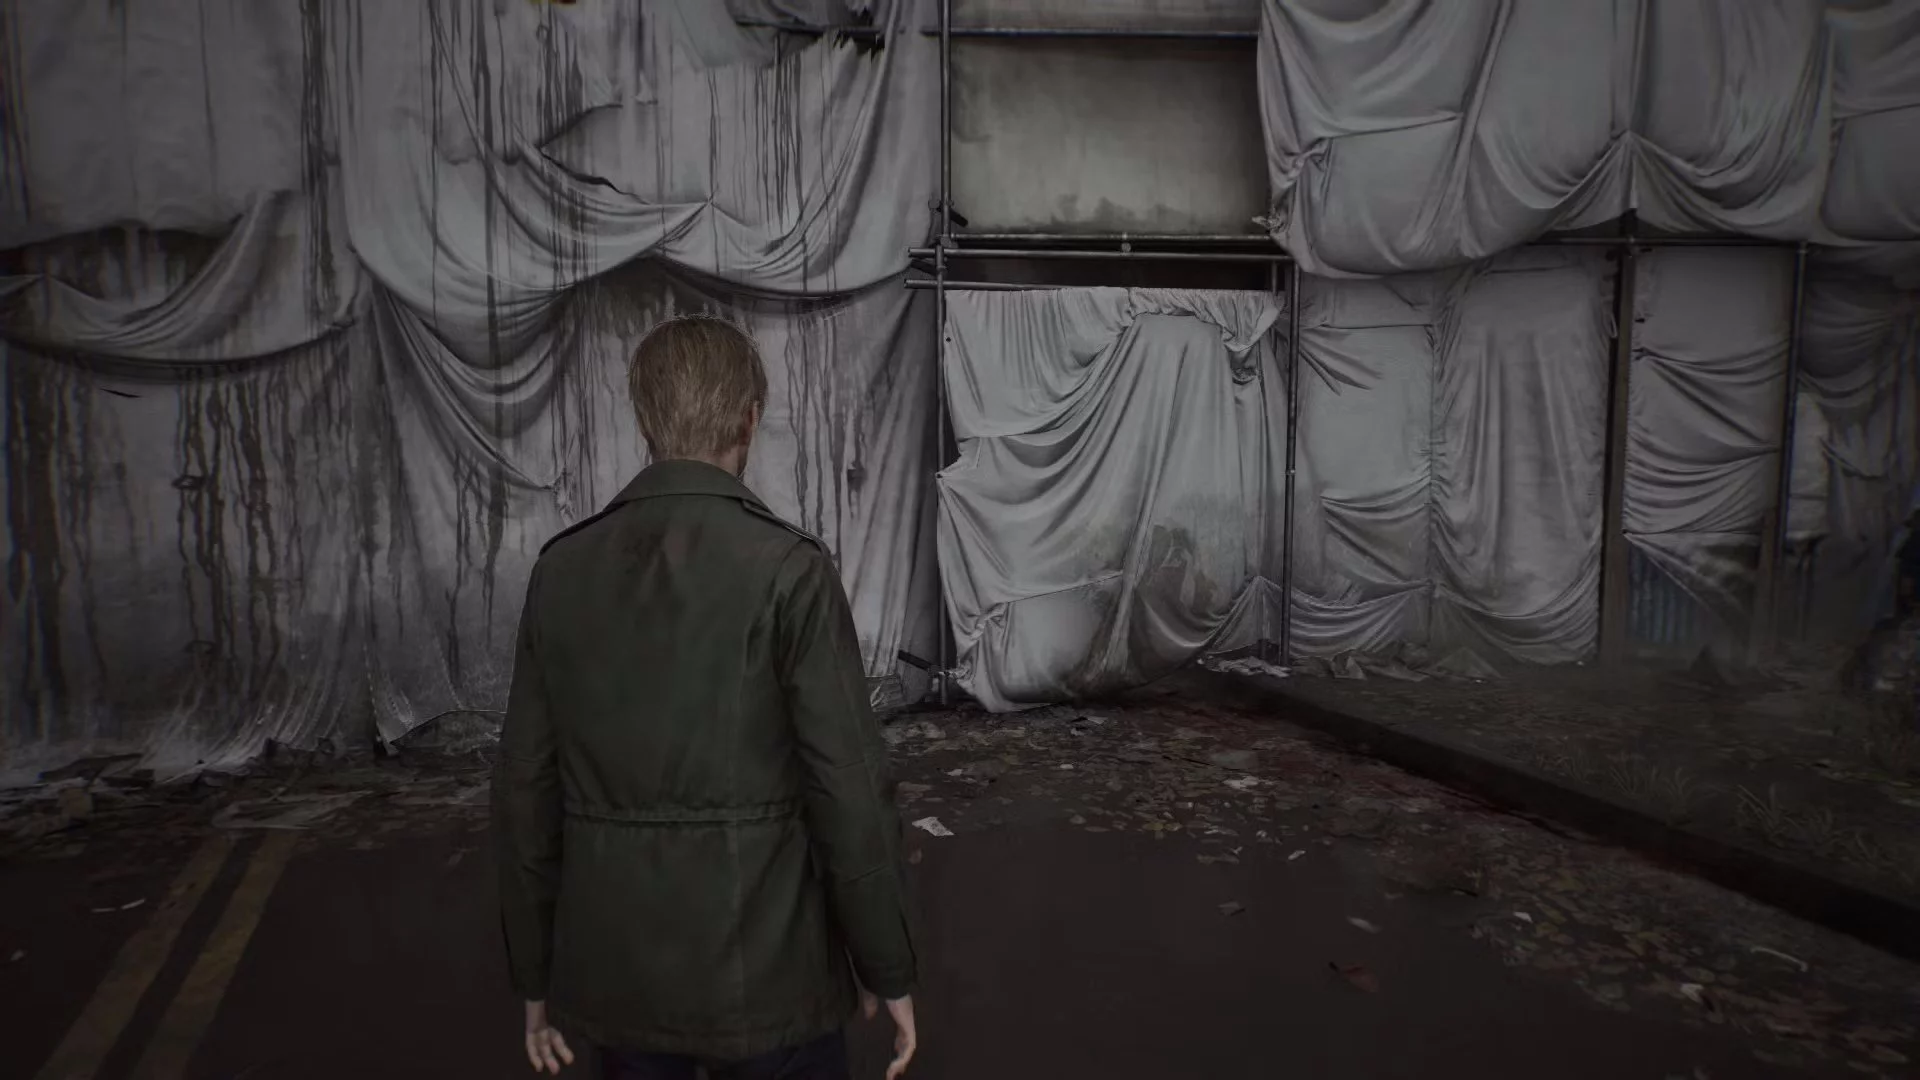
Inspect the construction barricade that blocked the west end of Katz Street outside the Wood Side building. The place you need to check is near the Barrier Note. You will find the first version of the message the door that wakes in darkness, which the remake moved to the north end of Neely Street.
This is one of the hardest memories to find in a run with default UI settings, as it involves finding a white dot on a gray wall.
Wood Side Apartments
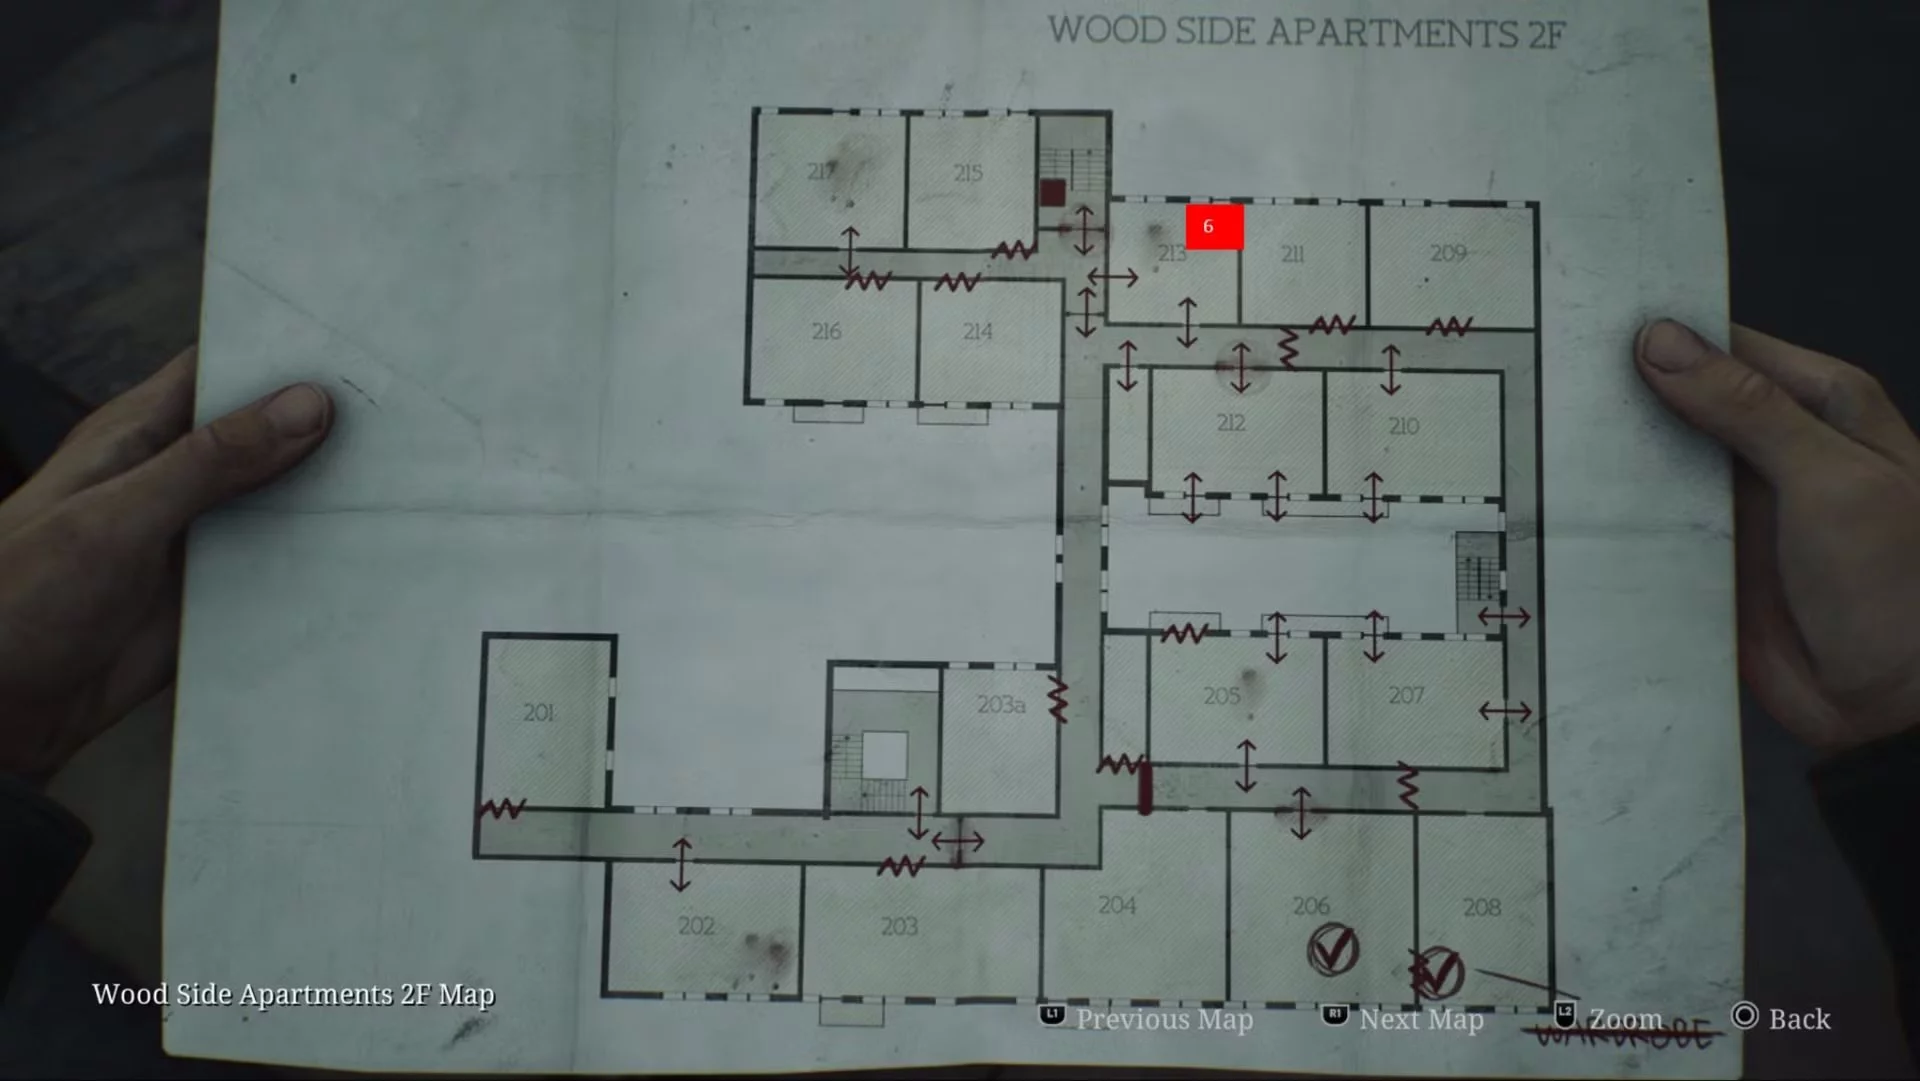
Scene from the past #6
Check the scratched wall in the bedroom in apt. 213. It's dark here, so it can be easily missed. It's a bit easier to notice this glimpse once you get the gun, as it triggers an event where the TV in room 213 lights up the room.
This is a reference to the original location of the clock puzzle, which was moved to Blue Creek in the remake.
Blue Creek Apartments
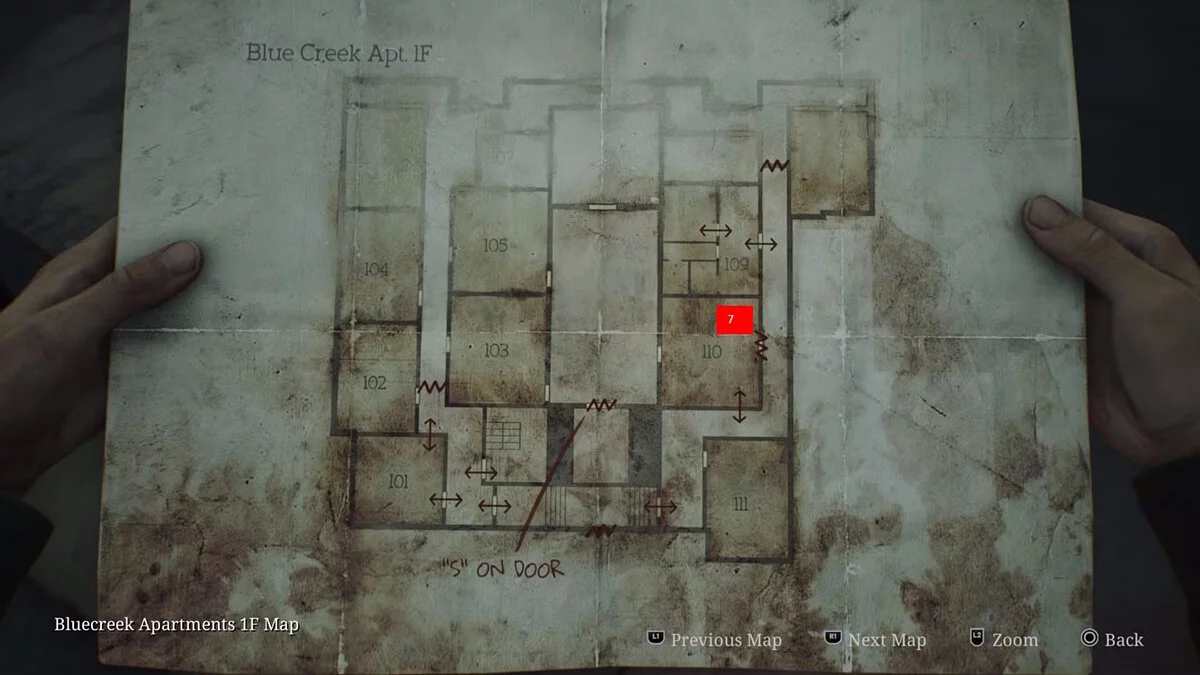
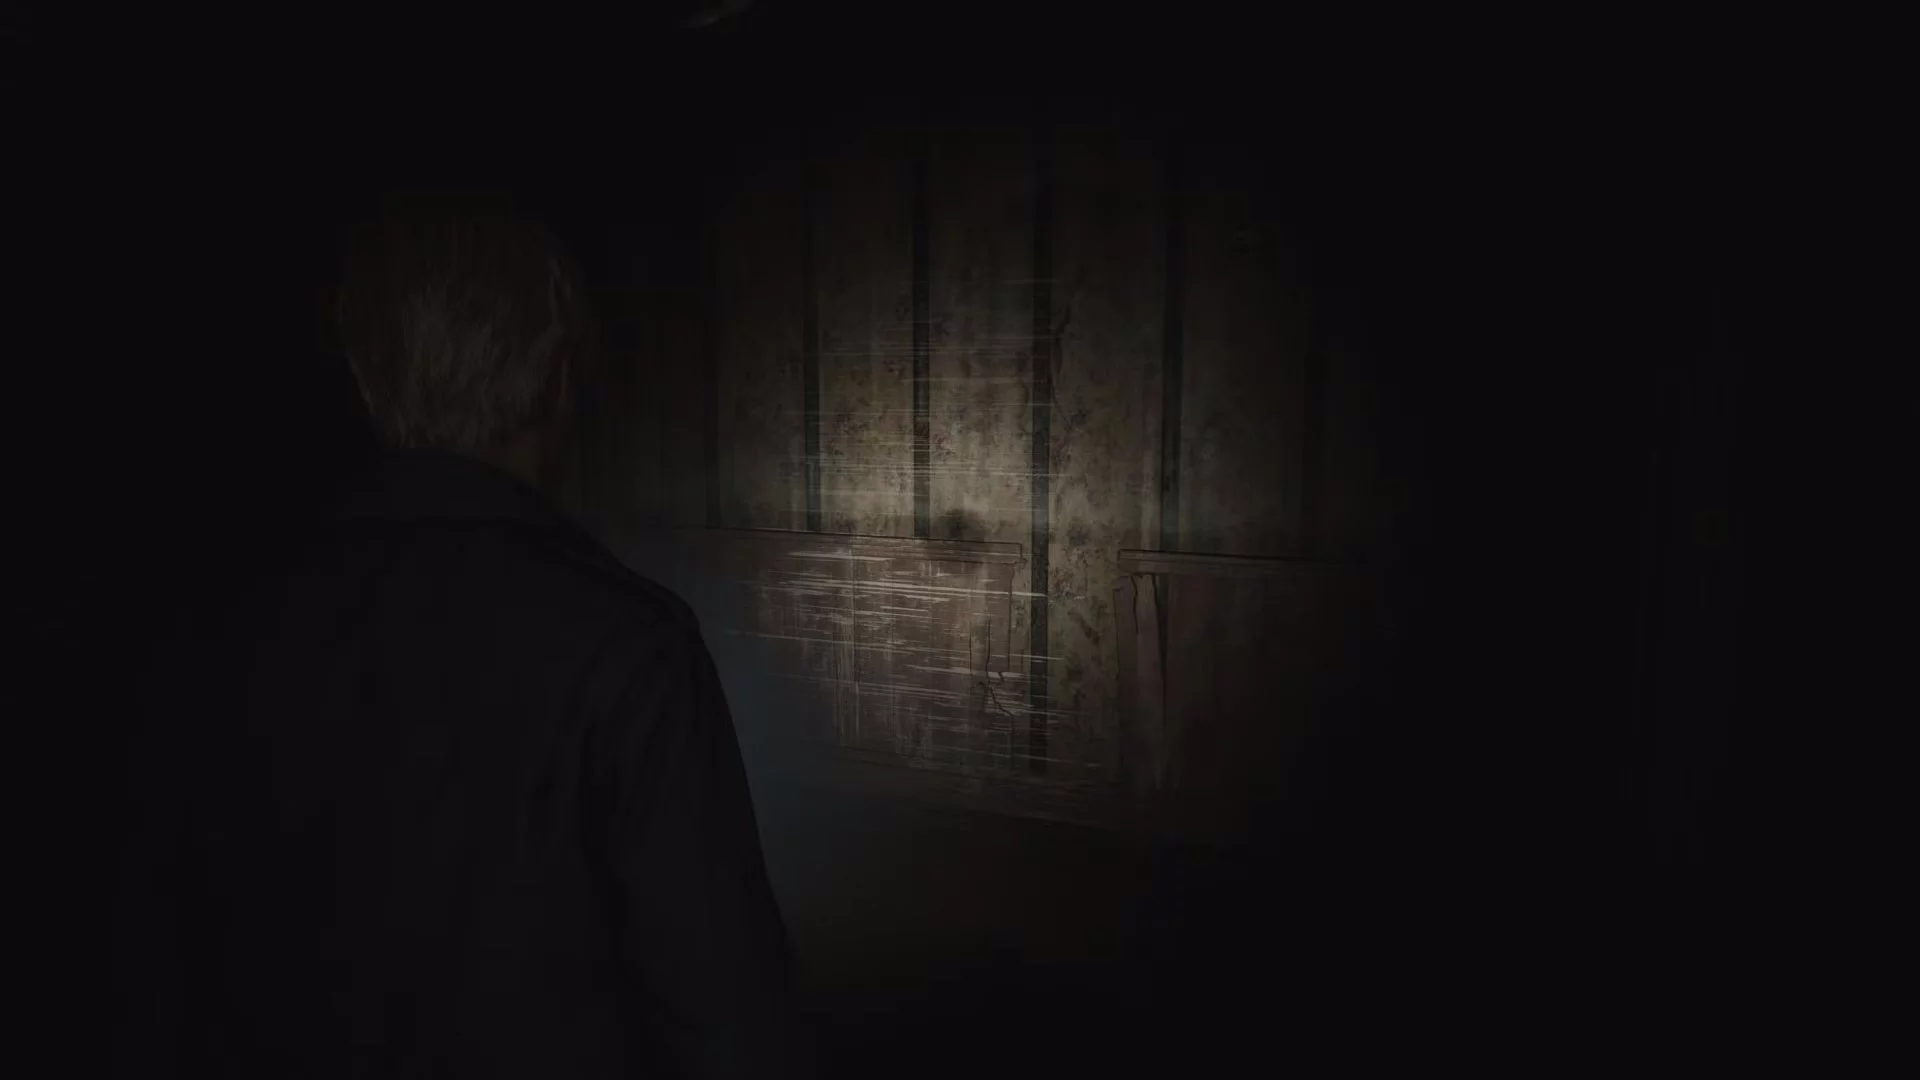
Scene from the past #7
This broken version of the coin desk puzzle from the original Silent Hill 2 can be found on the floor in apartment 110 in Blue Creek Apartments.
You land next to this glimpse after jumping down from apartment 210. However, you need to walk right up to the desk before the interaction prompt appears. The desk looks almost indistinguishable from the rest of the room's interior. It's one of the trickiest collectibles in the game.
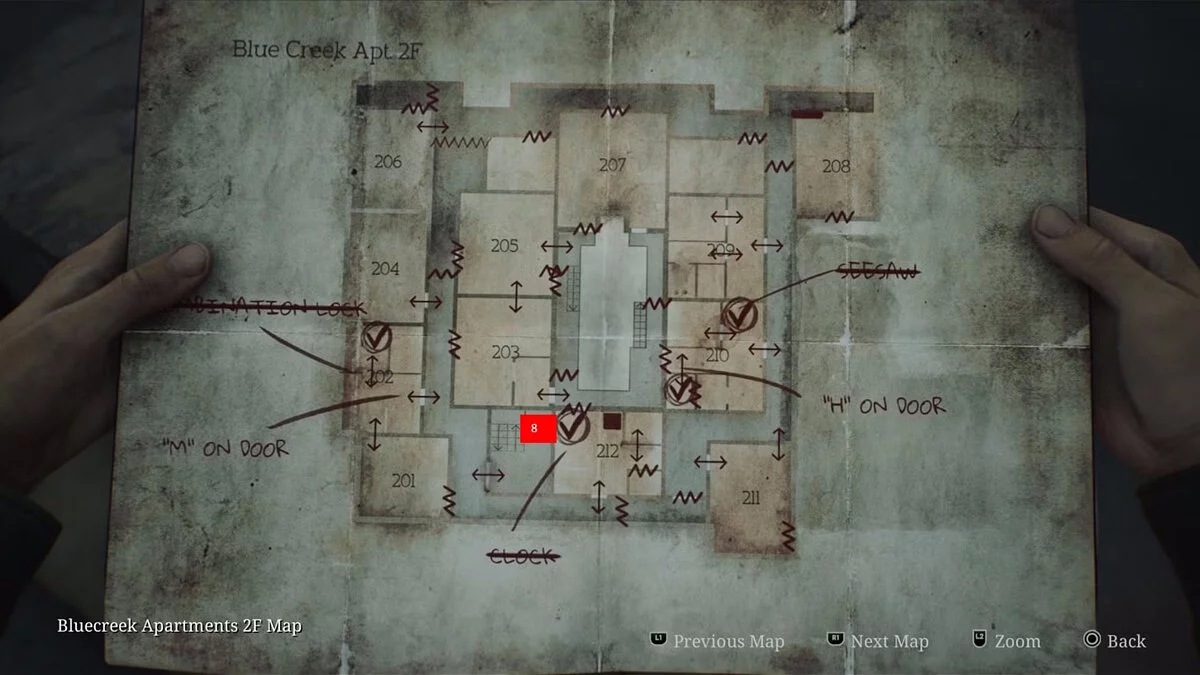
Scene from the past #8
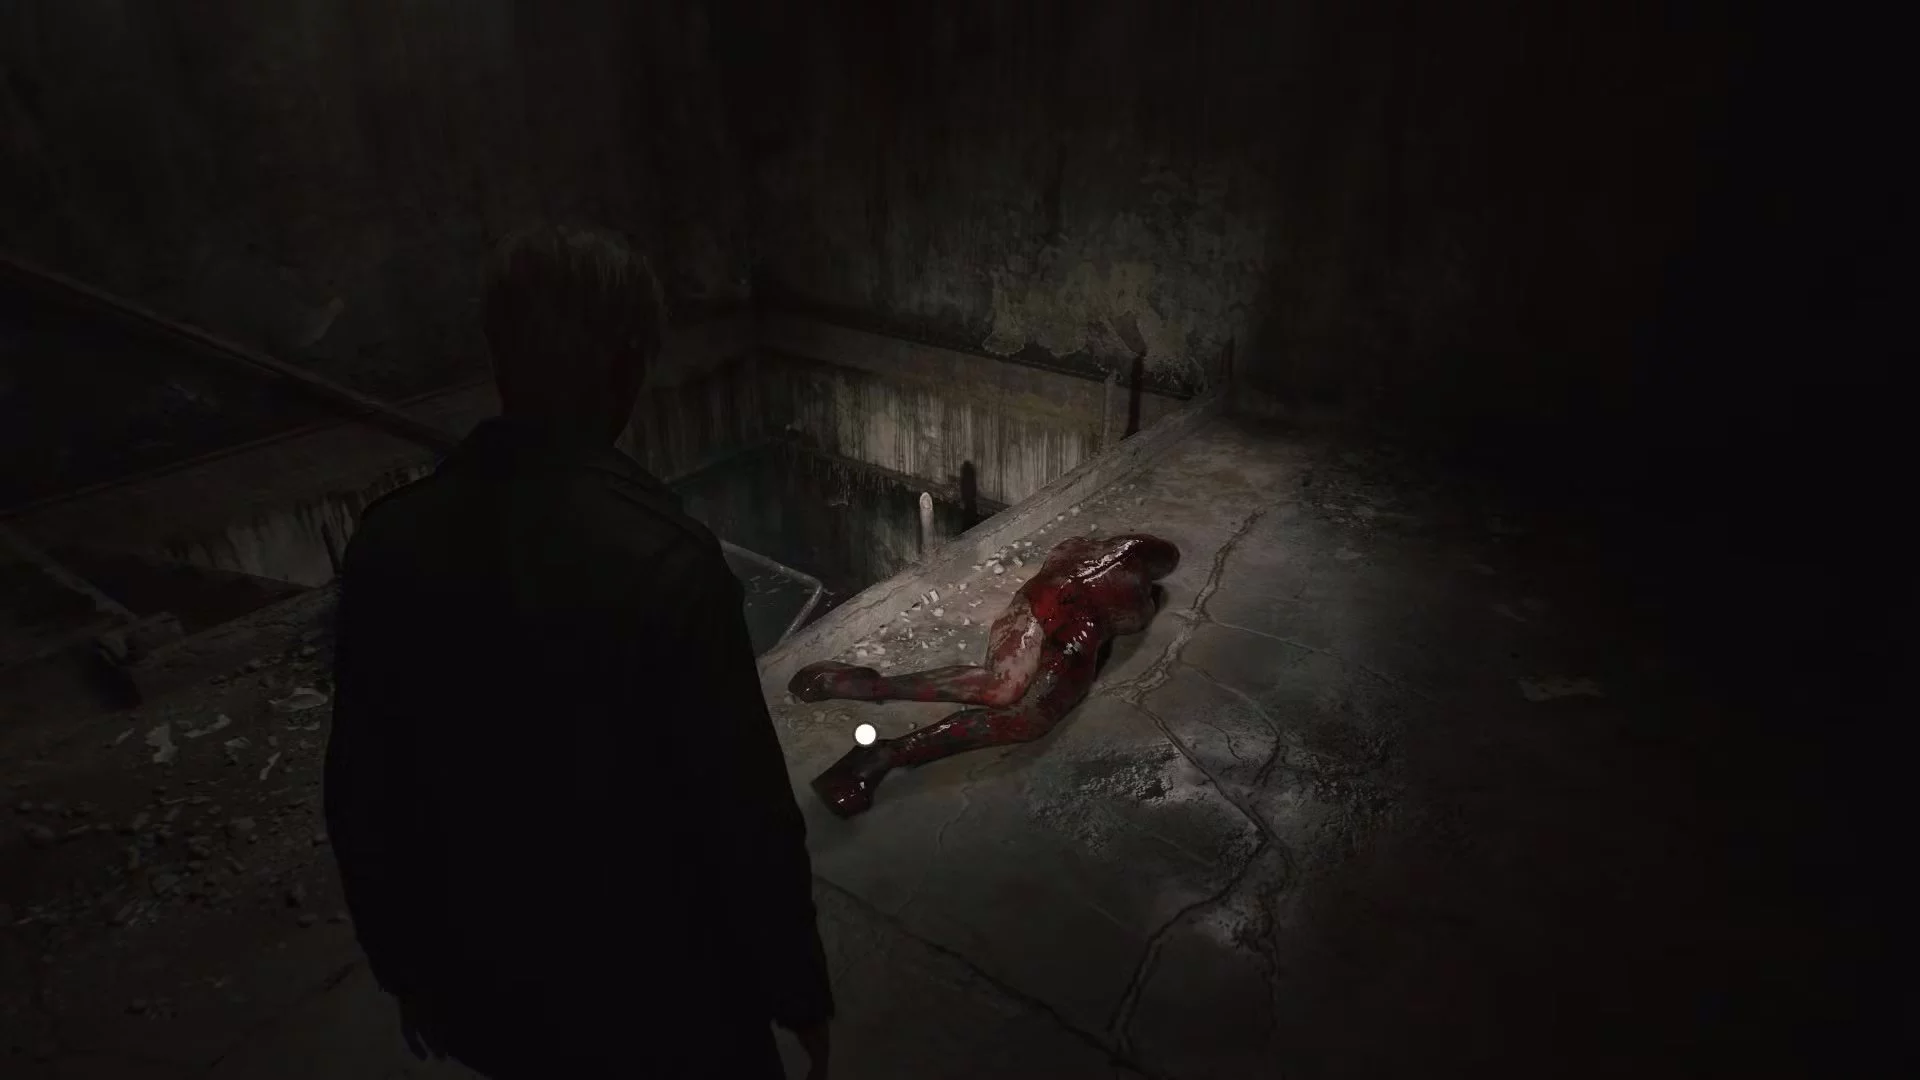
After you successfully solve the clock puzzle in Blue Creek, go back to the staircase to find a dead lying figure on the second-floor landing. Inspect it.
This landing was the original location of your first fight with Pyramid Head.
South Vale (West)
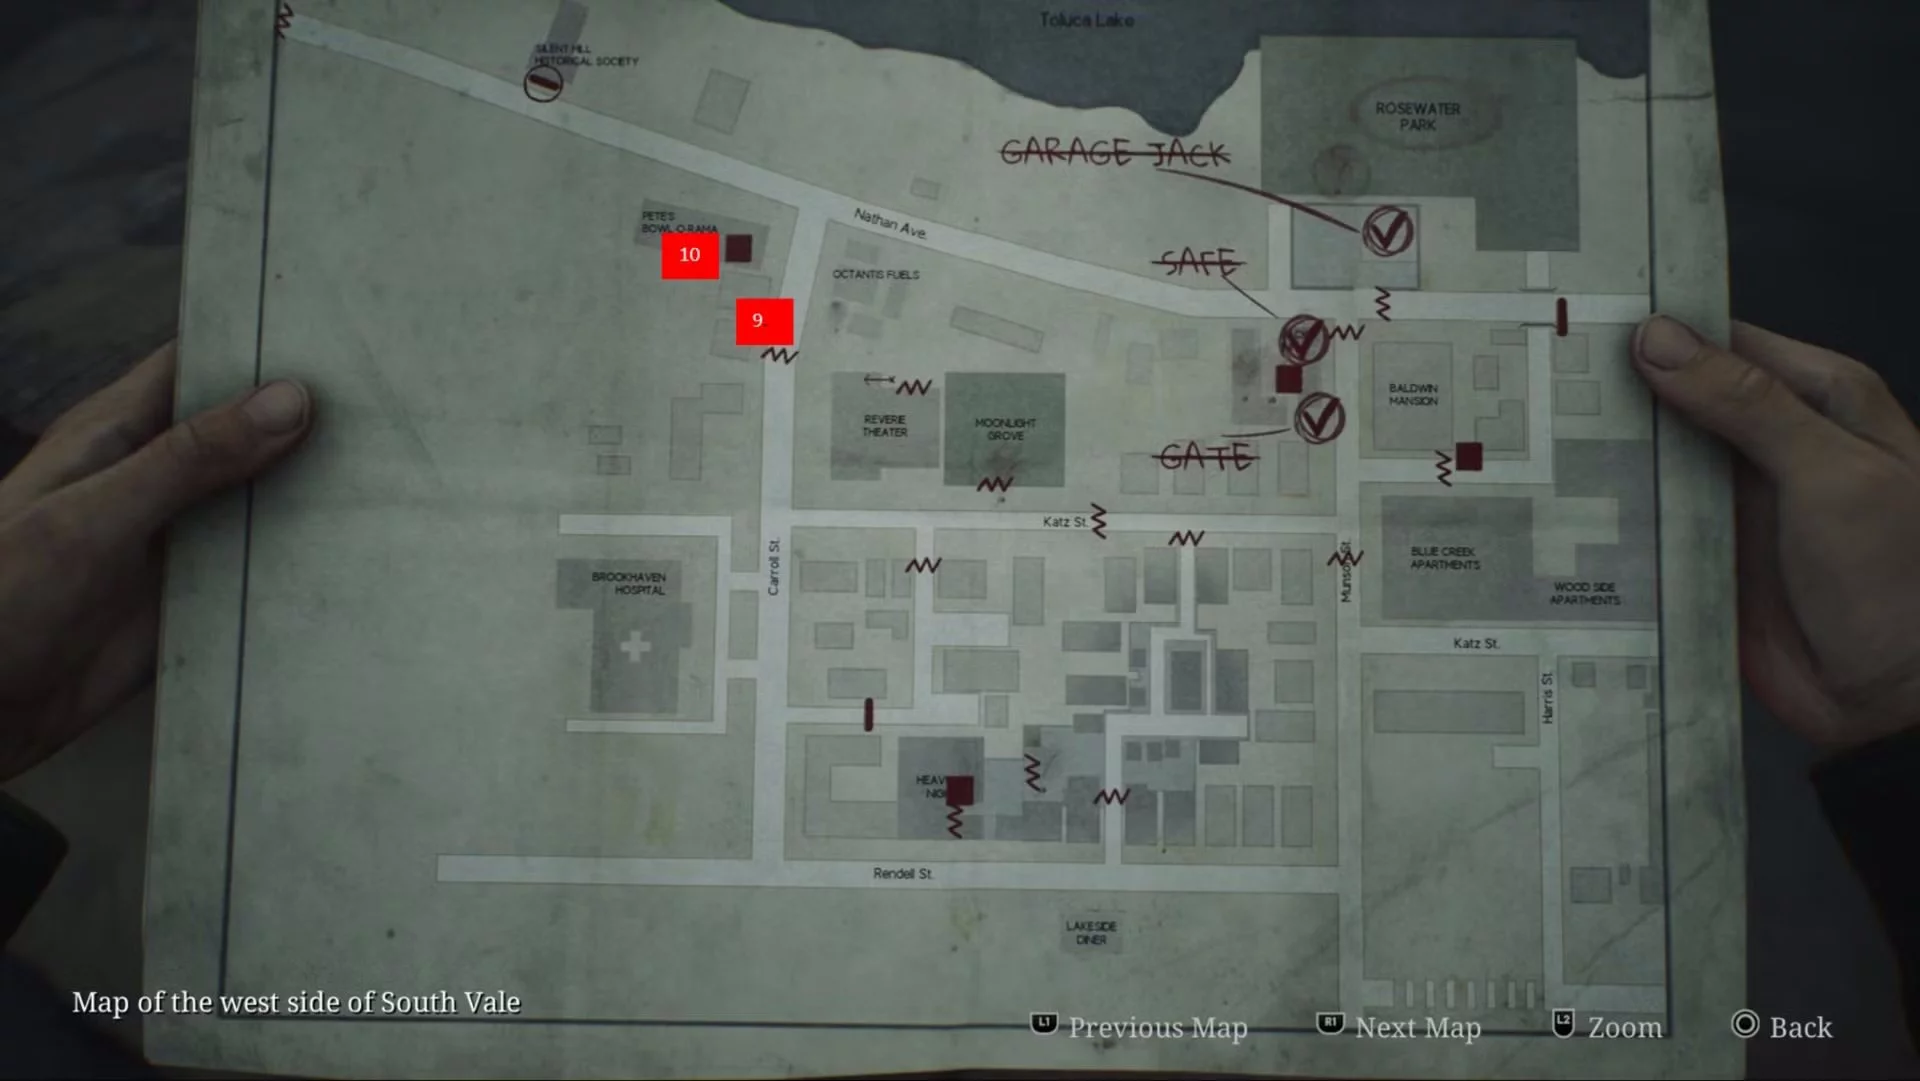
Scene from the past #9
You can find this place during the day, before you reach the hospital, when it is much easier to notice, or at night, when you are on your way to the Historical Society. Go south from Pete's Bowl-O-Rama and inspect the door at the end of the short staircase.
This seems like a random place for a flashback, but Heaven's Night was in this building in the original game. For some reason, the remake moves it a block east. If you bring Maria here, she will comment on it.
Scene from the past #10

There isn't much of interest in the bowling alley in Silent Hill 2 Remake, but you can find a discarded pizza box on a table near the lanes. Inspect it to get an extra hidden trophy/achievement Leftovers.
As with the previous flashback, you can get the reference during the day on your first visit to the area or at night when passing by on your way to the Historical Society.
The conversation between Eddie and Laura took place in Bowl-O-Rama in the original Silent Hill 2. In the remake, it was moved to the Dreams Theater.
Brookhaven Hospital
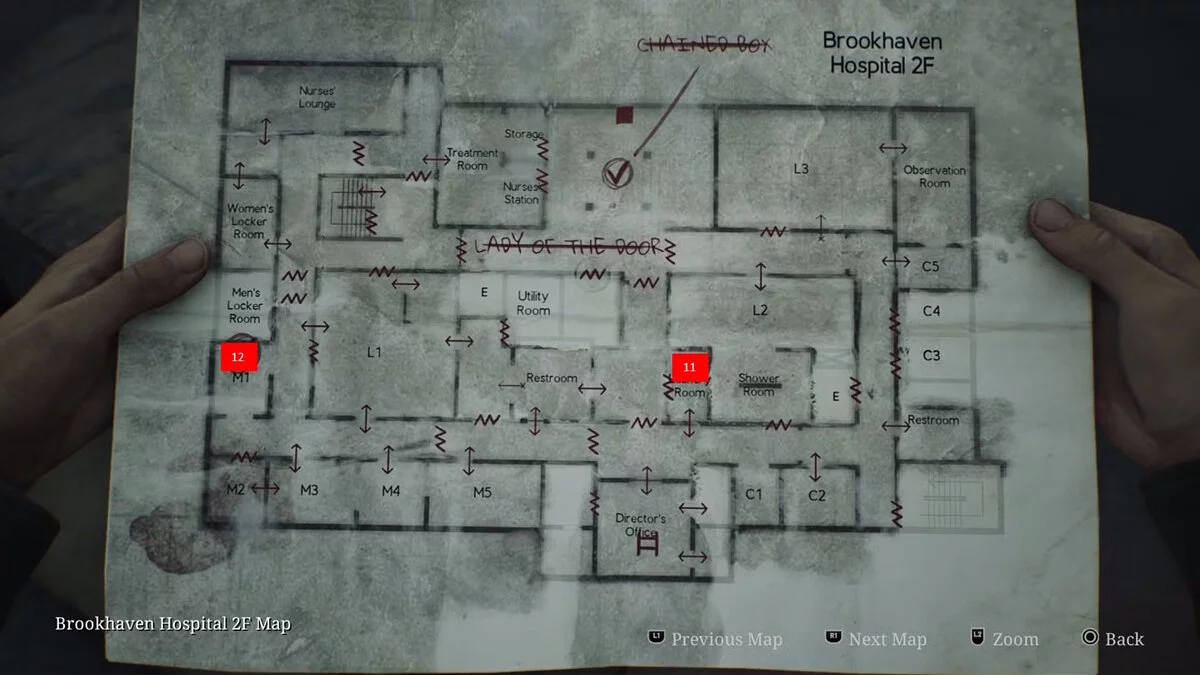
Scene from the past #11
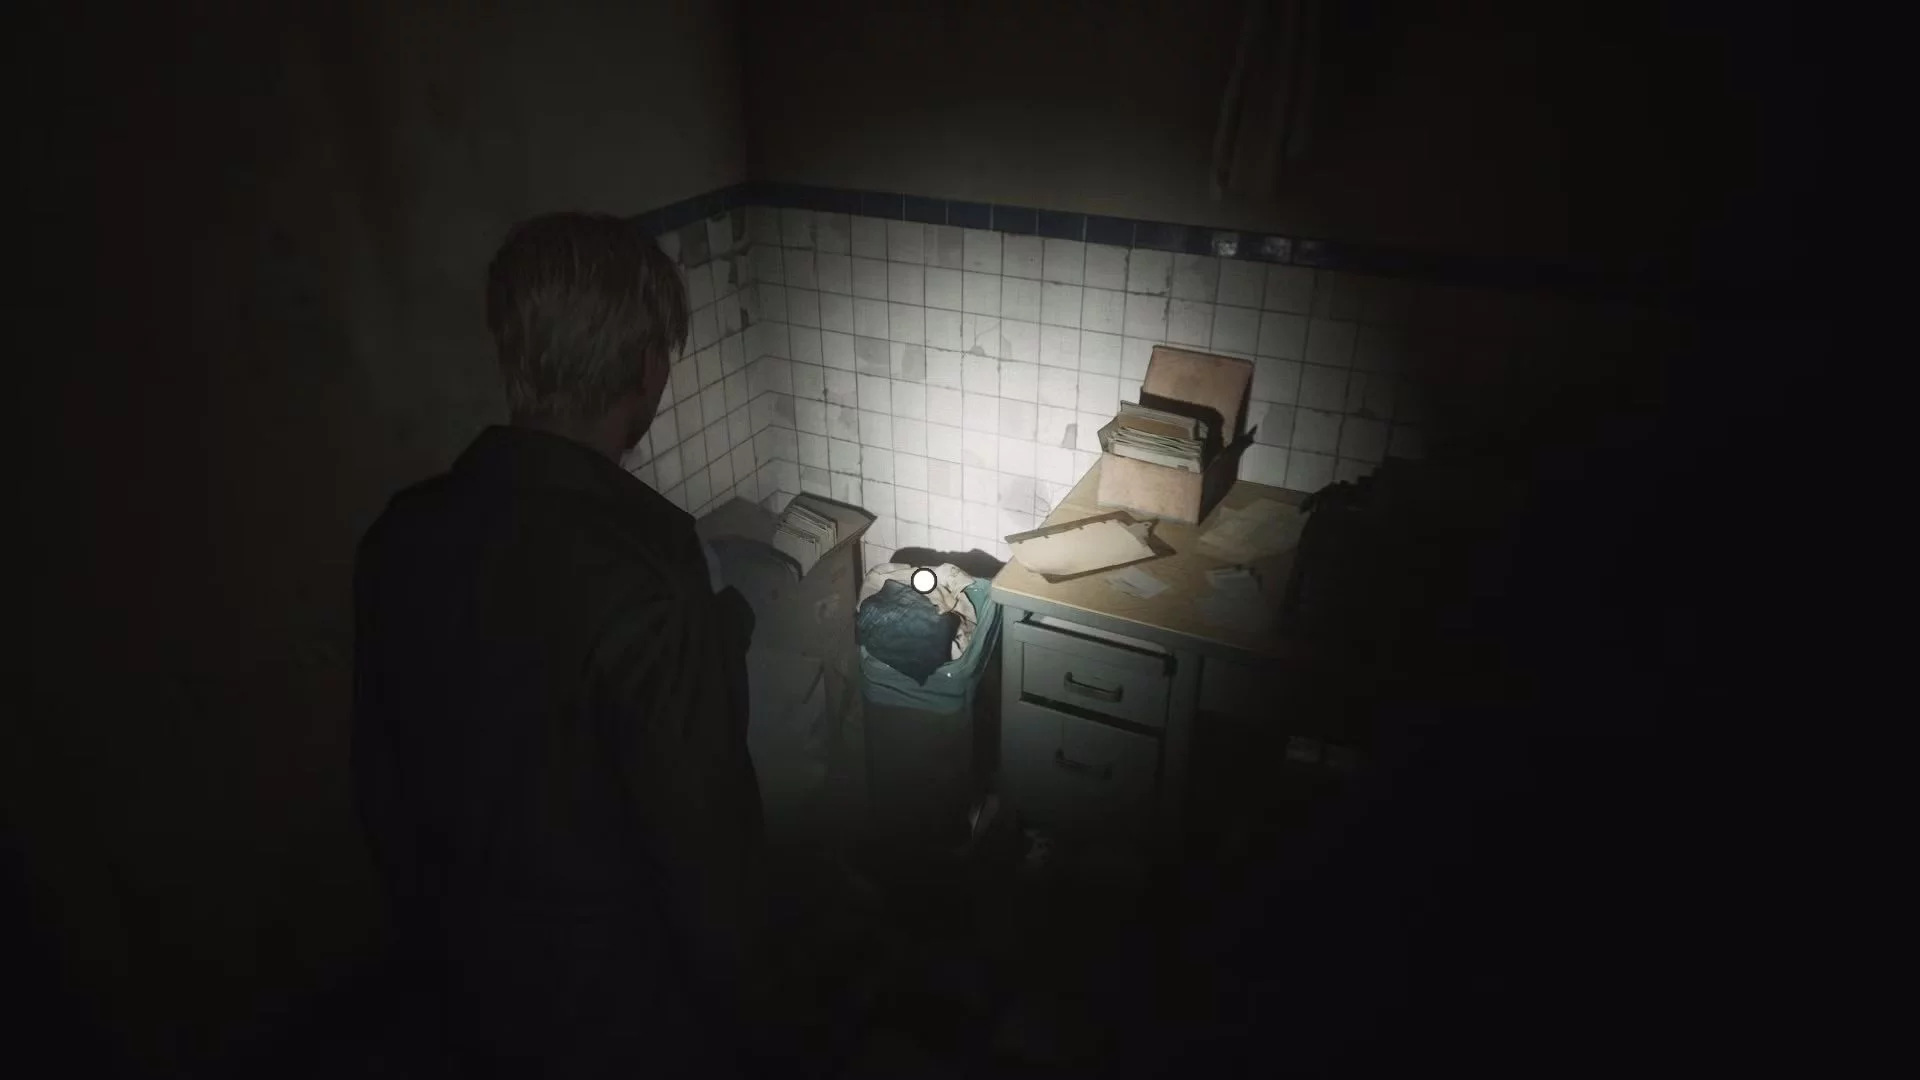
Gaining access to Brookhaven Hospital. The crumpled sheet of carbon paper on top of the trash can is from one of the original game's puzzles, where you looked at it to find an important code. It can be found in the corner of the laundry room on the second floor of the hospital.
Scene from the past #12
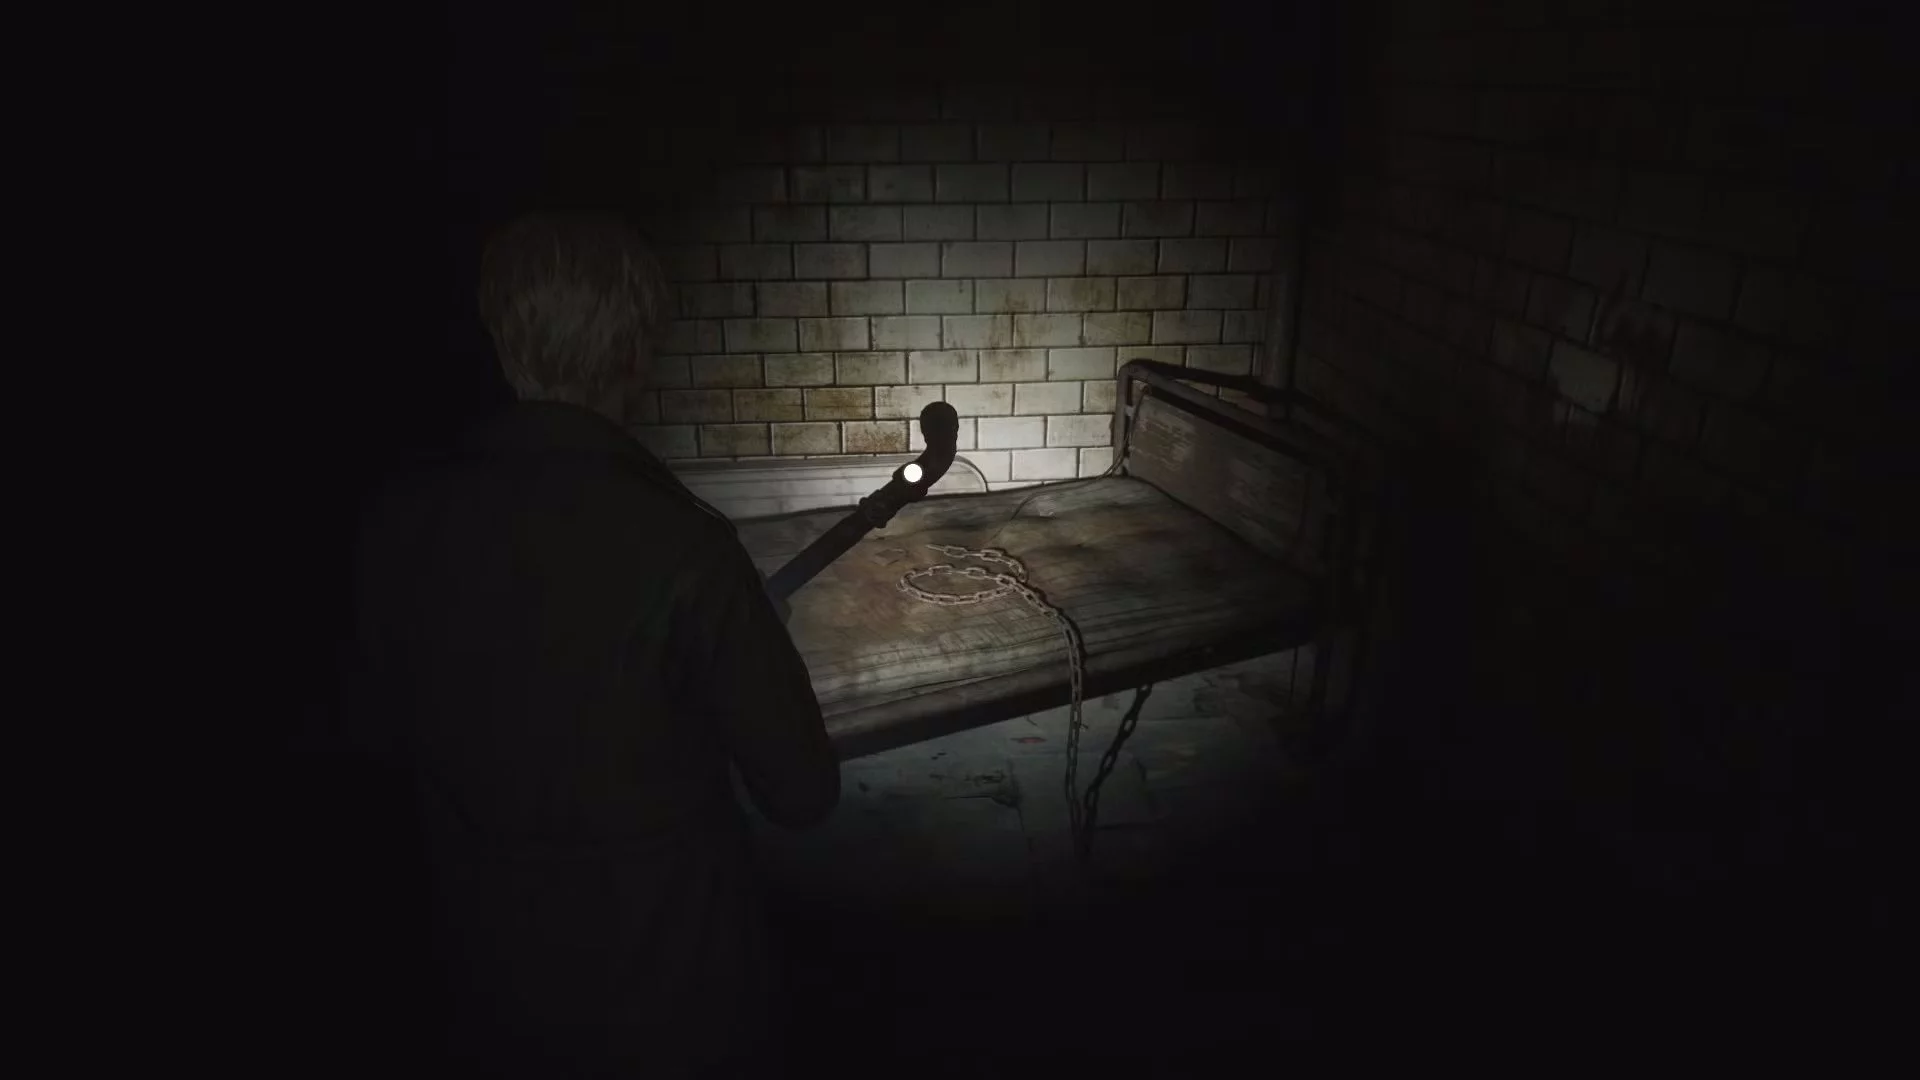
Inspect the chain on the bed in ward M1 on the second floor of Brookhaven Hospital.
This likely references the Louise puzzle from SH2, which inspired the Attached Box puzzle in the remake. The Attached Box only has 3 locks, so its padlock was discarded.
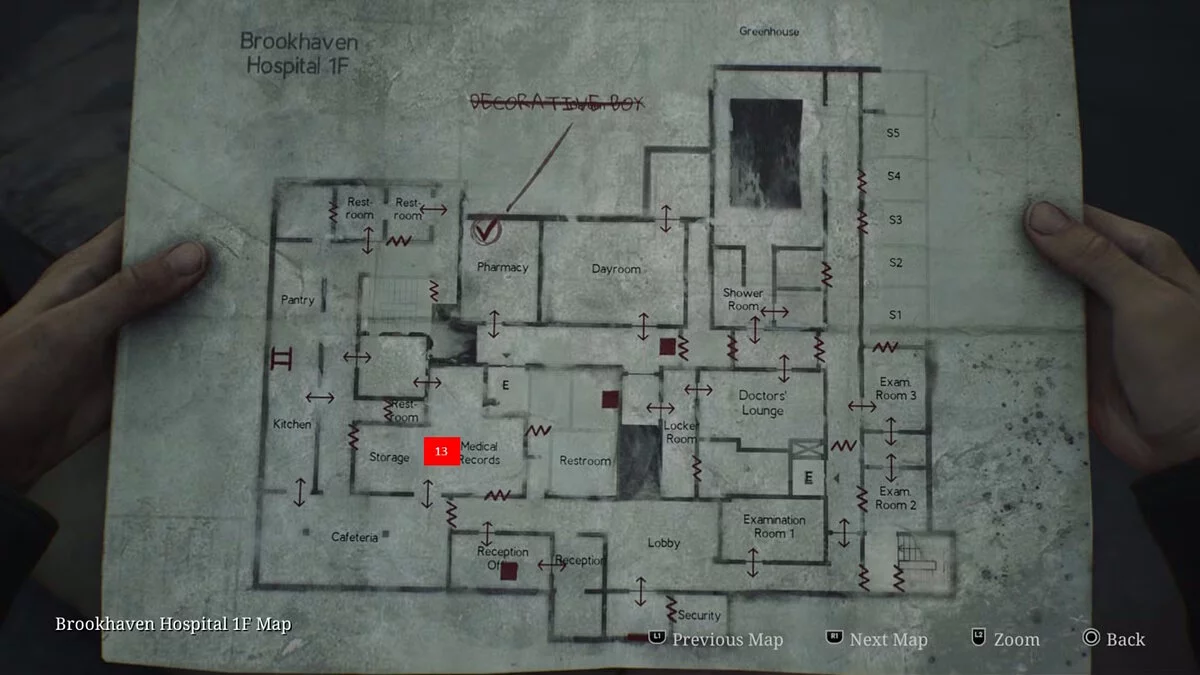
Scene from the past #13
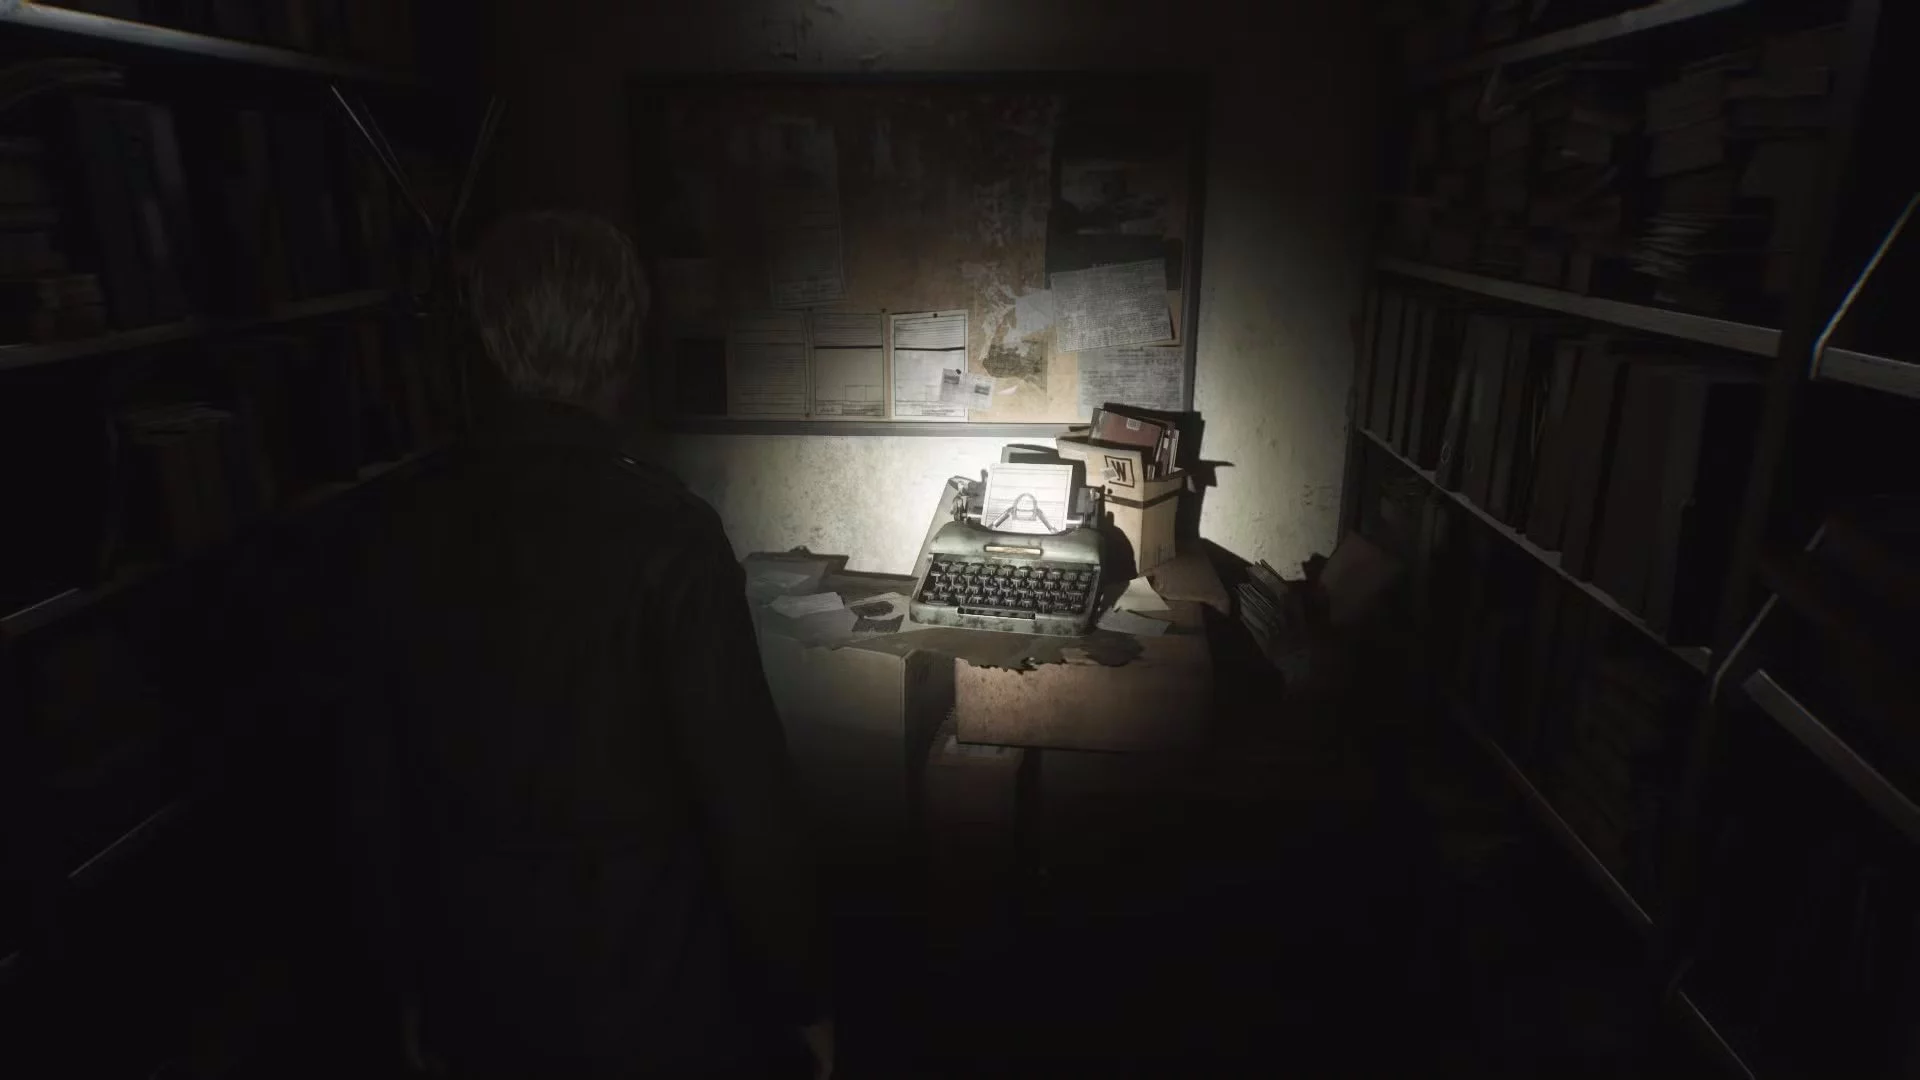
When you reach the medical records room of Brookhaven Hospital on the first floor, inspect the typewriter in the corner.
The broken purple keycard next to the typewriter is the Purple Bull key, one of the two you needed to find to open Louise's Box in the original SH2.
Scene from the past #14
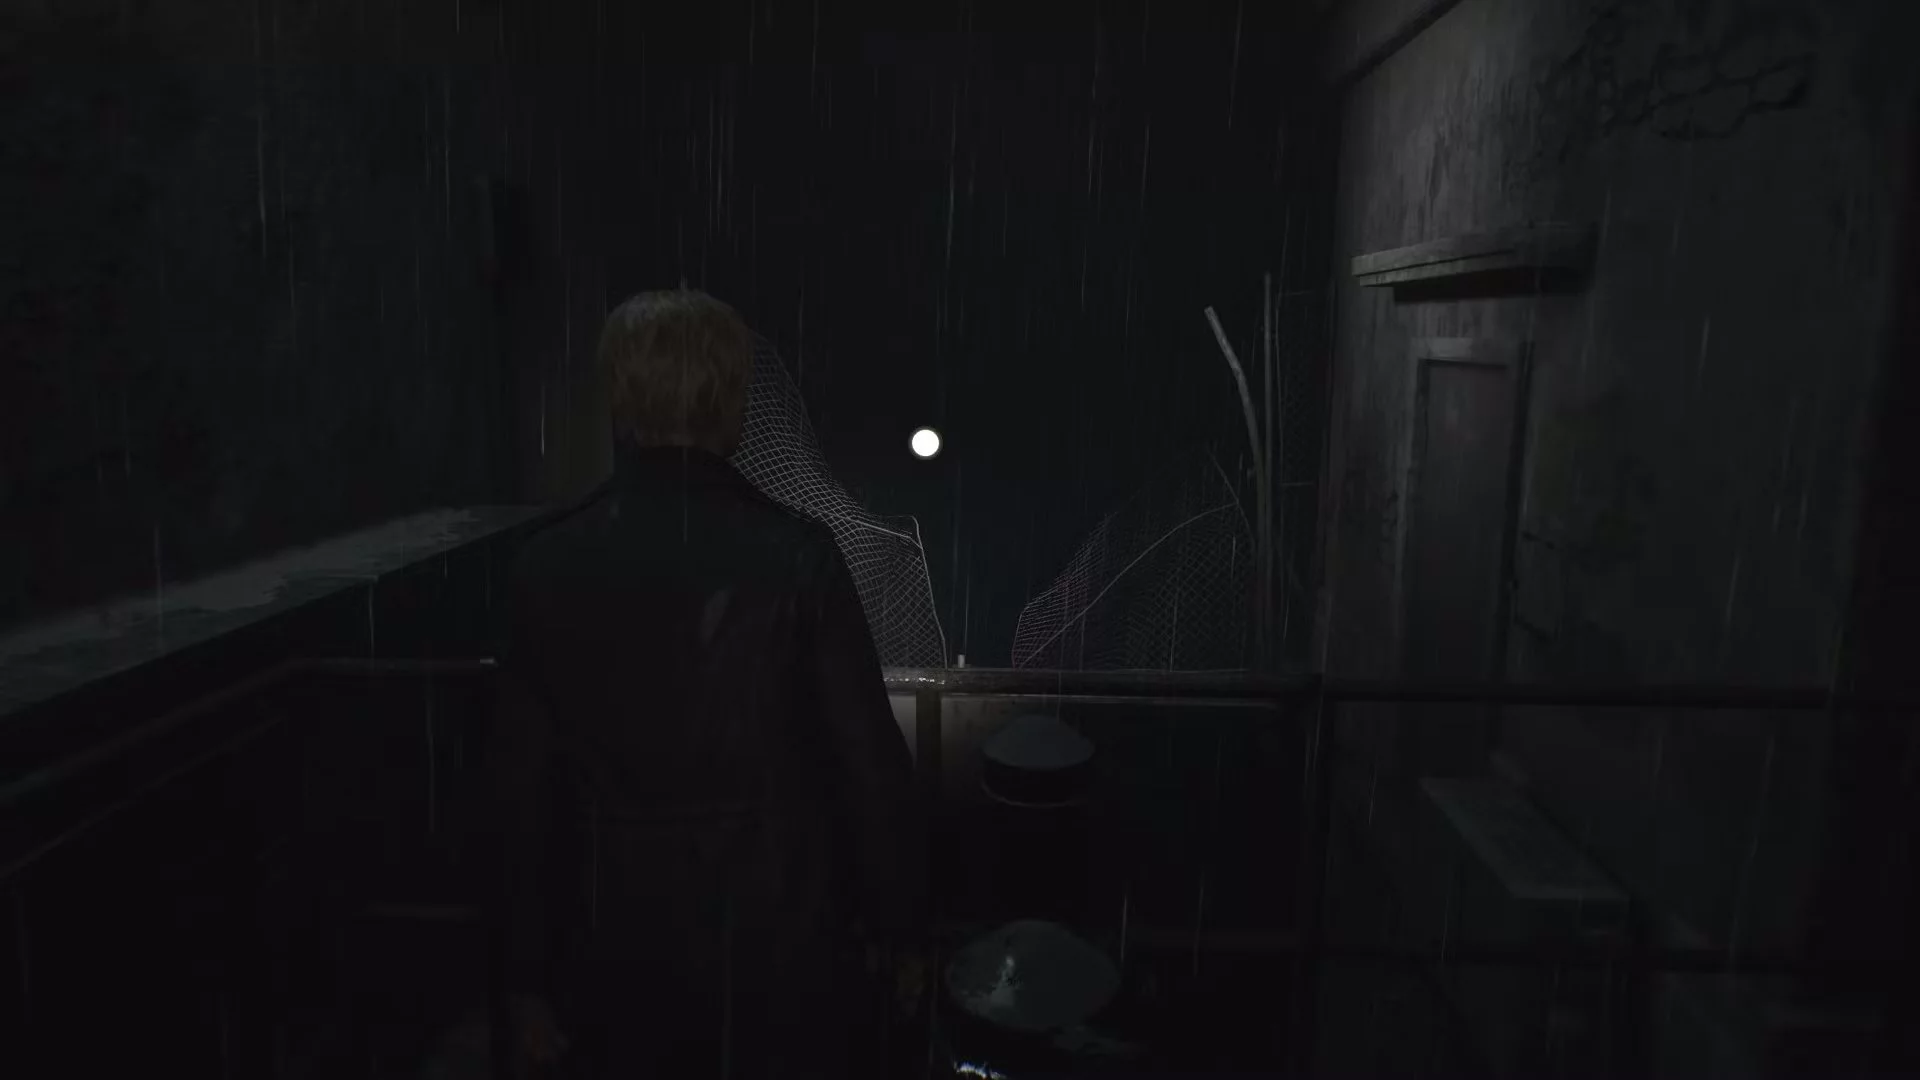
By the time you reach the hospital roof, it will already be dark and pouring rain, so it may be hard to notice, but you can use the passage near the door to reach the heavily damaged part of the outer fence and inspect it.
In the original game, James was thrown through this fence and fell into a room, unlike the remake, where Pyramid Head chokes him through the top of the elevator shaft.
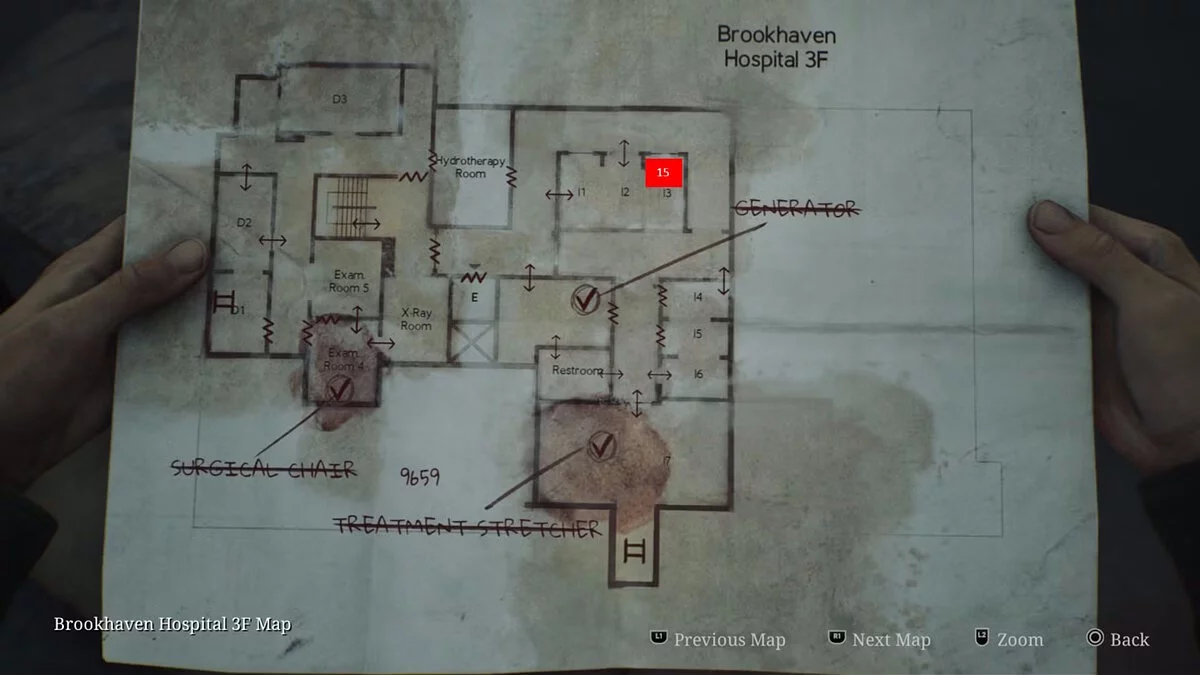
Scene from the past #15
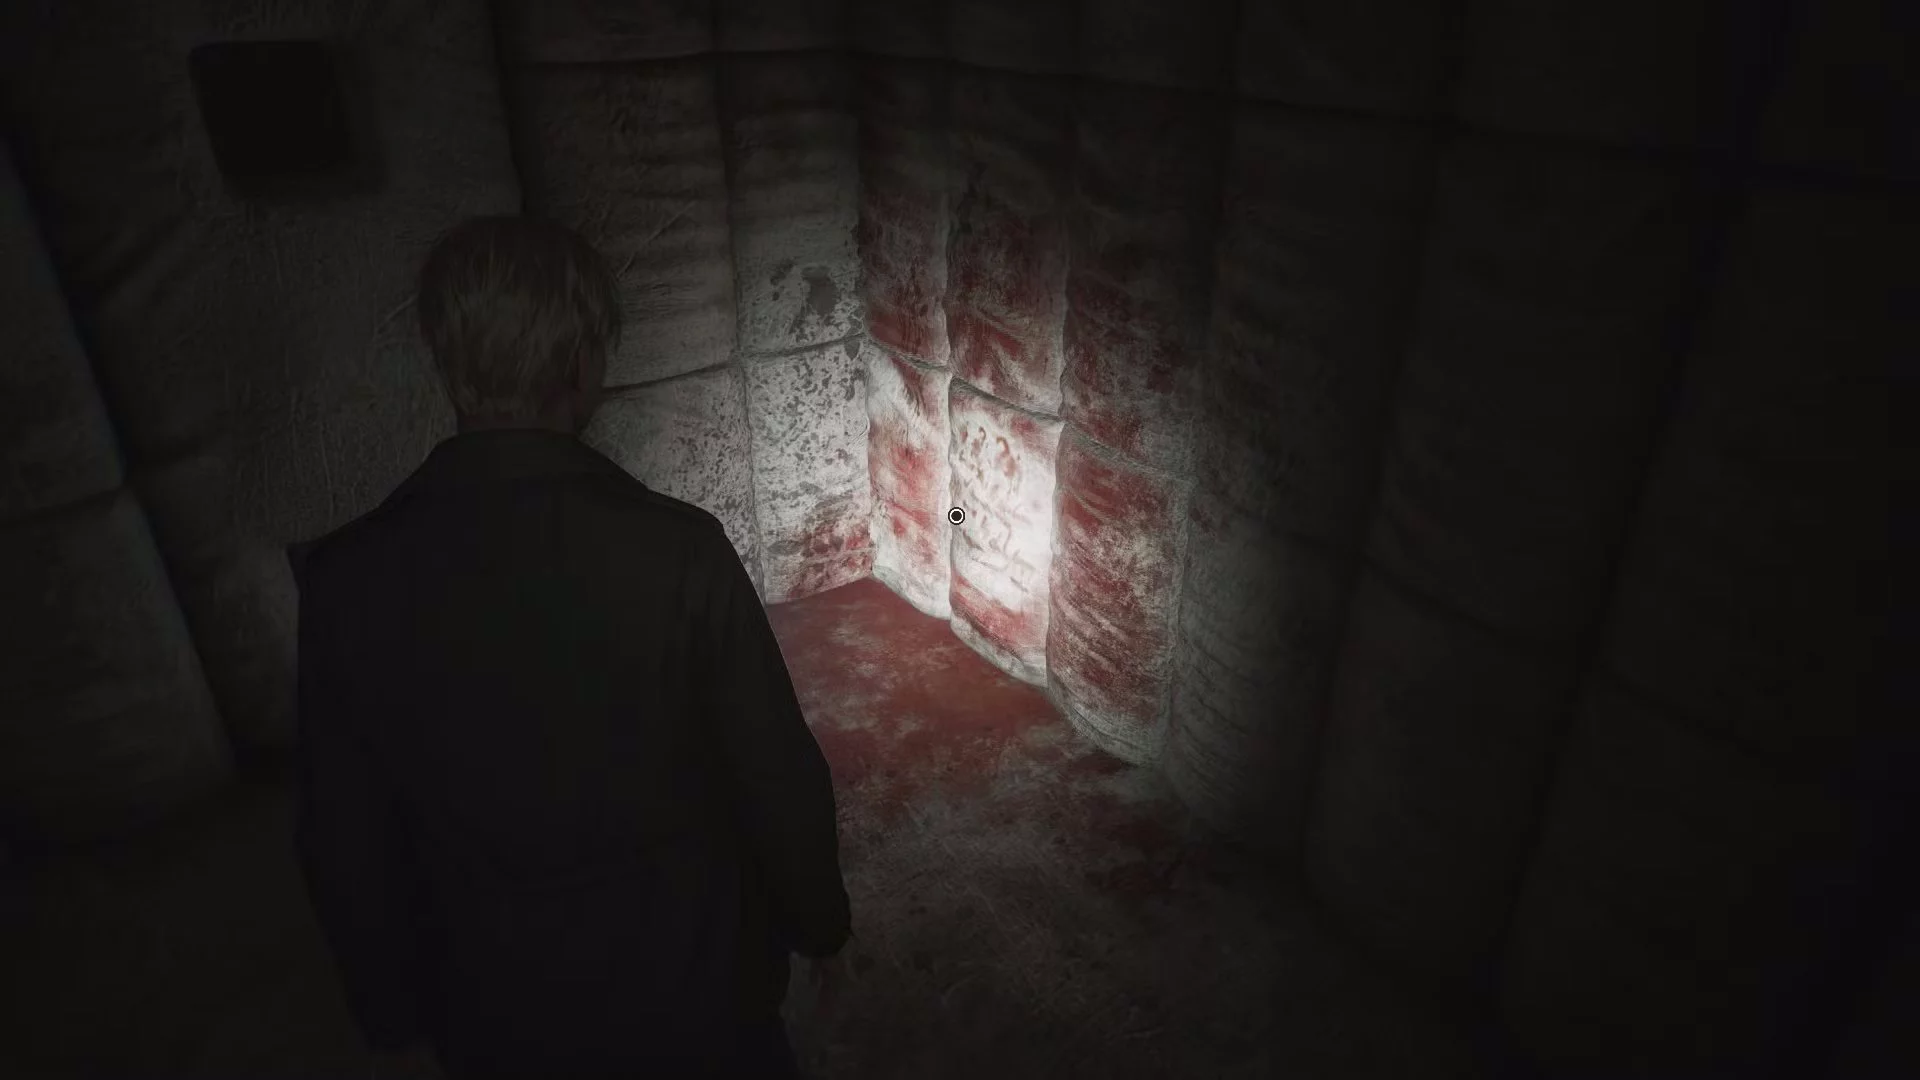
Before searching for Laura in the psychiatric ward of Brookhaven, check cell I3 to find faded stains on the wall behind the door. This may be a reference to the infamous blood wall code in the original SH2.
You have a very narrow window in which you can catch this glimpse, and on the other side of the prison block, there is an unmarked point of no return. It's easy to miss.
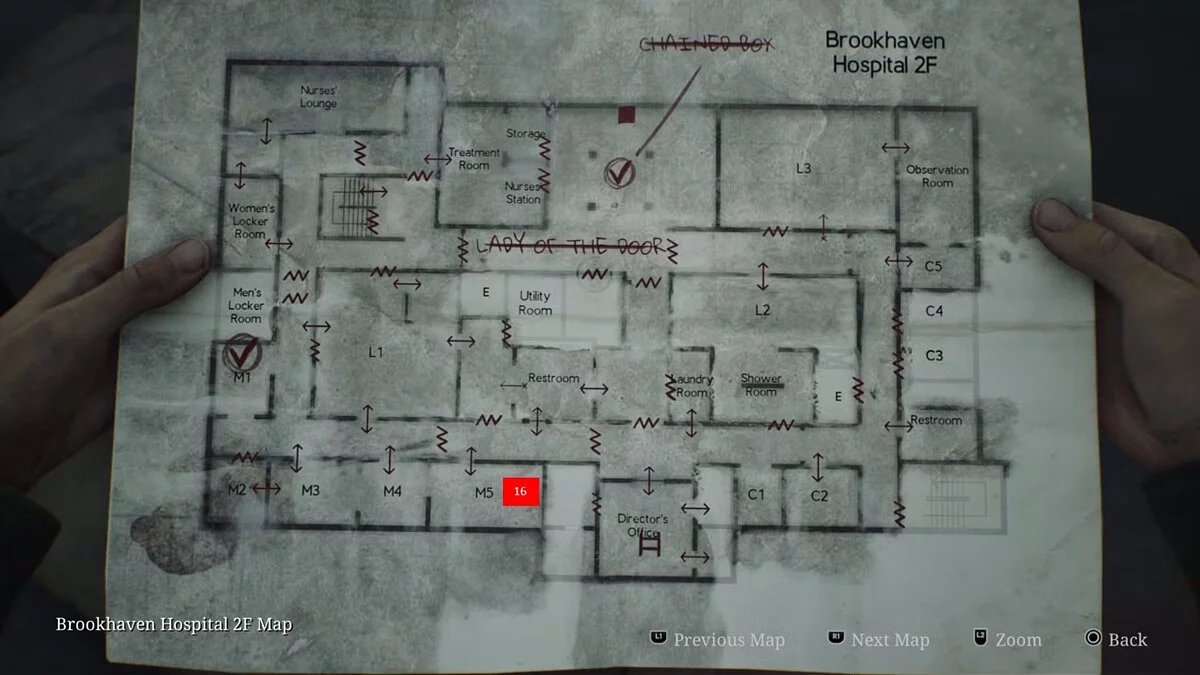
Scene from the past #16
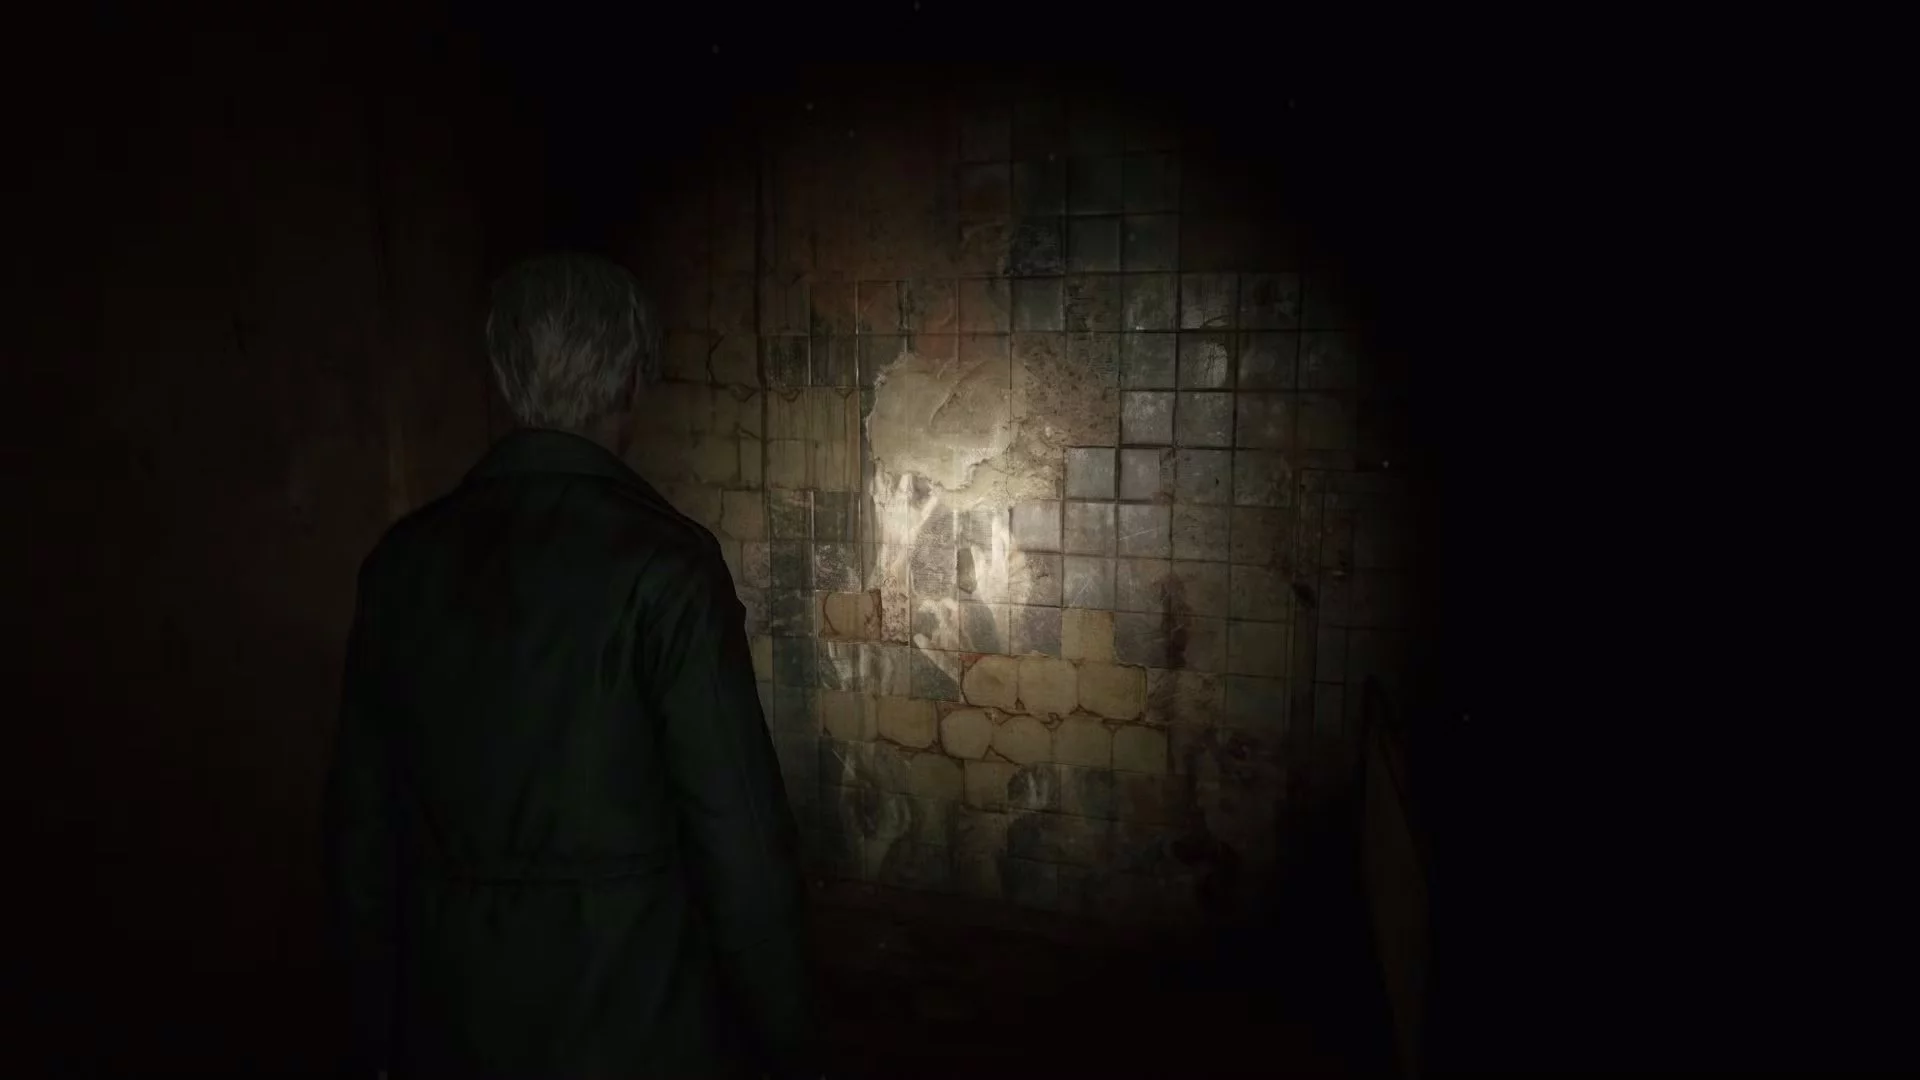
In the otherworld version of Brookhaven Hospital, look into ward M5 to find a bunch of handprints and a plastered-over hole on the east wall. Use the metal cart to get into room L1, then follow the corridor to room M4, where the hole in the wall will allow access to room M5.
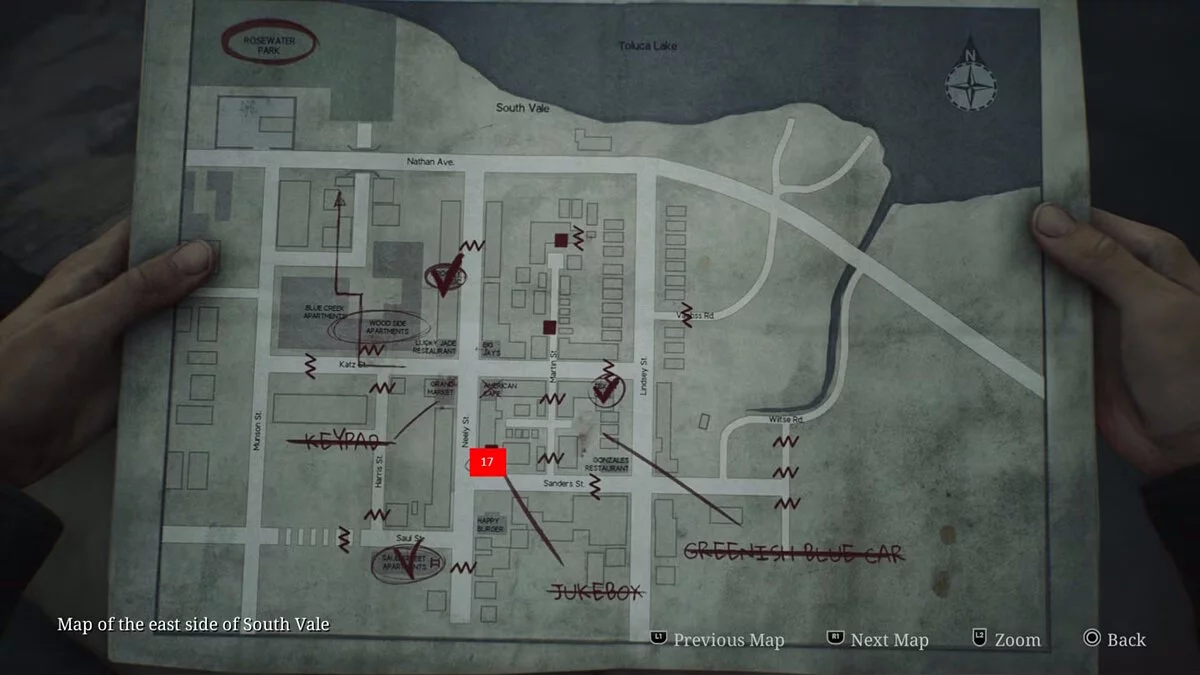
Scene from the past #17
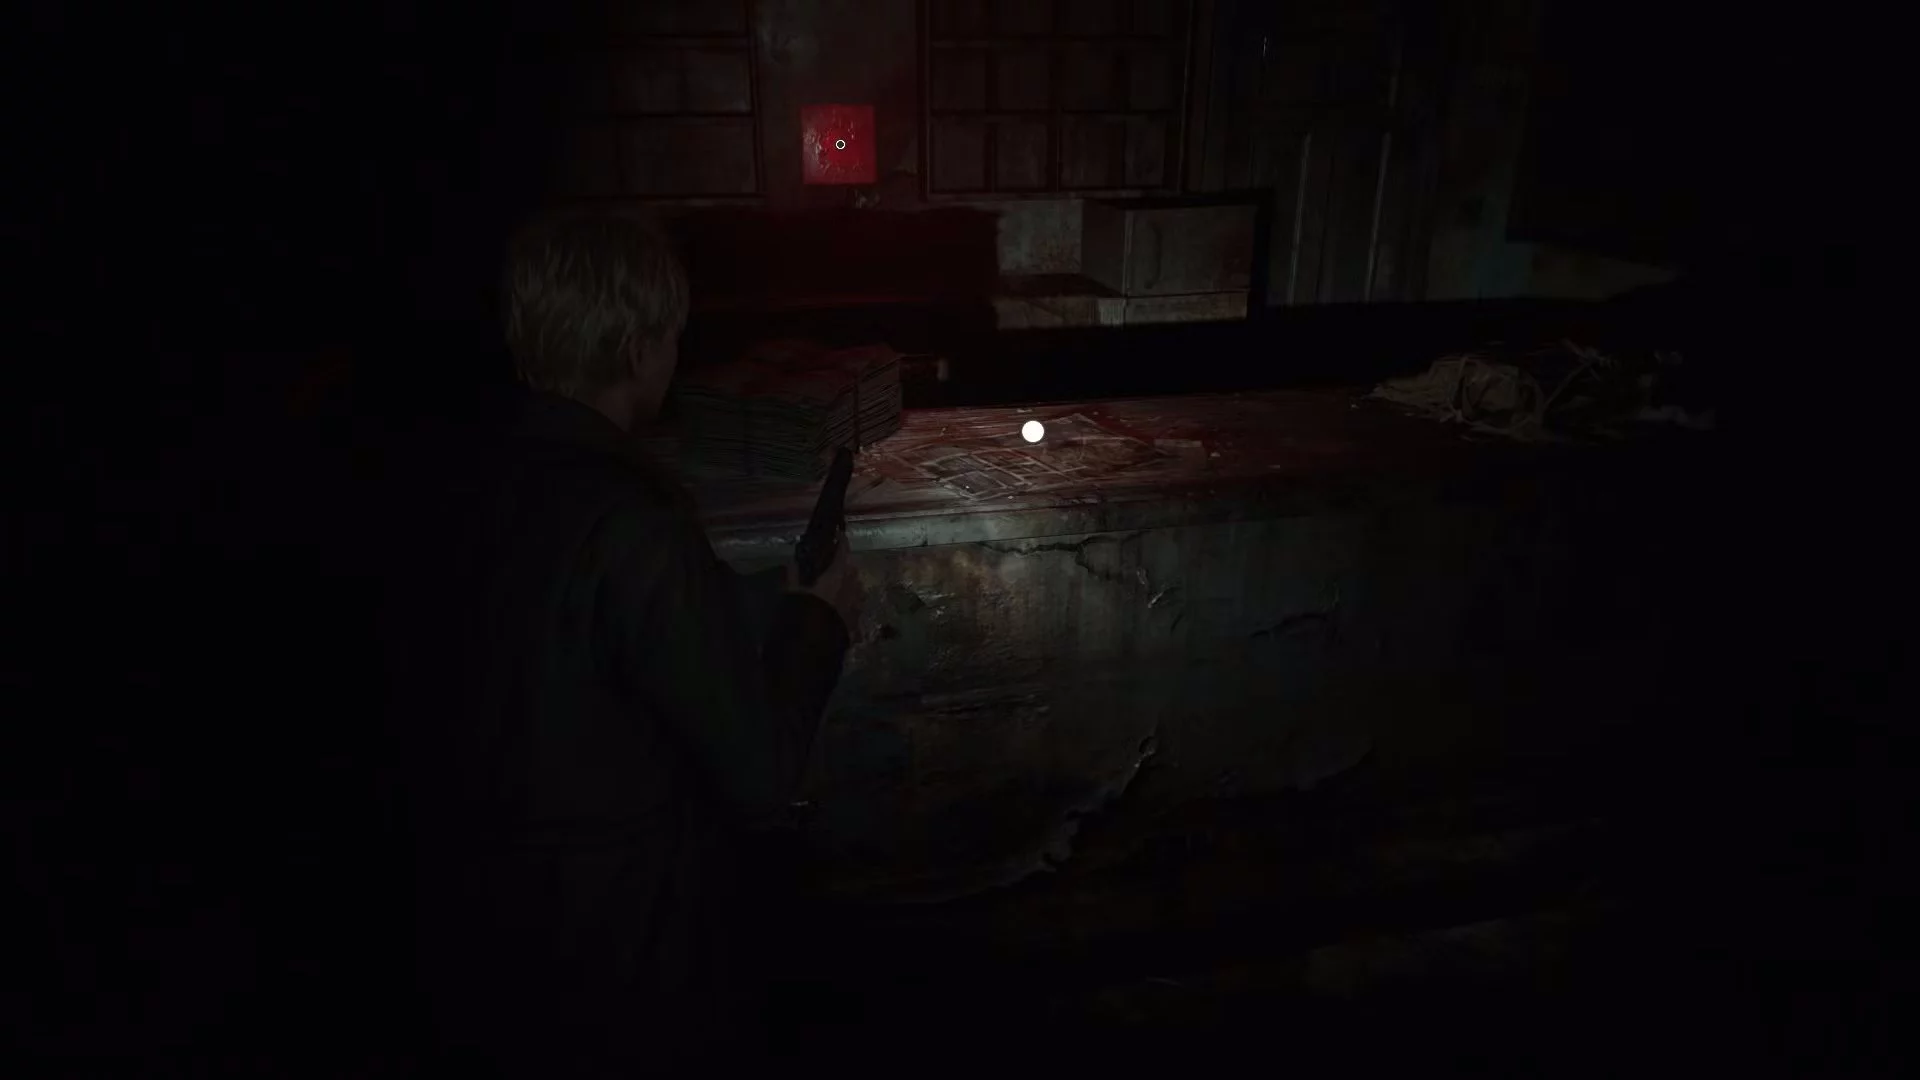
When you return to the eastern part of South Vale, revisit Neely's Bar to find someone else's map of the town. It looks like they retraced James's route in reverse...?
Toluca Prison

Scene from the past #18
When you first find yourself in the dining hall of Toluca Prison, check one of the tables to the right of James to find a clay tablet with a strange Aztec engraving on it.
This is one of the key items you need to get the Horseshoe in SH2, which was also found in the prison dining hall.
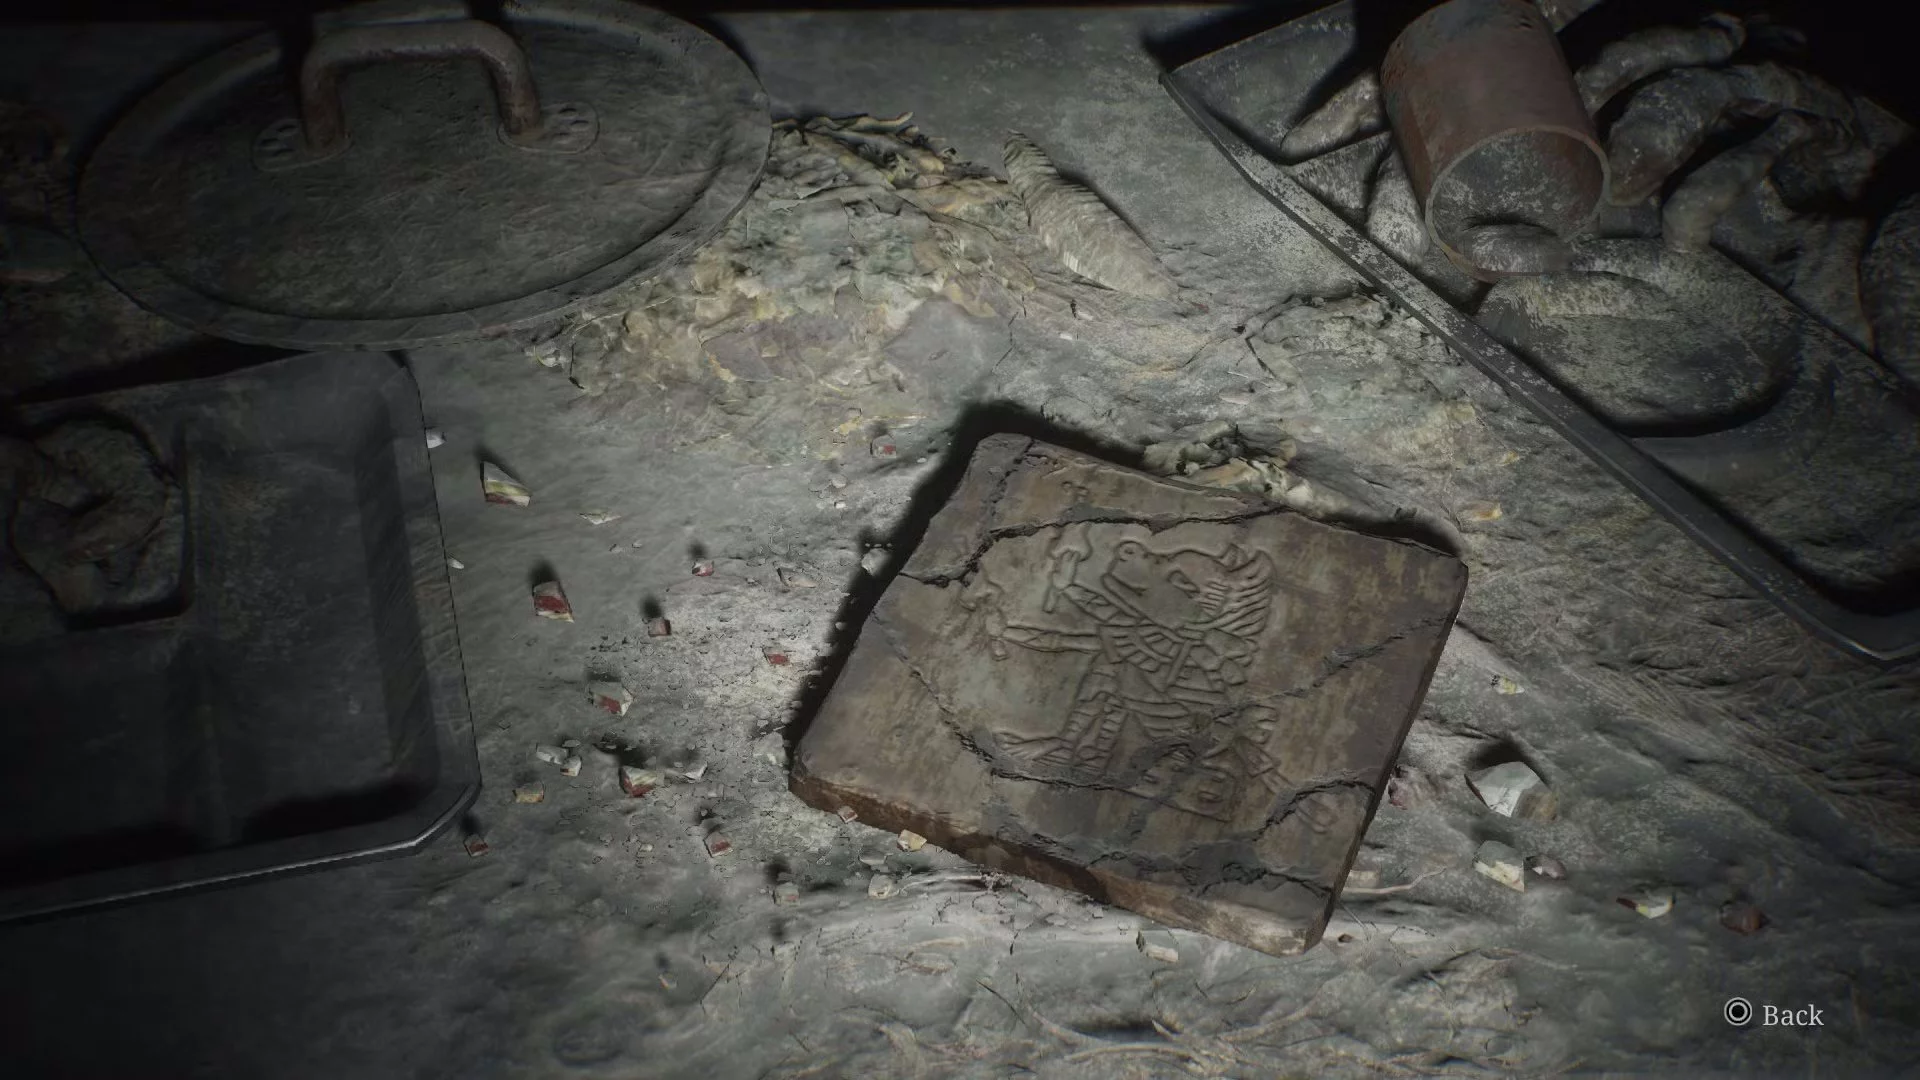
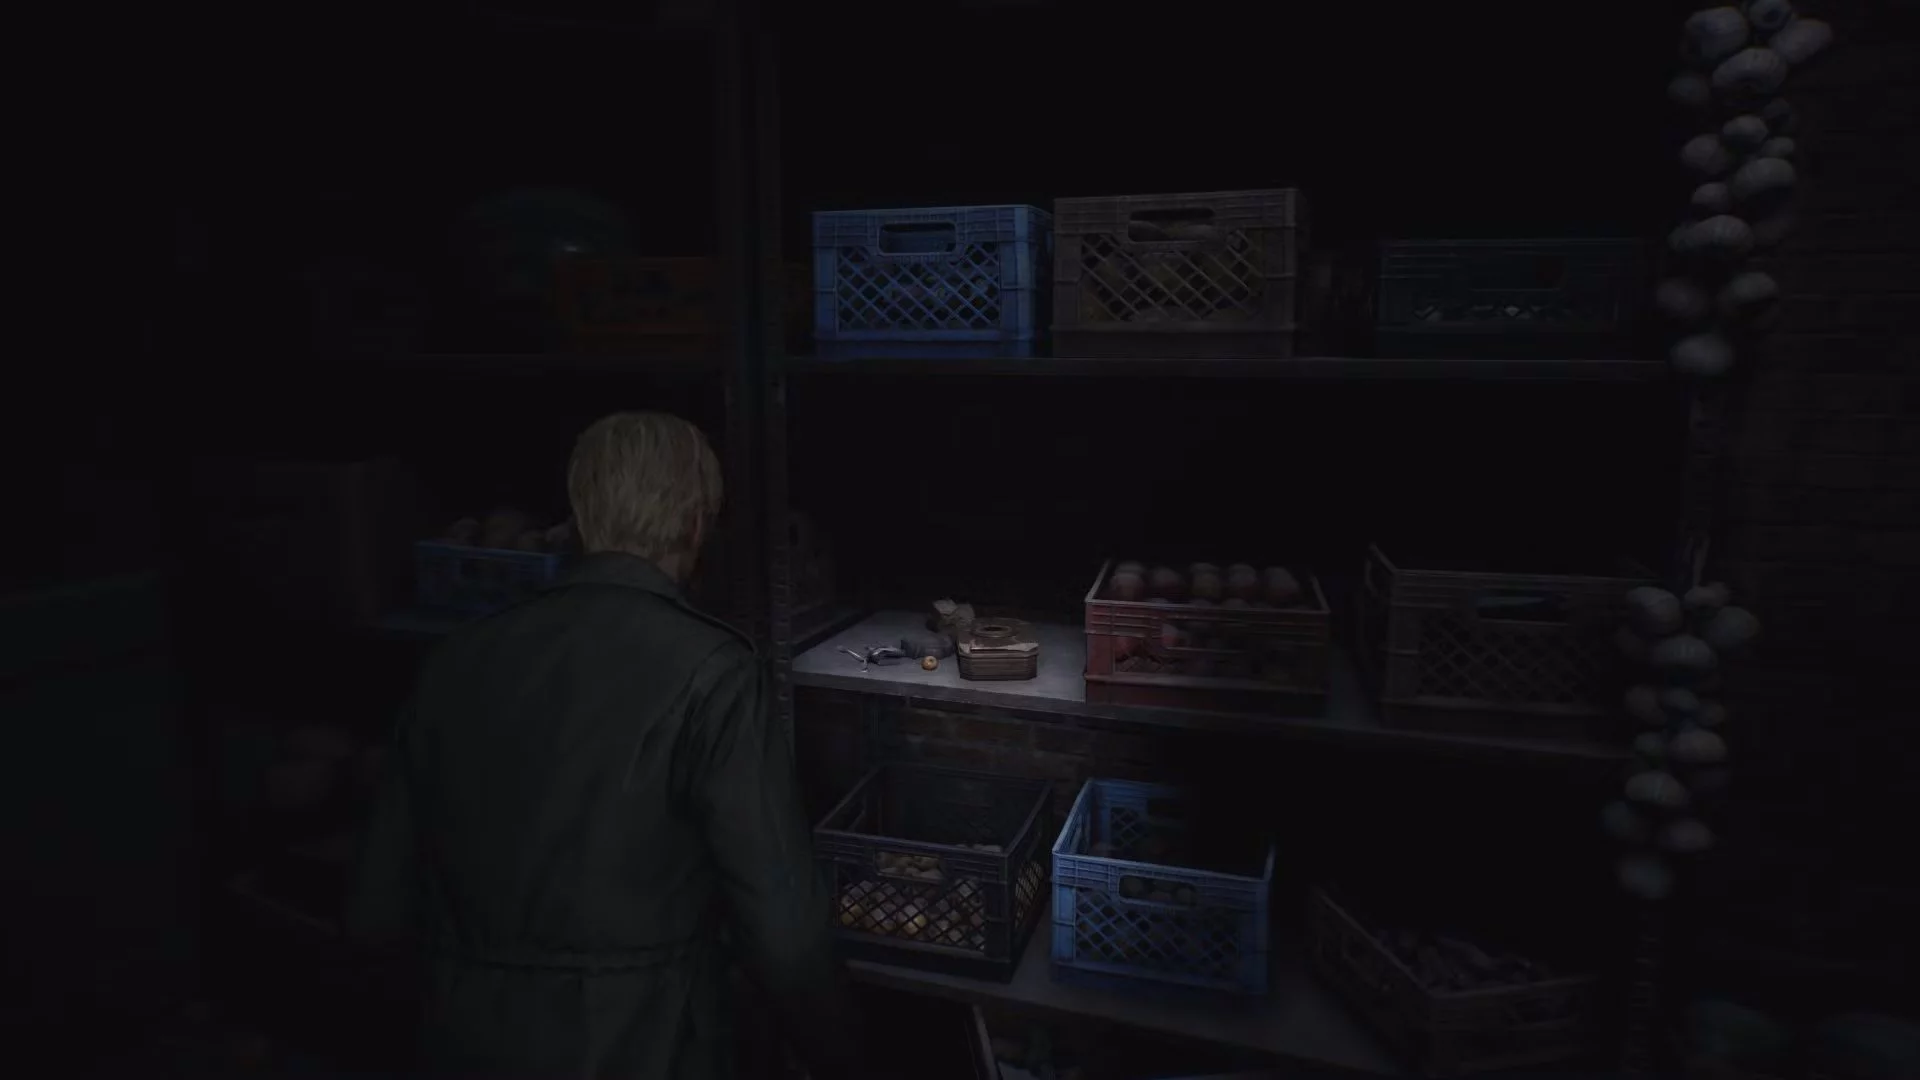
Scene from the past #19

You can access cell A3 in Toluca Prison either by opening its door or breaking through cell A4. Either way, there is a mannequin guarding a box of rifle rounds and an improvised altar with another clay tablet on it.
This is the second of three key items you need to get the Horseshoe in SH2. It was also found in the cell.
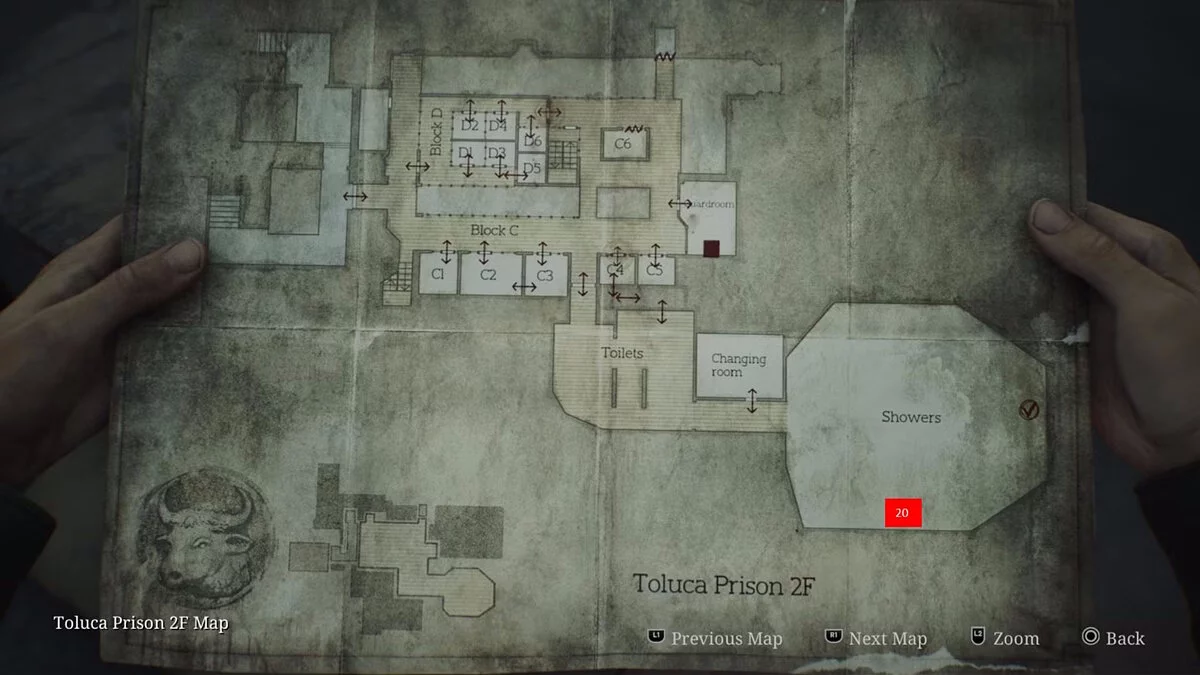
Scene from the past #20
This clay tablet is located at the base of the south wall of the shower room on the second floor of Toluca Prison.
As in the previous two scenes from the past, this is the third and final key item you need for the Horseshoe. Like the other two tablets, it was left in a similar spot where it was found in the original game.
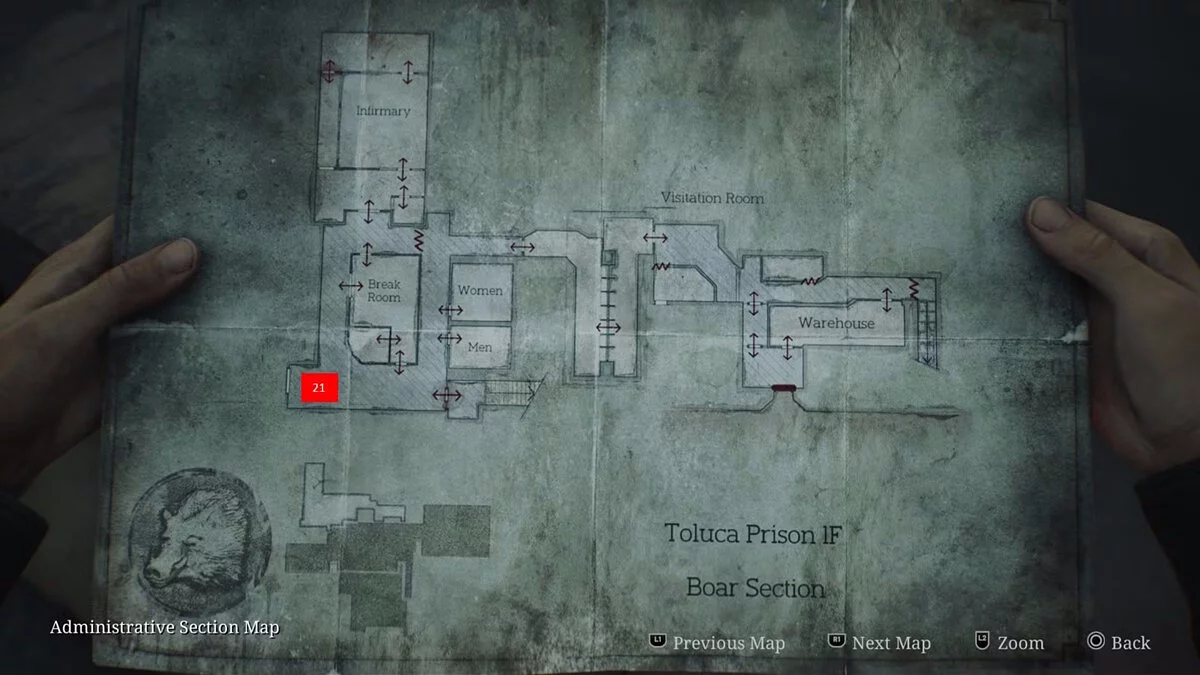
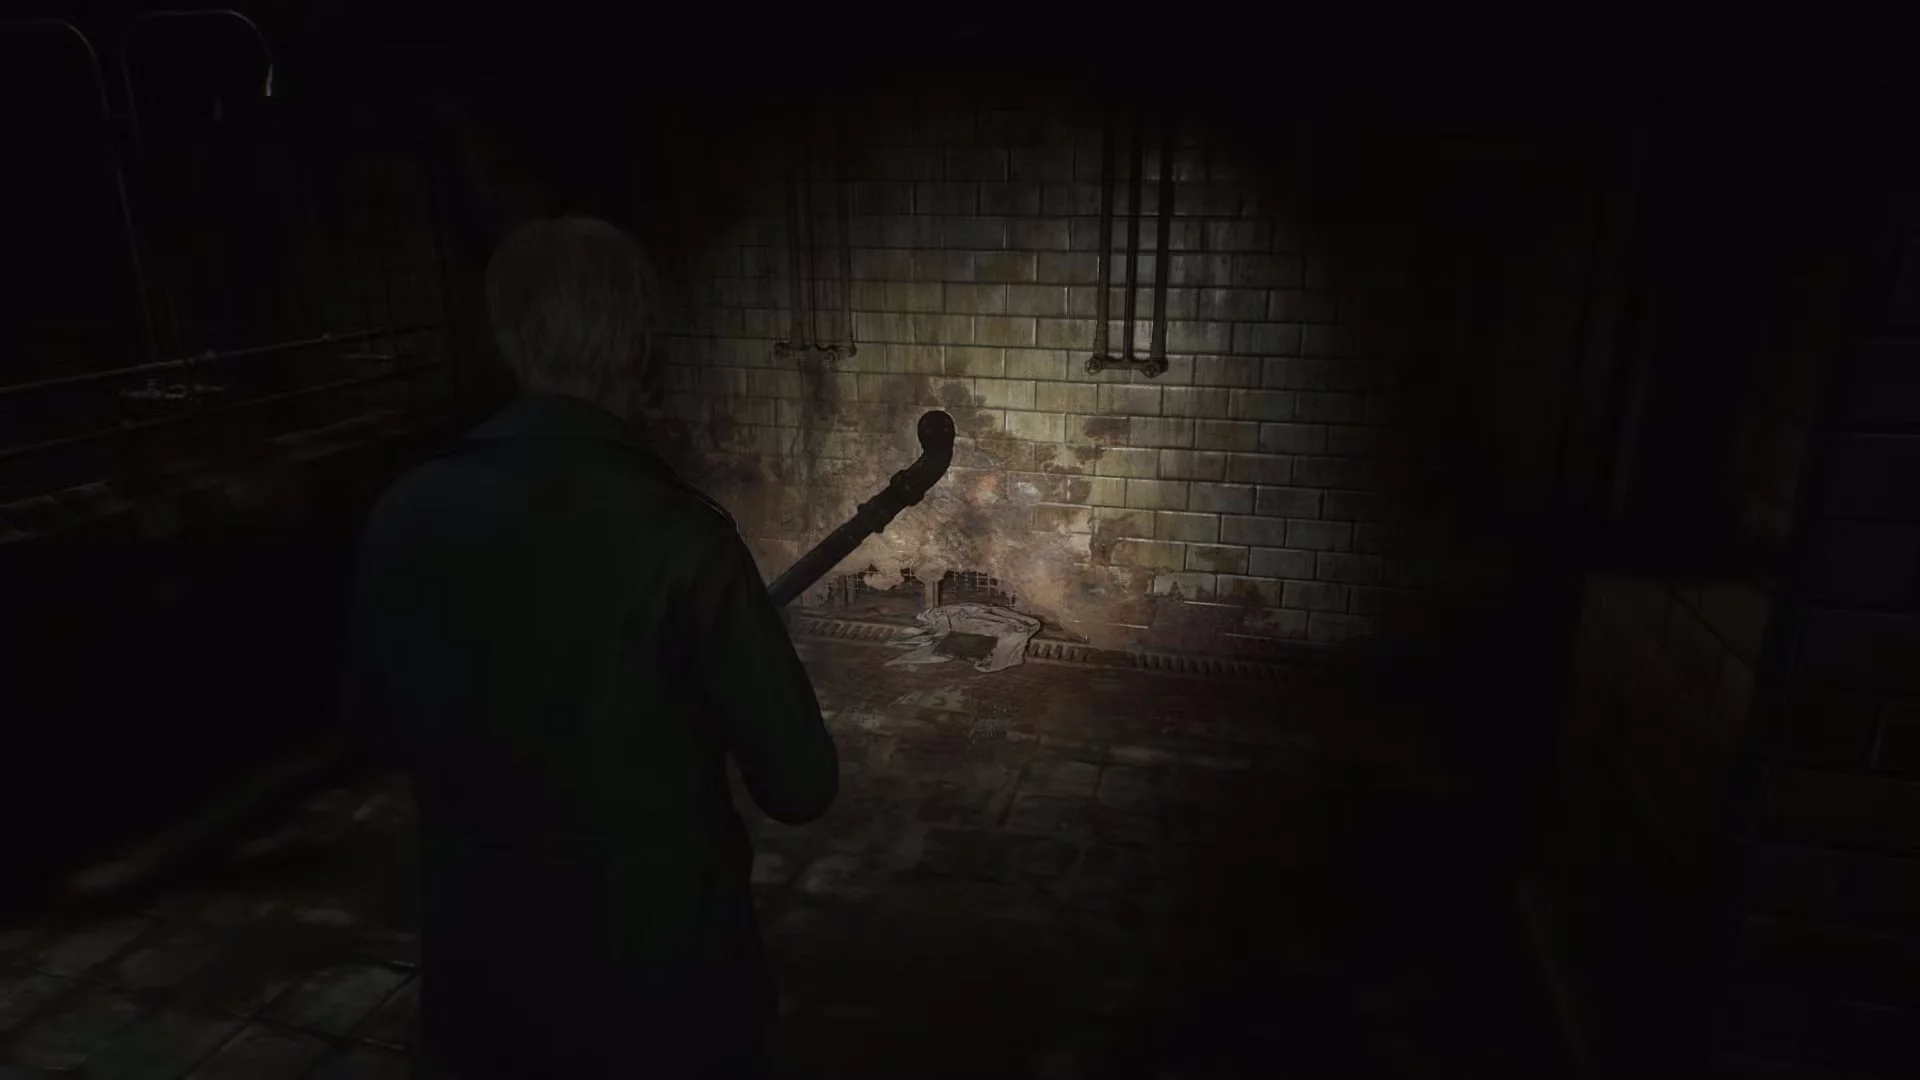
Scene from the past #21
When you reach the break room in the block, inspect the barricaded doors to the southwest. In front of them on the floor is a hatch covered in candle wax.
This is a remnant of a particularly strange puzzle from the prison run of the 2001 game, where James used a candle, a horseshoe, and a lighter to create an improvised handle for the hatch.
Labyrinth
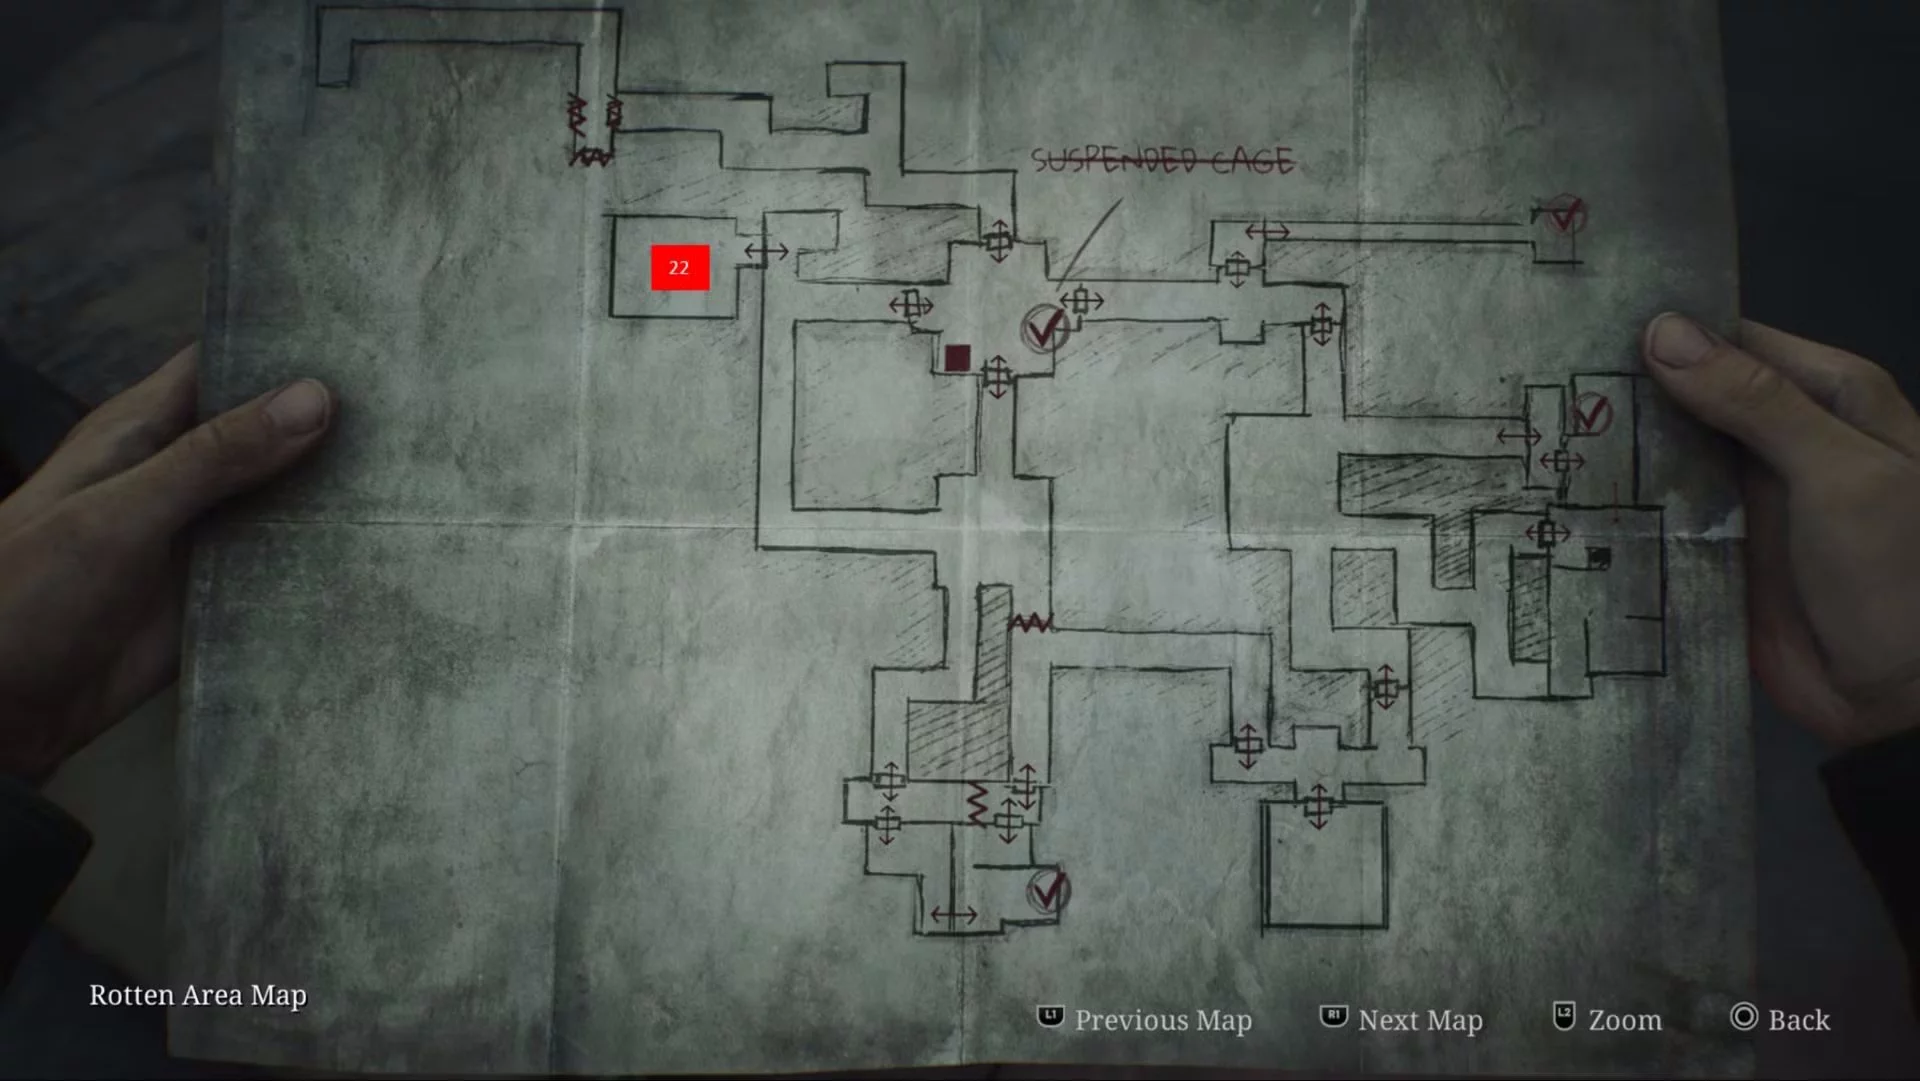
Scene from the past #22
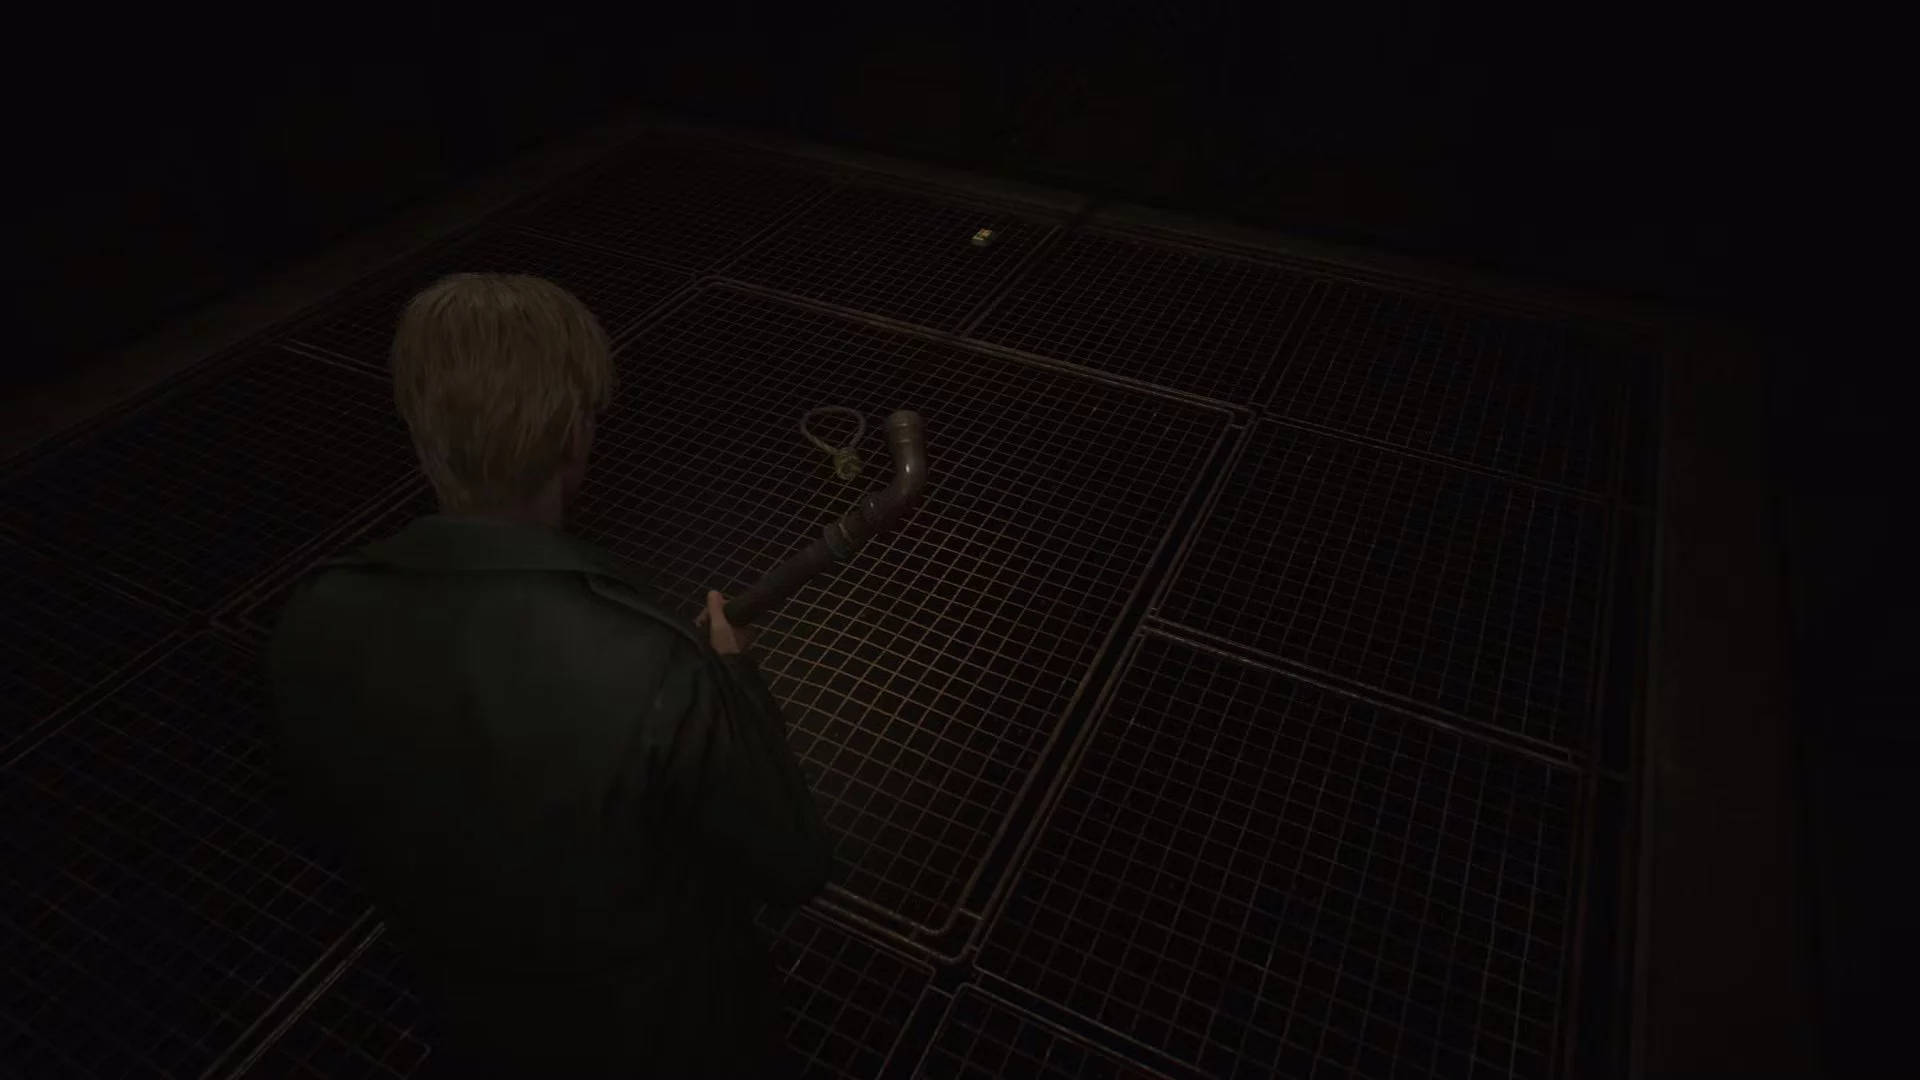
On the western side of the decayed area in the labyrinth, find a weak spot in the outer wall. Break through it to find a large mesh cage with a severed noose in the center. This is a reference to the original version of the gallows puzzle from SH2.
Lakeview Hotel
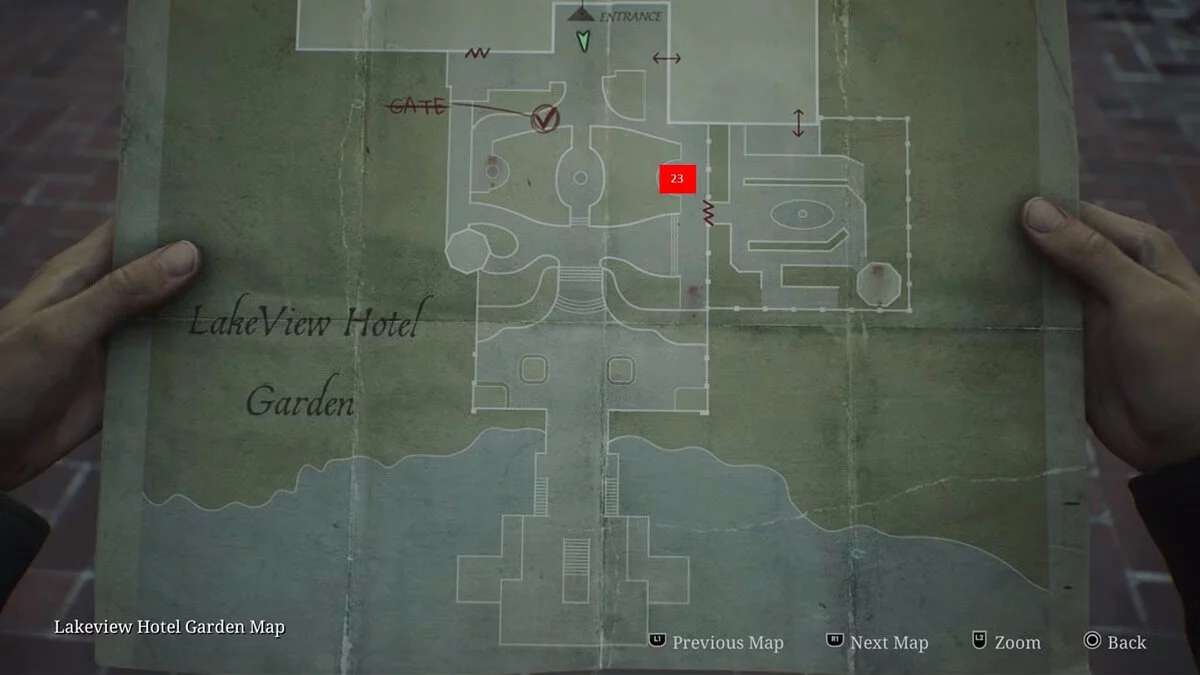
Scene from the past #23
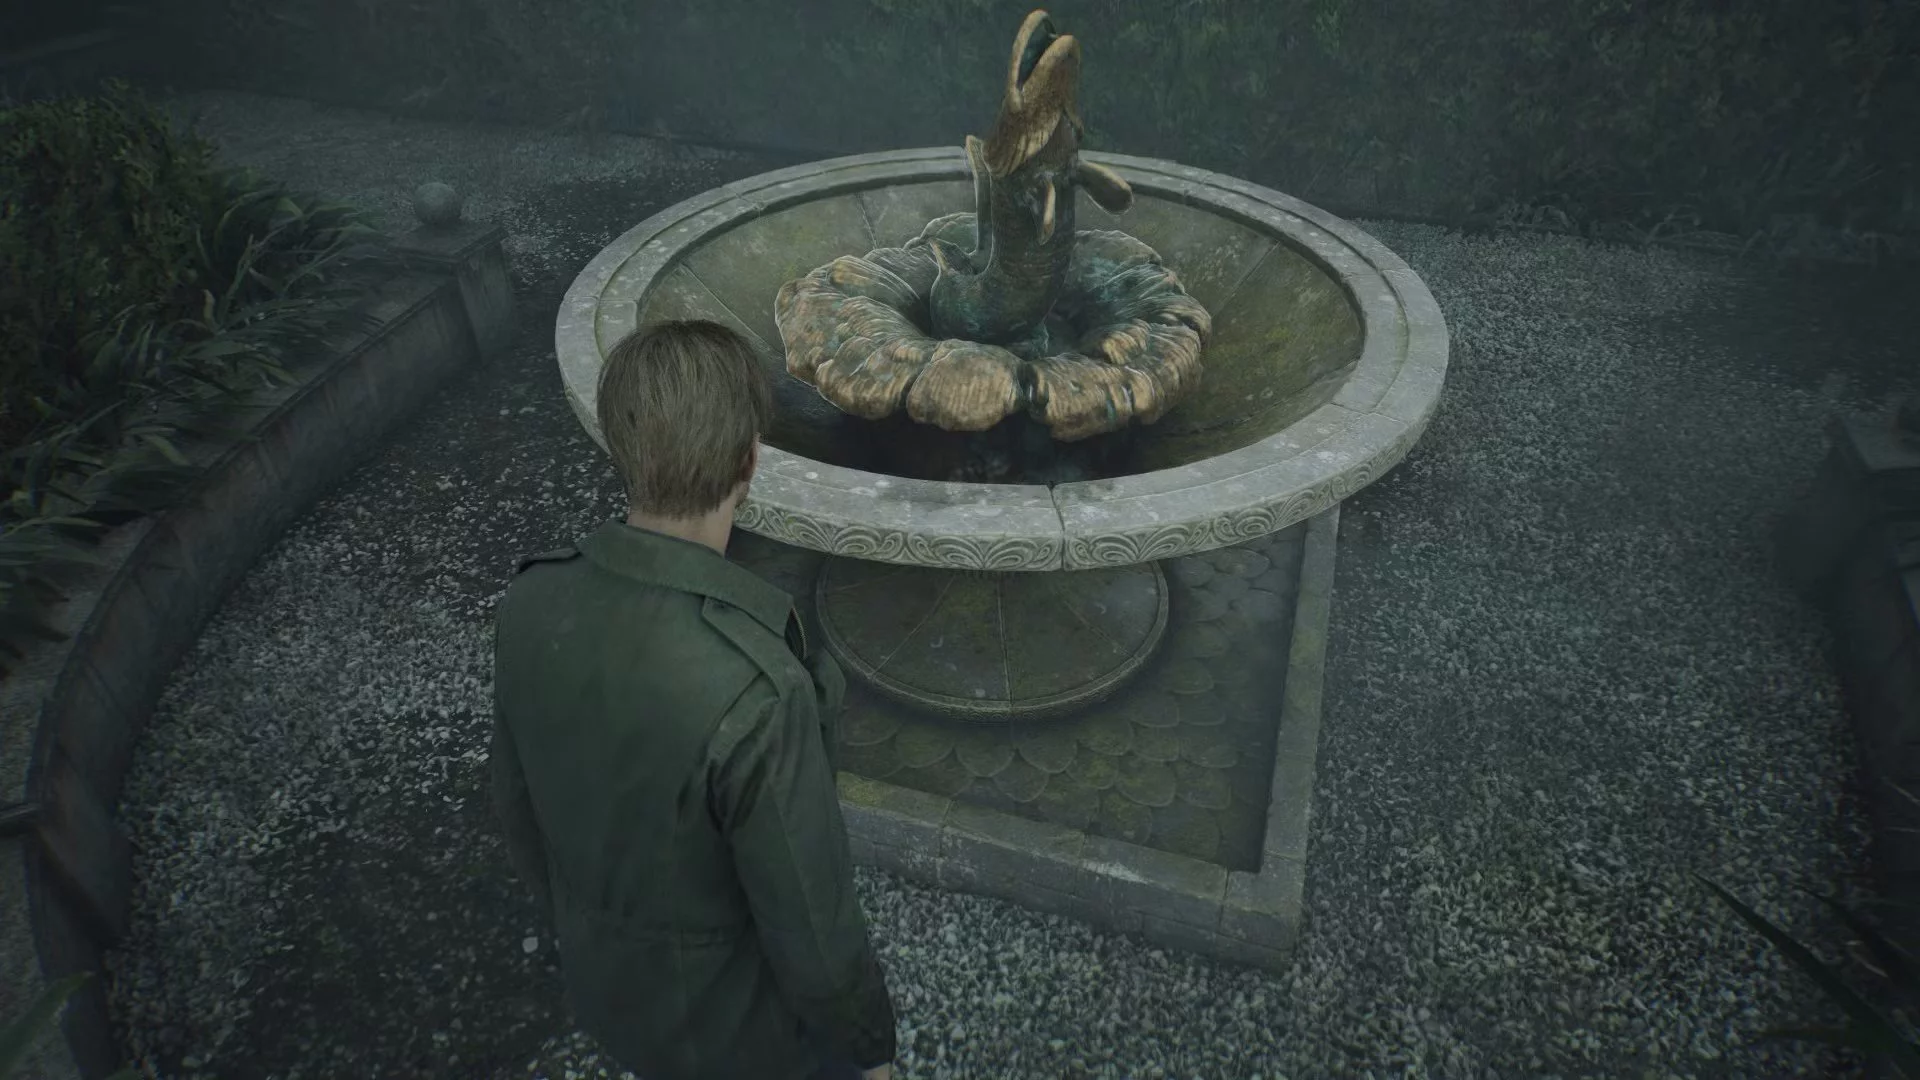
If you are in the garden opposite the main entrance of the hotel, turn right, and you will see a decorative fountain with a fish statue. Look inside this fountain to find a broken figurine. This is one of the three items you needed to find to solve the original version of the hotel's music box puzzle. In the remake, it was replaced with a simple figurine.
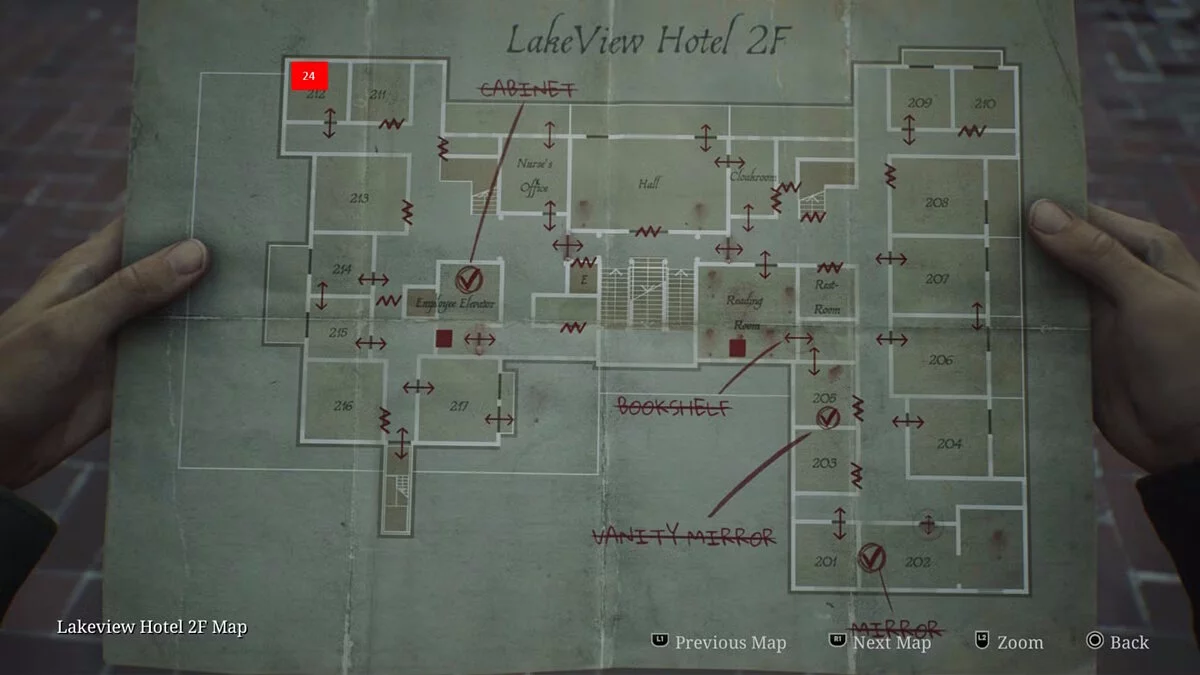
Scene from the past #24
This is one of the easiest items to find, as it is simply lying on the floor by the bed in room 212. The door isn't even locked. This is the second of the three music boxes you need for the final puzzle in the original SH2 hotel.
Scene from the past #25
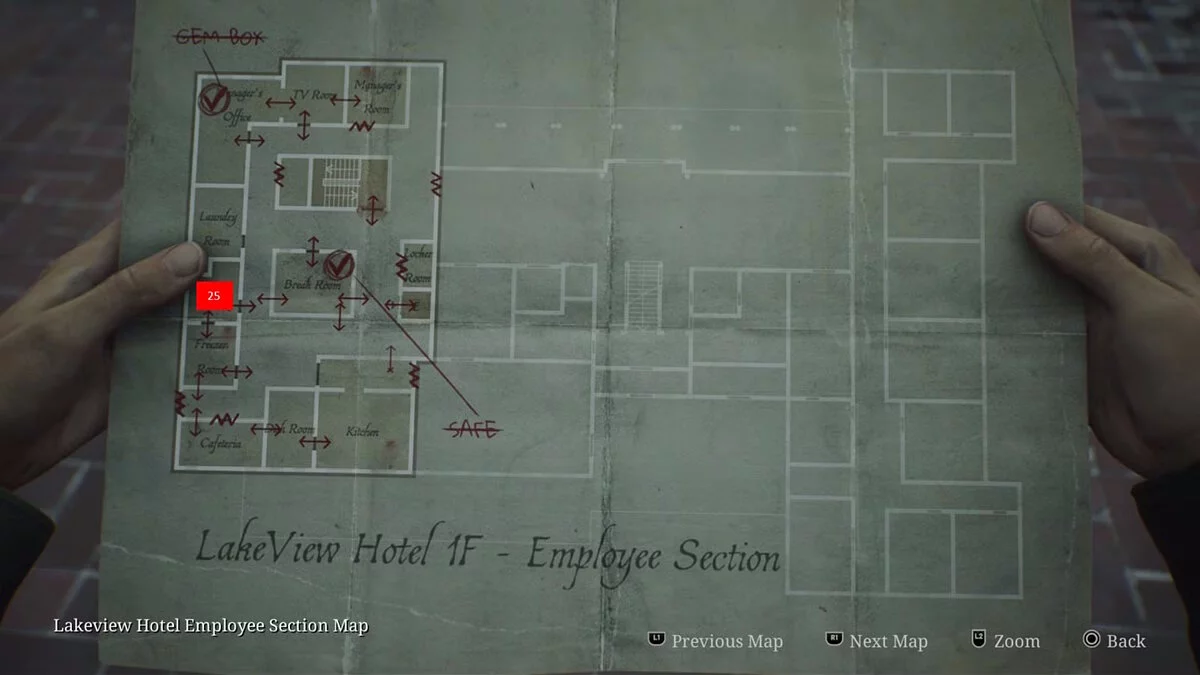
If you check the storage room while in the hotel's employee section, you will find a broken Snow White figurine on a shelf. As above, this is one of the items you need for the original version of the music box puzzle.
Scene from the past #26
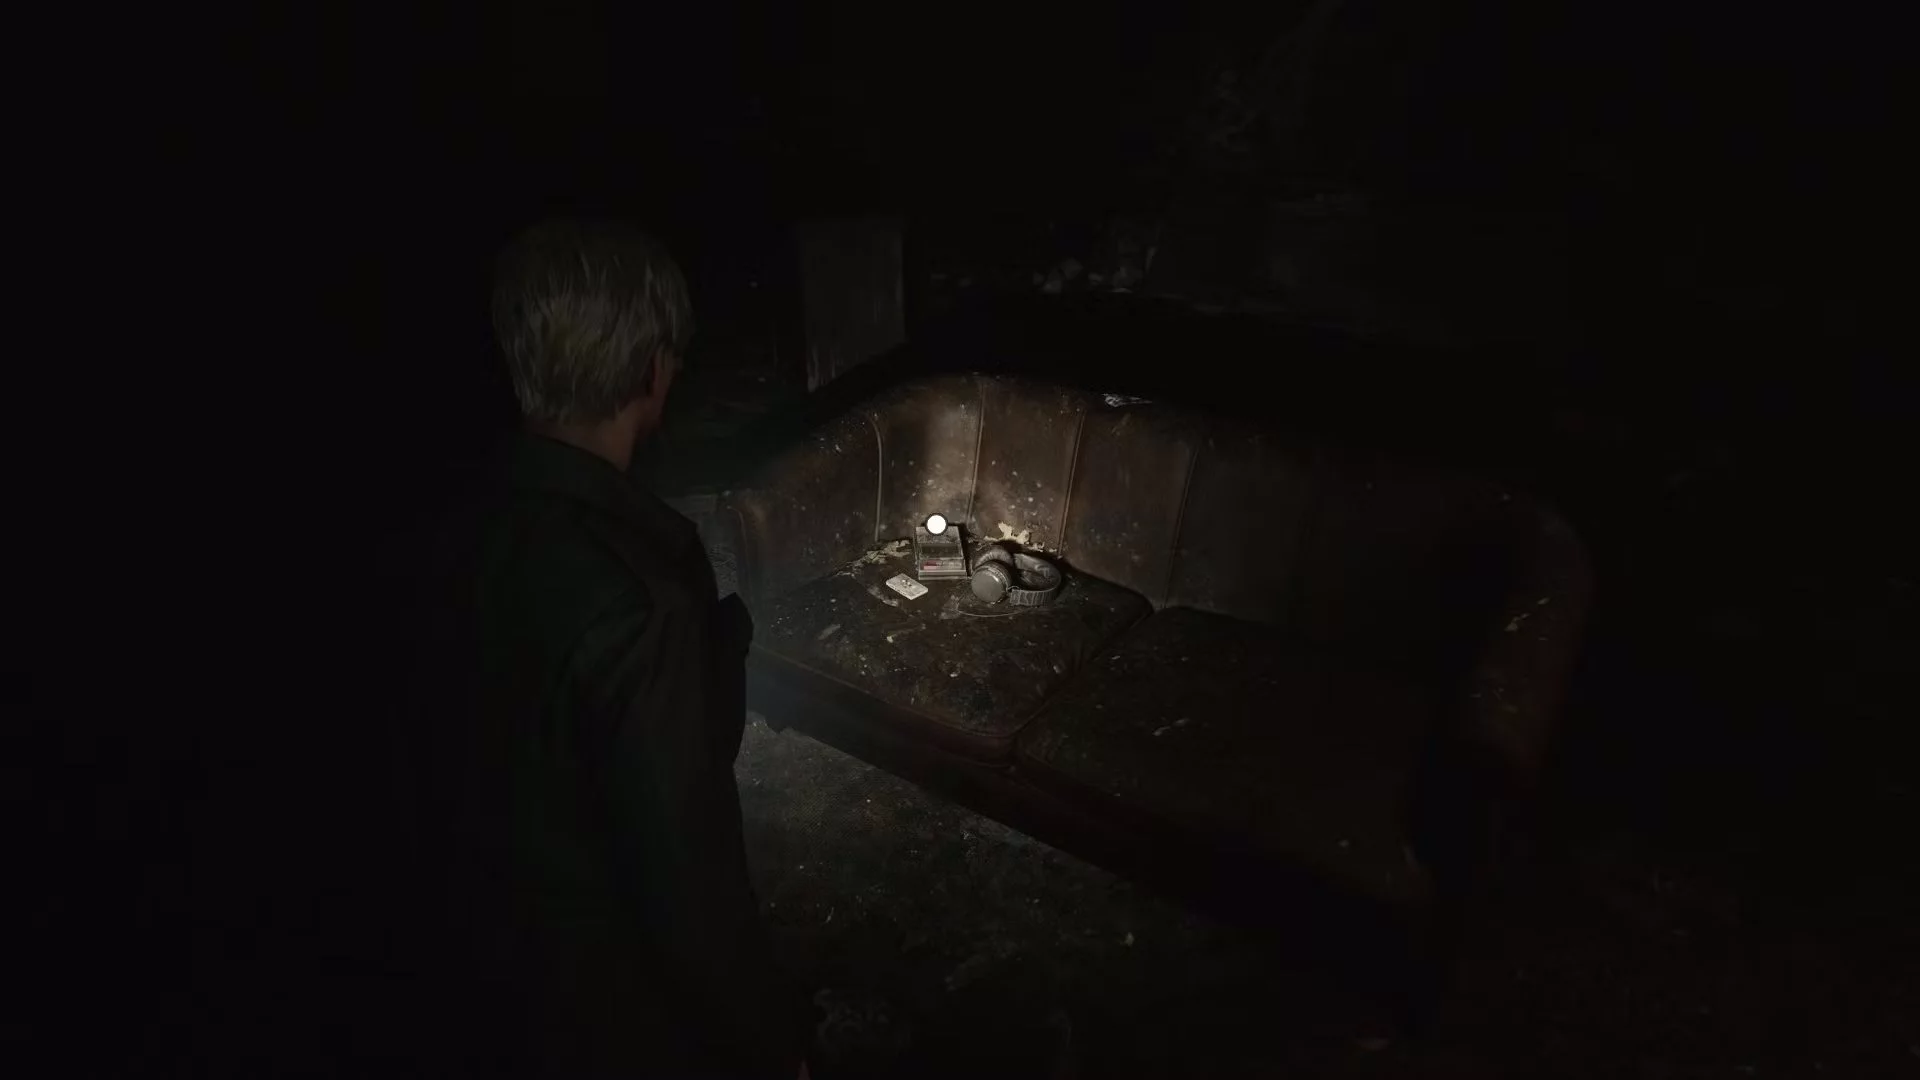
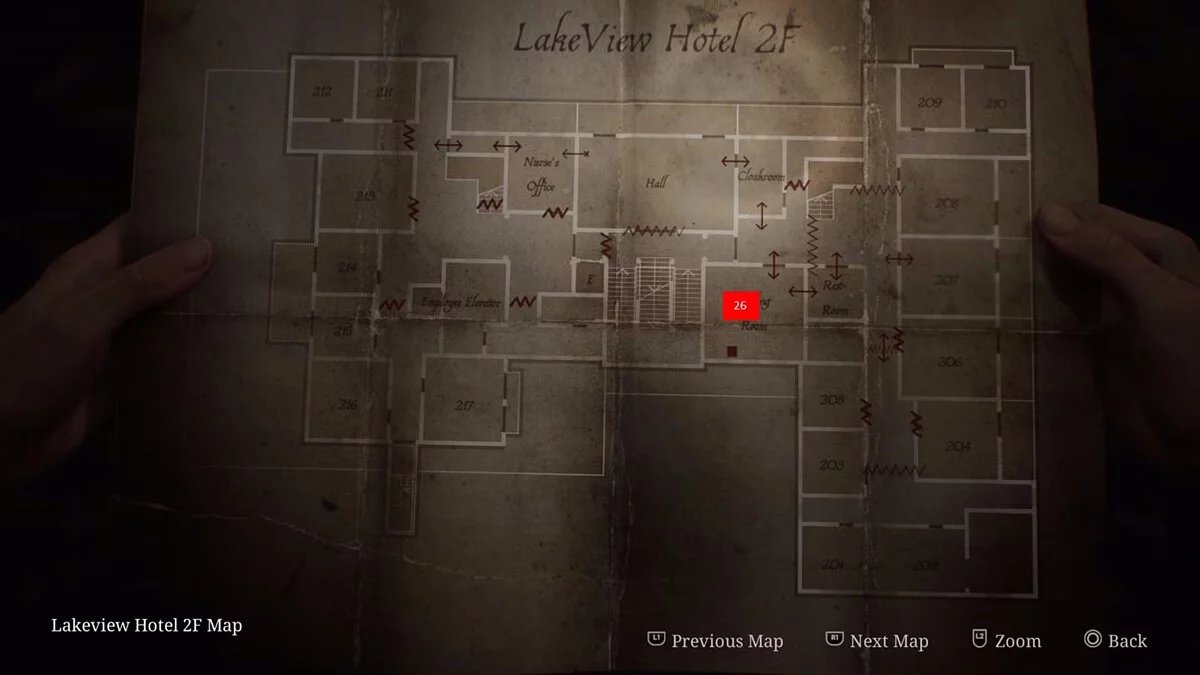
On your way back through the ruined version of the hotel, check the couch in the reading room. This is the last glimpse of the past in the game. Listening to this recording was an important factor in determining your ending in the original version of SH2.
Here you should receive the Echoes trophy, which requires finding all the scenes from the past in one playthrough.
Other guides
- All lock and safe codes in Silent Hill 2 Remake
- Boss Guide for Silent Hill 2 Remake — How to Win
- Complete Silent Hill 2 Remake Walkthrough at 100%
- All endings of Silent Hill 2 Remake — how to get the secret endings
- How to Find All Strange Photos in Silent Hill 2 Remake
- How to get all weapons in Silent Hill 2 Remake
- How to open the box with chains and two locks in Silent Hill 2
- How to find the flashlight in Silent Hill 2 Remake
- How to solve the riddle and coin puzzle in Silent Hill 2
- Puzzle with the hand and bracelet in Silent Hill 2 — How to Solve
- Maria aus dem Silent Hill 2 Remake hat ihr Aussehen verbessert und ihr kanonisches Outfit zurückgebracht — Mod
- Silent Hill 2 Remake verkauft sich über eine Million Mal
- Gamer zeigt Silent Hill 2 Remake mit fester Kamera — jetzt sieht es aus wie die ersten Resident Evil Spiele