How to Optimize Windows 10 and Windows 11 for Gaming: Maximum Performance, Game Mode, and Other Tips
Today, we'll explore the settings necessary for gaming optimization in Windows 10 and Windows 11. Unlike numerous guides online that might completely break your system or kill some functionalities, we won't delve into complexities. We'll only cover the settings and methods that the article's author personally uses on their home PC.
First and foremost, ensure that you have the latest drivers for your motherboard and other components installed. Visit the manufacturer's official website and look for the latest drivers in the support section. Moreover, it might make sense to reinstall Windows 10/11 if it's cluttered and laggy.
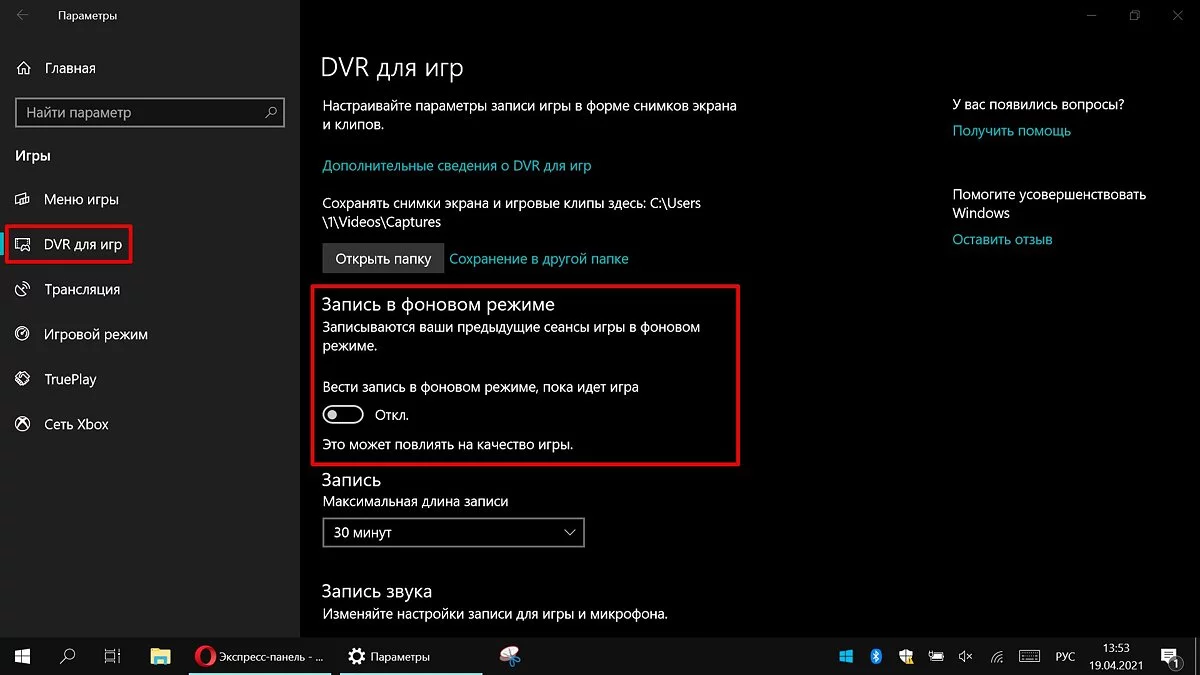
Disable Background Screen Recording
The system can record gameplay in the background, which affects performance. And you might not even notice that recording is happening. This will only be felt in decreased performance and lags, especially if your computer is on the weaker side.
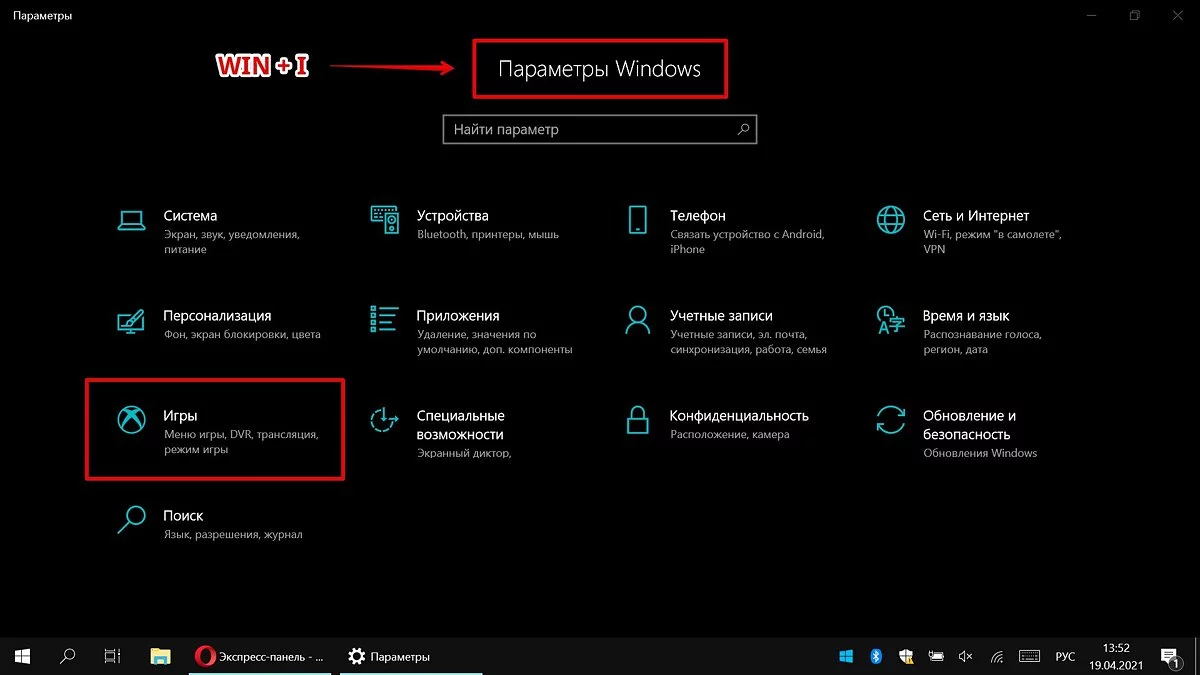
Go to Windows settings. You can do this in several ways:
- left-click on «Start» and select «Settings» (gear icon),
- right-click on «Start» and select «Settings»,
- press the «Win + I» keys (Win — the Windows emblem icon).
Next, go to «Gaming». On the left panel, select «Game DVR». Turn off the «Record in the background while I'm playing a game» slider.
Also, if desired, you can completely disable «Game Bar» and system-based video recording. In our opinion, it's more convenient to use the overlay from the video card manufacturer. But the choice of software for recording video and screenshots is entirely up to you.
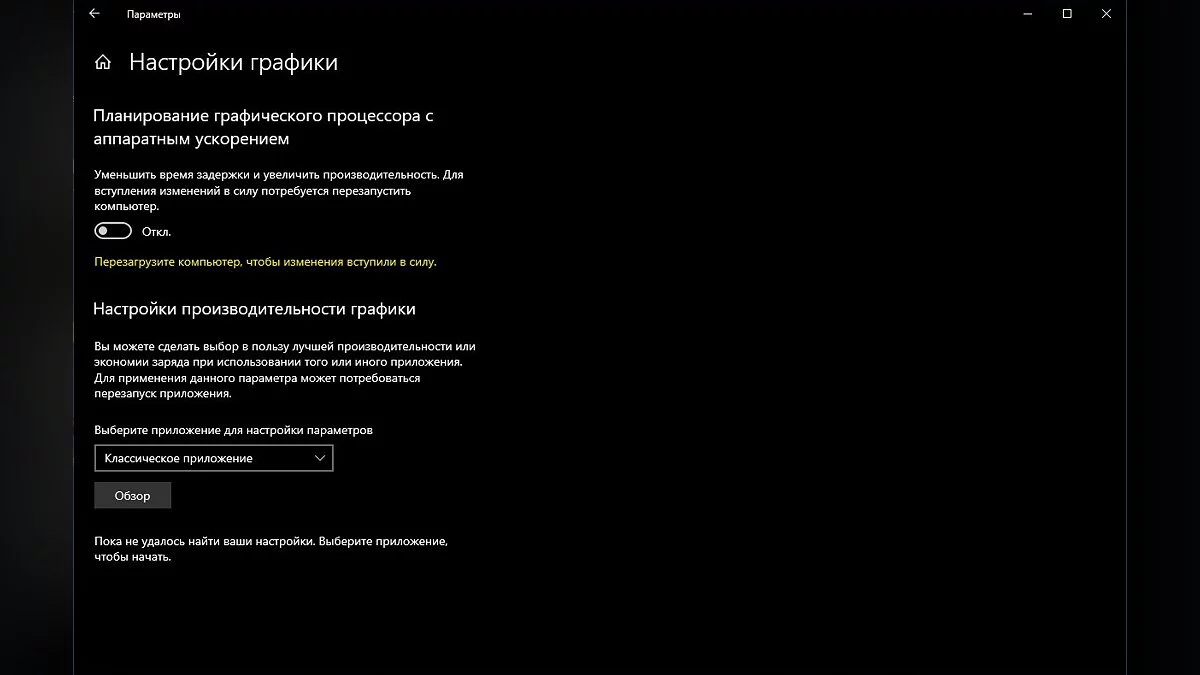
Enable Hardware-accelerated GPU Scheduling
This is a relatively new feature that appeared with the update to version 2004. Moreover, it only works on 10th generation video cards and above, starting with GT 1030. Don't expect miracles from it, but the minimum FPS might slightly increase. Make sure you have the required OS version. You can check this in Windows settings. Go to «Update & Security», then on the right side of the screen, follow the link to «OS Build Info».
To enable scheduling, go to Windows settings and then «System». Select «Display» on the left side of the screen and scroll all the way down. Follow the link to «Graphics settings». Turn on the switch for «Reduce latency and increase performance». Restart your computer.
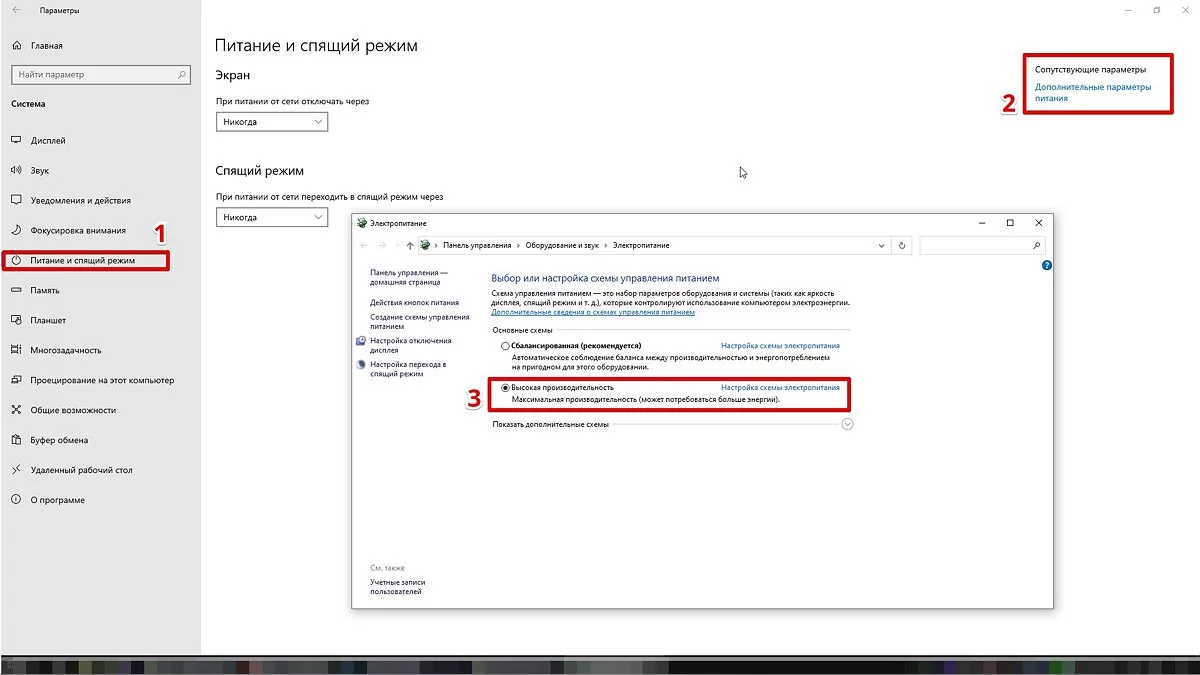
Set Maximum Performance Mode
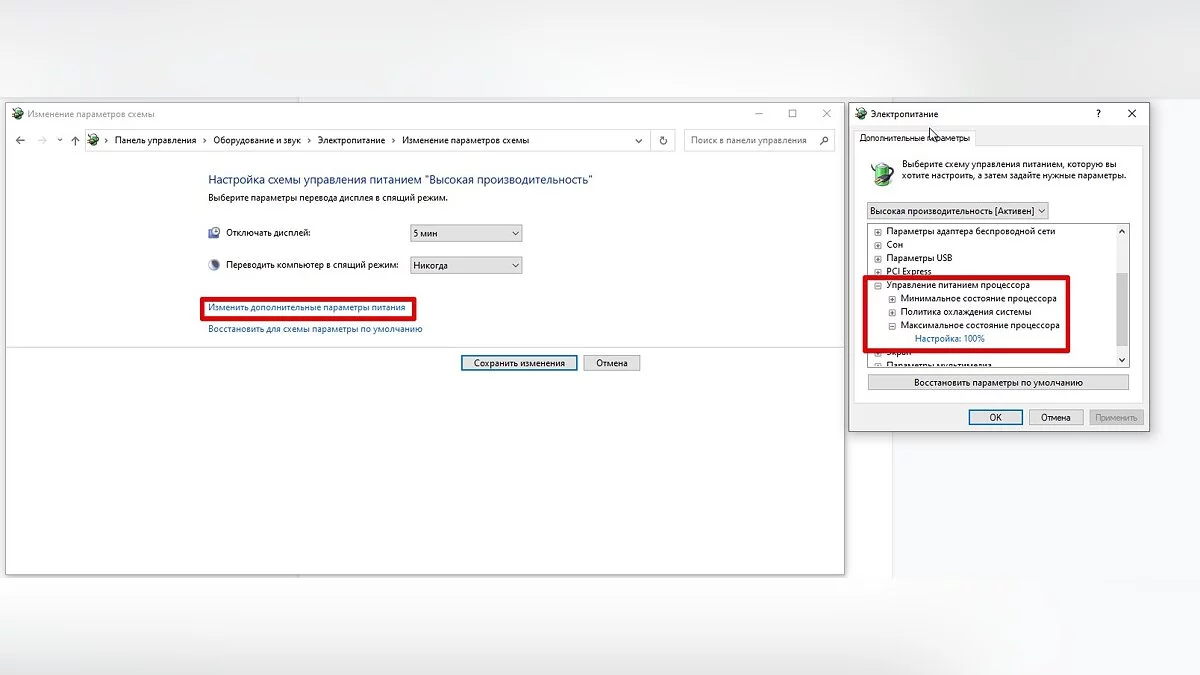
Go to Windows settings, then «System» and «Power & sleep». On the right side of the screen, follow the link to «Additional power settings». Enable the «High performance» mode. Now you can be sure that no power-saving settings will hold back performance.
If you want to go even further, then open PowerShell as an administrator (just type its name in the system search). Enter the following code.
powercfg -duplicatescheme e9a42b02-d5df-448d-aa00-03f14749eb61
After this, an additional «Ultimate Performance» mode will appear. To restore the original modes, type the following in PowerShell.
powercfg -restoredefaultschemes
It's also worth checking the CPU usage limit. Without leaving the power settings, click on the link «Change plan settings» and then «Change advanced power settings». Next, go to «Processor power management» and «Maximum processor state». Make sure it is set to 100%.
However, you may want to lower this setting if, for example, you have a less expensive laptop that overheats. In this way, the system will not allow the processor to work at full power.
Activate Game Mode
Windows has a special game mode that optimizes resource allocation for gaming applications. Thus, background tasks will not be able to interfere with the game. Moreover, you won't be bothered by pop-up notifications during gameplay.
To activate it, go to Windows settings, then «Gaming». There will be a section called «Game Mode». Activate the slider. On older versions of Windows, game mode needs to be additionally launched from the game overlay (Win + G).
If you have a weak computer, especially one burdened with numerous background processes, game mode can help. But for weak systems, it's better to close all interfering processes beforehand: do not leave the browser open, unload unnecessary processes from startup. However, if you experience a decrease in performance or other problems, it's better to turn off the mode.
Disable Mouse Acceleration
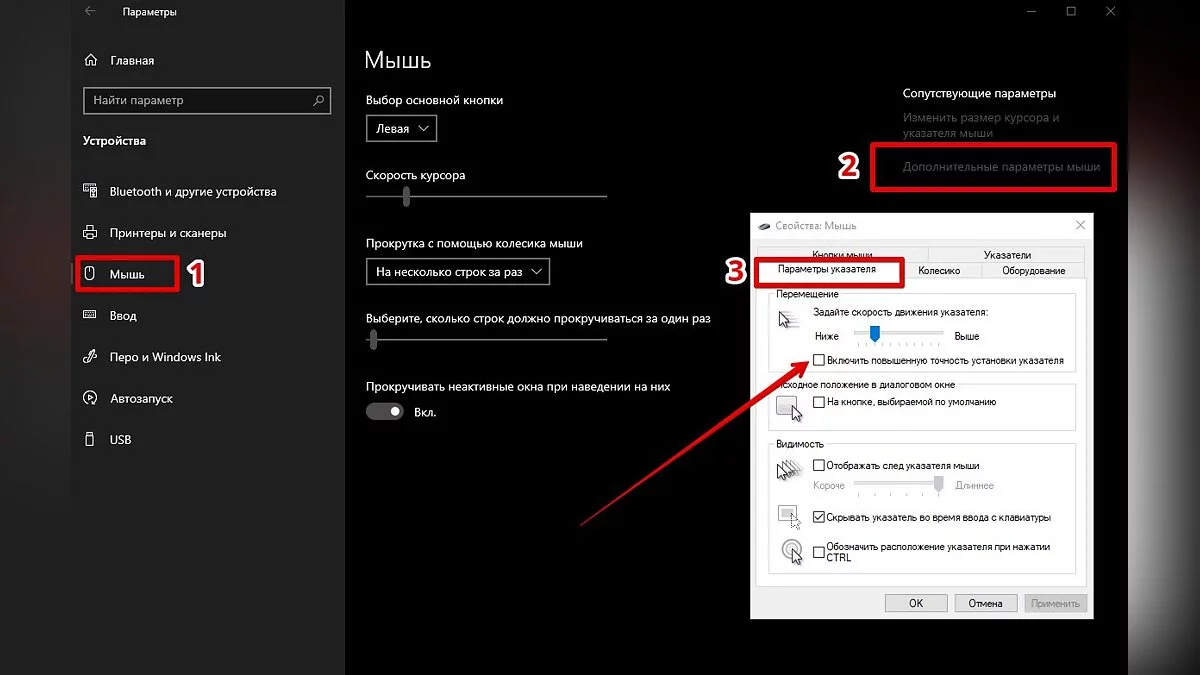
The «Enhance pointer precision» feature is also known as «Acceleration.» Contrary to its name, it can be more of a hindrance in games as it makes the mouse movements unpredictable. However, for everyday use, it might actually be beneficial. It works like this: the faster you move the mouse, the farther the cursor moves. Meaning, a quick flick of the mouse can send the cursor to the other side of the screen. This can be useful when you have a small mouse pad.
Go to Windows settings, then «Devices». On the left side of the screen, select «Mouse» and then follow the link to «Additional mouse options». On the «Pointer Options» tab, uncheck «Enhance pointer precision» if it is checked.
Switch Gaming API
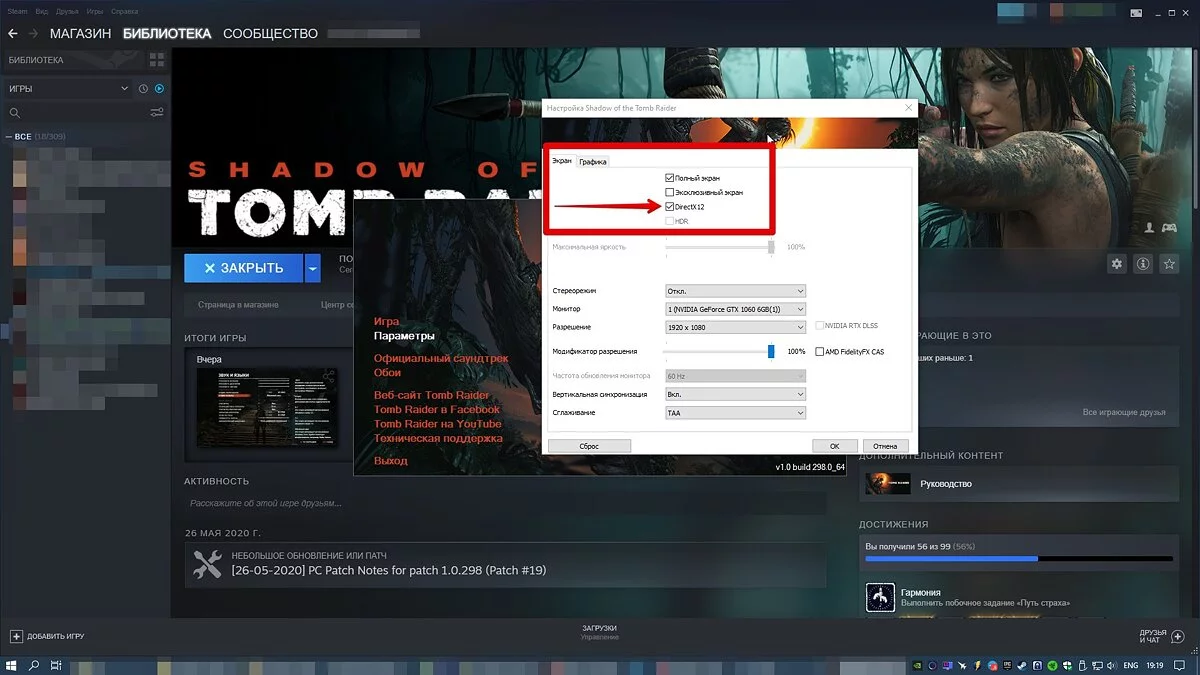
This isn't exactly a Windows setting, but it's closely related to it. It's about DirectX 11 and 12, as well as Vulkan. You can switch the API version in some games that support it. For example, Shadow of the Tomb Raider or Red Dead Redemption 2. Performance can vary across different APIs. For instance, games on Vulkan generally run faster.
- Was die Home- und Pro-Versionen von Windows 11 unterscheidet
- Wie man die CPU-Temperatur in Windows 10 und Windows 11 überprüft
- Wie man die Größe der Auslagerungsdatei in Windows 7, Windows 10 und Windows 11 erhöht
-
How to Increase the Paging File Size in Windows 7, Windows 10, and Windows 11
-
Is Your Processor Running at 100%? Does a Game Load the Processor in Windows 10/11? — Troubleshooting
-
How to Permanently Disable Updates in Windows 10, Windows 11, and Stop Background Application Downloads
-
How to Check Your PC's Specifications on Windows 10/11
-
Steam Not Launching on Windows 10/11: What to Do and How to Fix?
