Optimization of Windows 10 and Windows 11: how to speed up the system

The Windows operating system is constantly expanding its functionality. It seemed that version 10 had already reached its maximum, but Windows 11 has shown a completely new level of user interface. Unfortunately, innovations affect the performance of PCs. In this guide, we will analyze in detail the main ways to optimize and speed up the work for both operating systems.
How to regularly restart and update
Windows operating systems are very different from macOS and other analogs. No matter how powerful your computer is, do not abuse the Sleep mode, it is better to completely turn off the machine, and after installing new programs, regularly restart. This is useful and helps Windows optimize its work on its own, without making significant changes to the functionality.
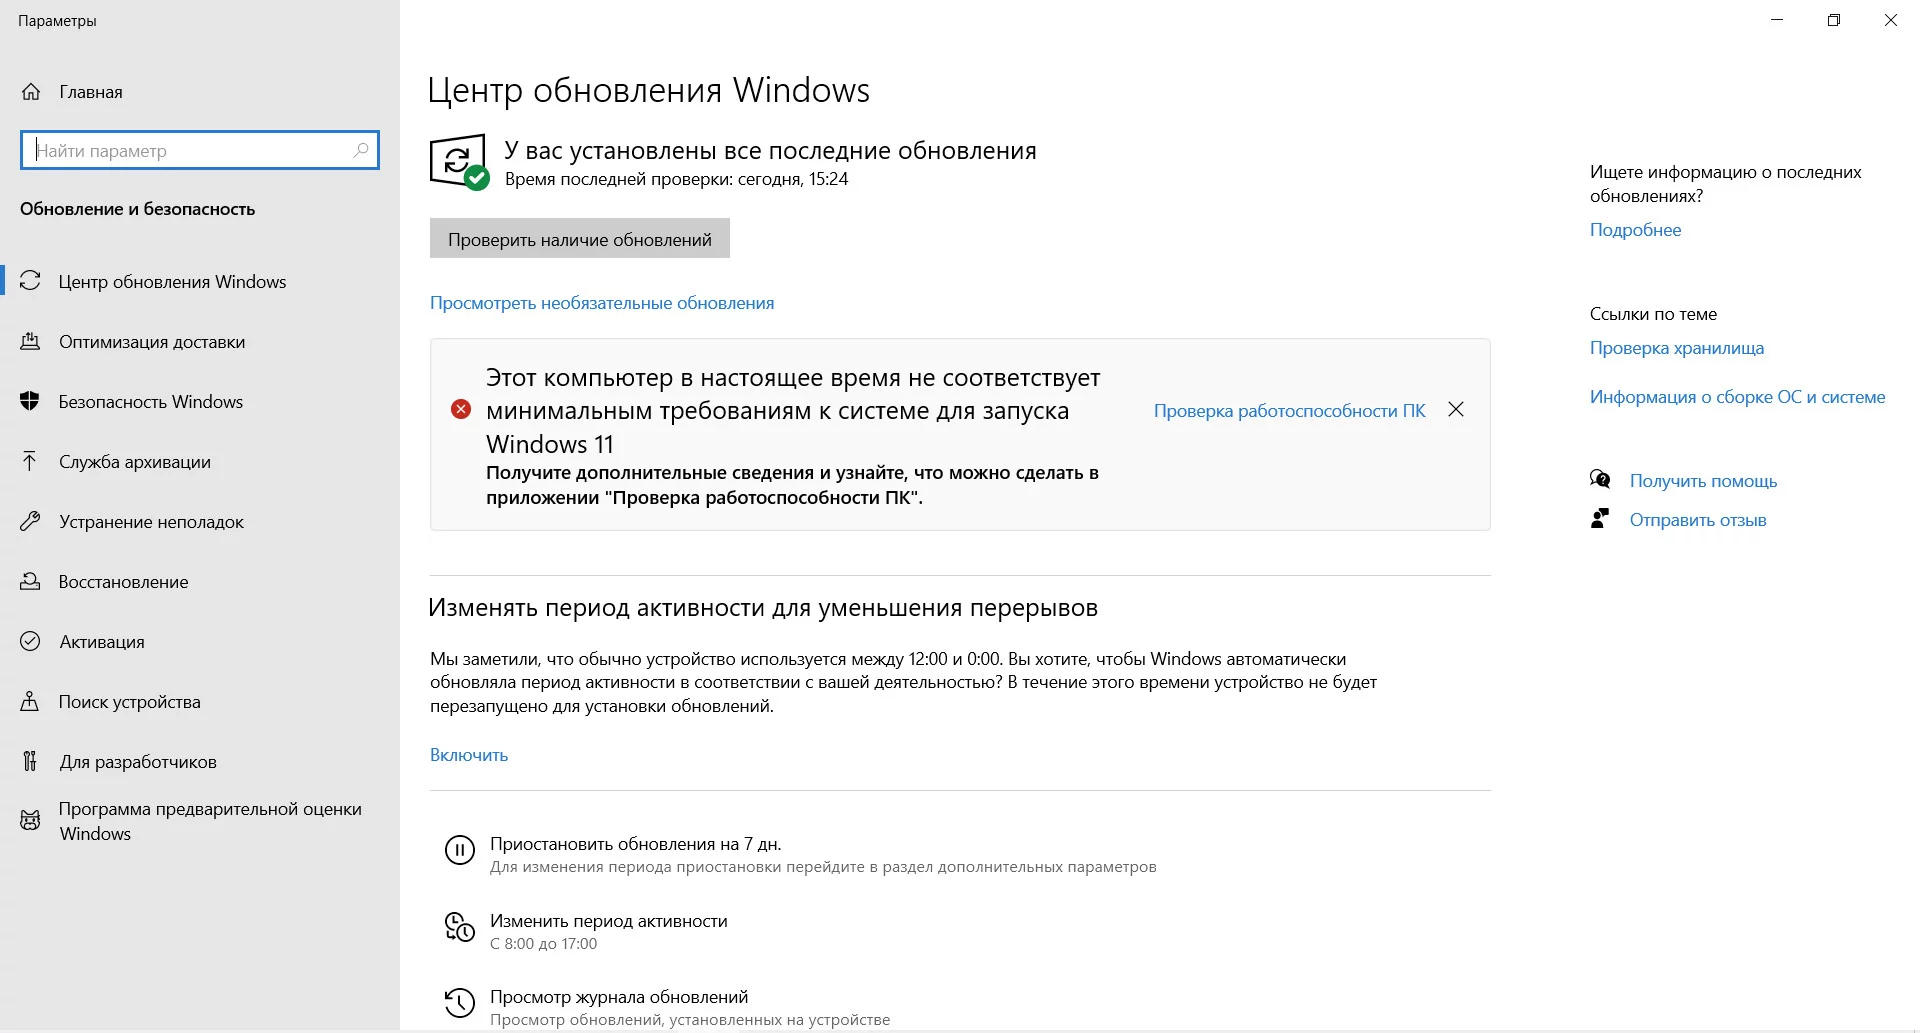
Also, regularly check the update center. This rule is equally applicable to both version 10 and version 11. Go to the menu Settings, Windows Update and Check for updates. Regular updates, of course, can make unpleasant changes to your usual work, but in most cases, they help to significantly improve the performance of the entire system, making it more stable and secure.
How to regularly update drivers
Even a laptop has quite a lot of internal devices, each of which has its own drivers. For the comfortable operation of the system, they should all be the latest version.
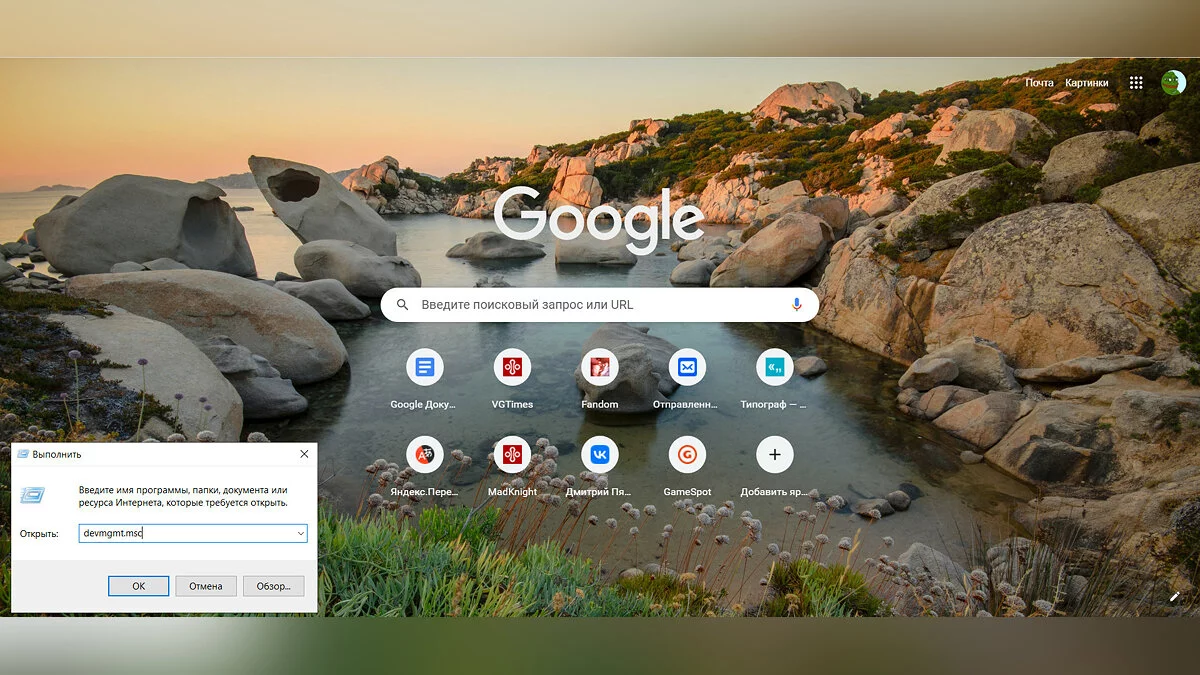
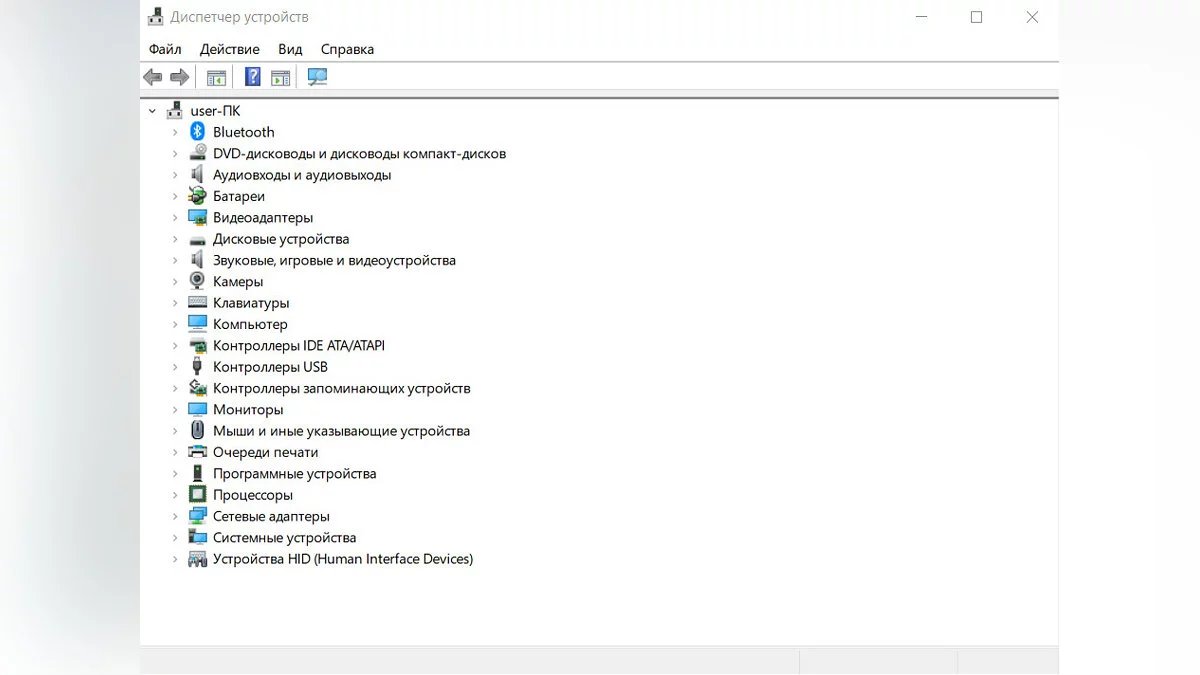
Press the keys Win+R or Run, opening the window with the right mouse button on Start, enter — devmgmt.msc. You will get access to the Device Manager, where all the components of the computer are displayed. By selecting the desired device, you can check for updates to its drivers and, if necessary, download them directly from the Internet.
How to use the Windows performance troubleshooter
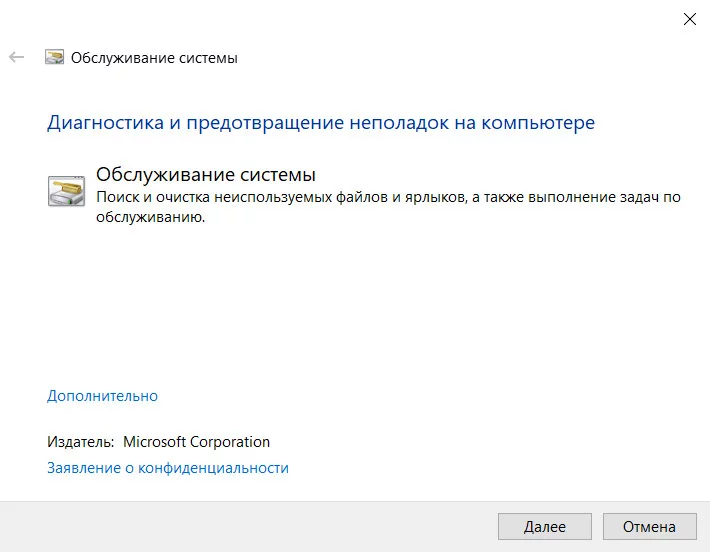
Another way that works equally well on Windows 10 and 11. Right-click on Start, select Run and in the dialog box enter the command: %systemroot%\system32\msdt.exe -id MaintenanceDiagnostic. As in the previous point, the dialog box can also be opened with the key combination Win+R.
After entering the command, the troubleshooter wizard will appear. Click Try troubleshooting as an administrator. The utility will analyze the system's operation and offer options for solving the problem. Use this method immediately when you notice something unusual or strange in the operation of Windows.
How to remove unnecessary programs and applications
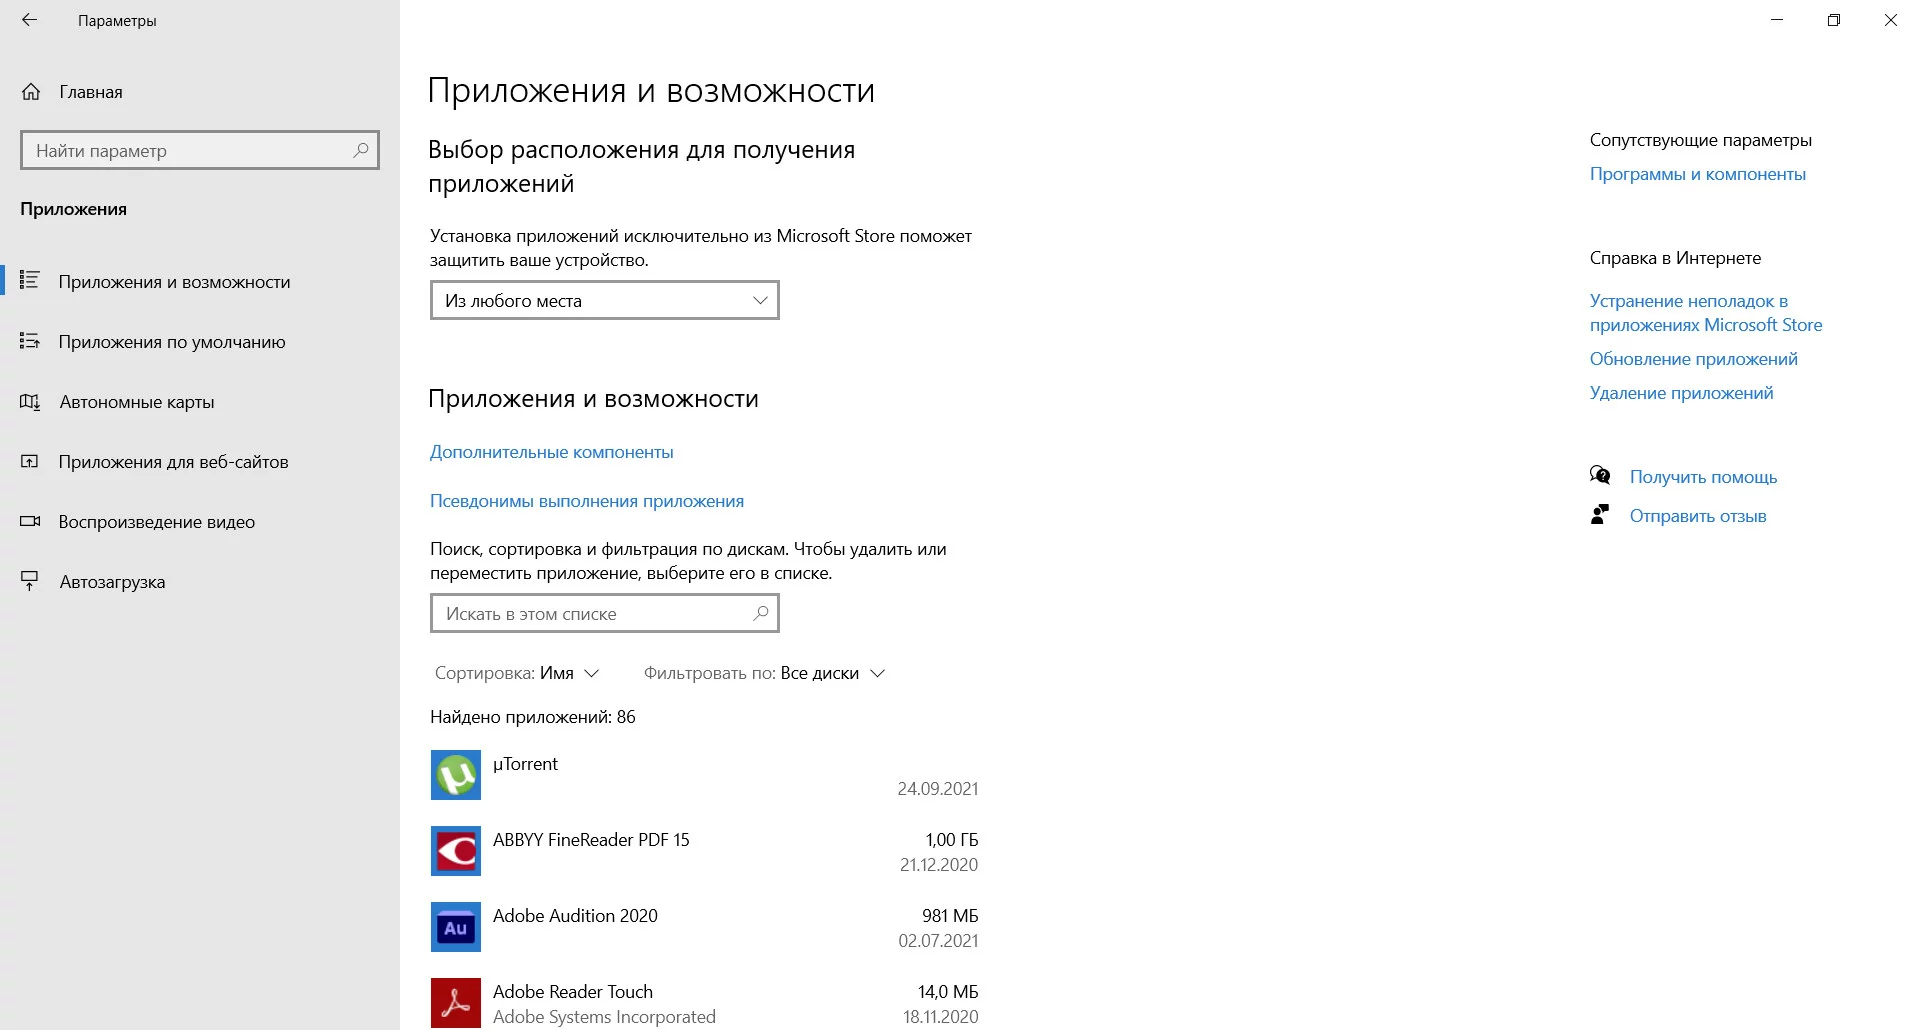
It is worth regularly checking your computer for unnecessary programs. They may weigh little, but they launch background processes and send statistics. To view the availability of applications, you need to right-click on the Start button to open the context menu and select Apps and Features.
There is another way. Use Win+R to open the panel and enter the combination appwiz.cpl. You will get into the Programs and Features menu. Here you will find absolutely everything that is currently installed on the PC. By selecting a program, you can easily remove it.
How to delete temporary files and enable storage sense
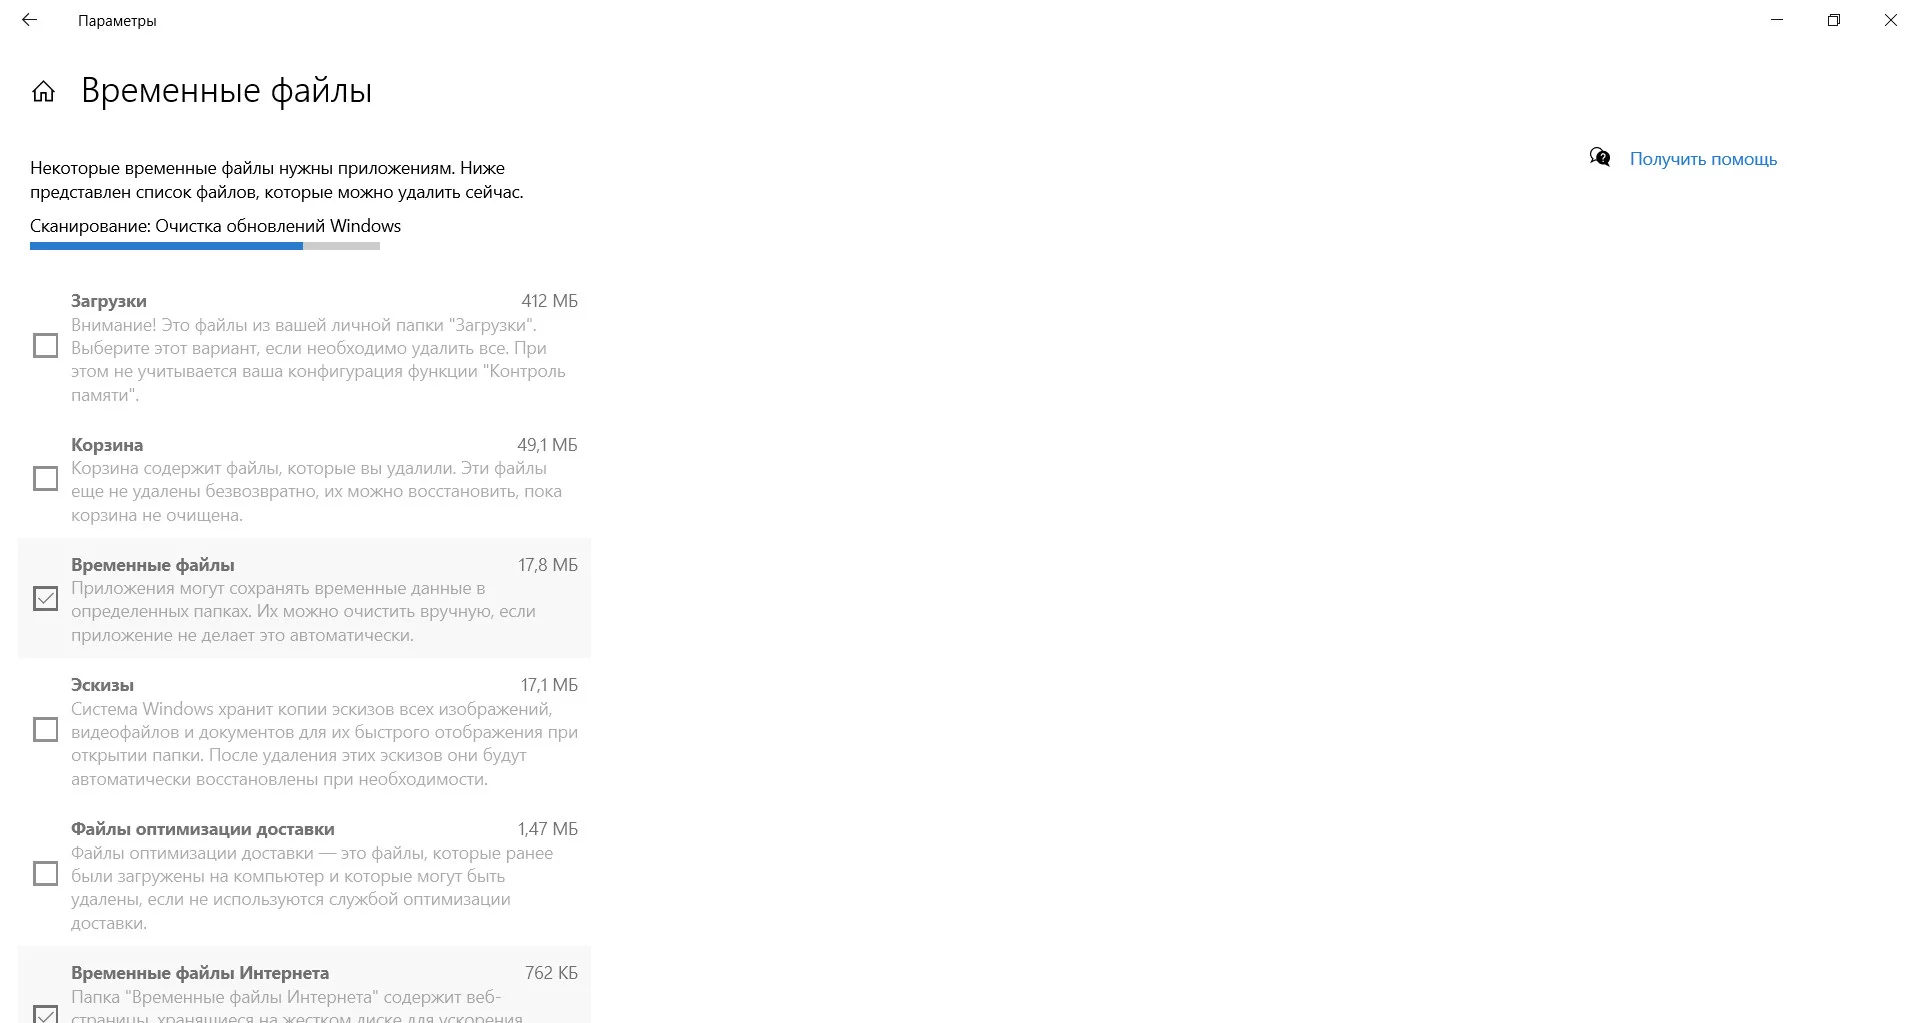
Temporary files include a wide variety of information: downloads, cache, update logs, and much more. It is also recommended to delete them. Open Settings from the Start menu. In the System section, click on Storage. Find Temporary files and select the ones you need to delete.
Unfortunately, this method is not universal — many temporary files can only be deleted manually. Various additional programs, such as WinDirStat or TreeSize Free, can help with this.
The last thing that can be recommended is the storage sense function. You can find it in the same Storage section. With this setting, you can determine the schedule for deleting temporary files and the conditions under which it will happen automatically.
How to disable the auto-start of programs and applications
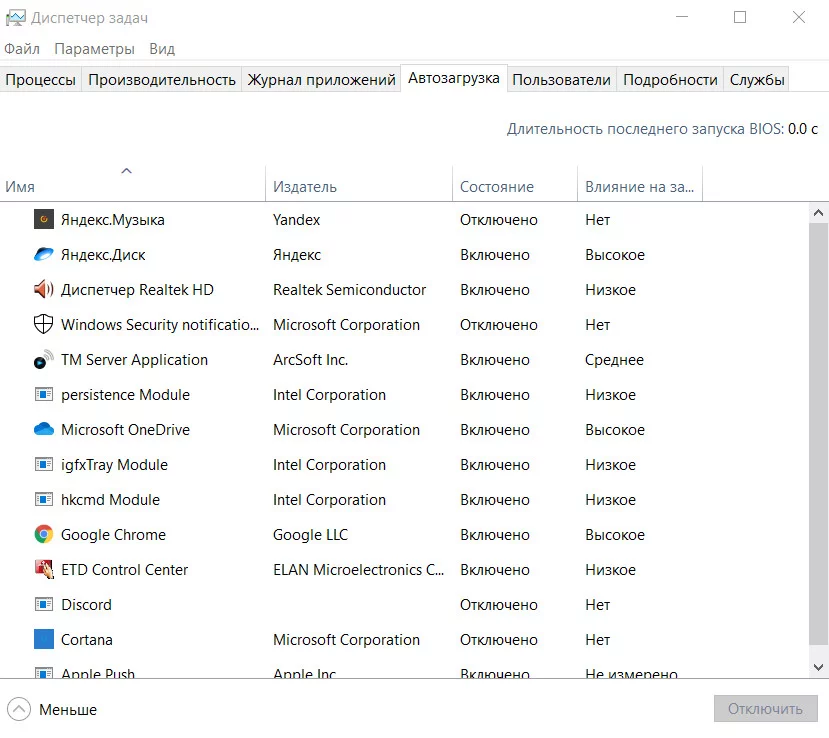
Many programs automatically start with Windows by default, which leads to a slowdown of the system. Fortunately, it is quite easy to fix this inconvenience. You need to open the Task Manager. There are several ways to do this: right-click on the Start menu and select the appropriate section, or use the key combinations Ctrl+Shift+Esc or Ctrl+Alt+Delete.
When you first open the task manager, click on the More details button. Here you will easily find the Startup tab. By opening it, you can disable many programs that slow down the system.
You can do something similar with applications. Open Settings and find the Apps section. There, click Startup to see applications with the active function. You can disable it with one click.
How to increase the paging file
Increasing the paging file will help compensate for the lack of RAM. This is one of the easiest ways to speed up the operating system.
How to configure the power scheme
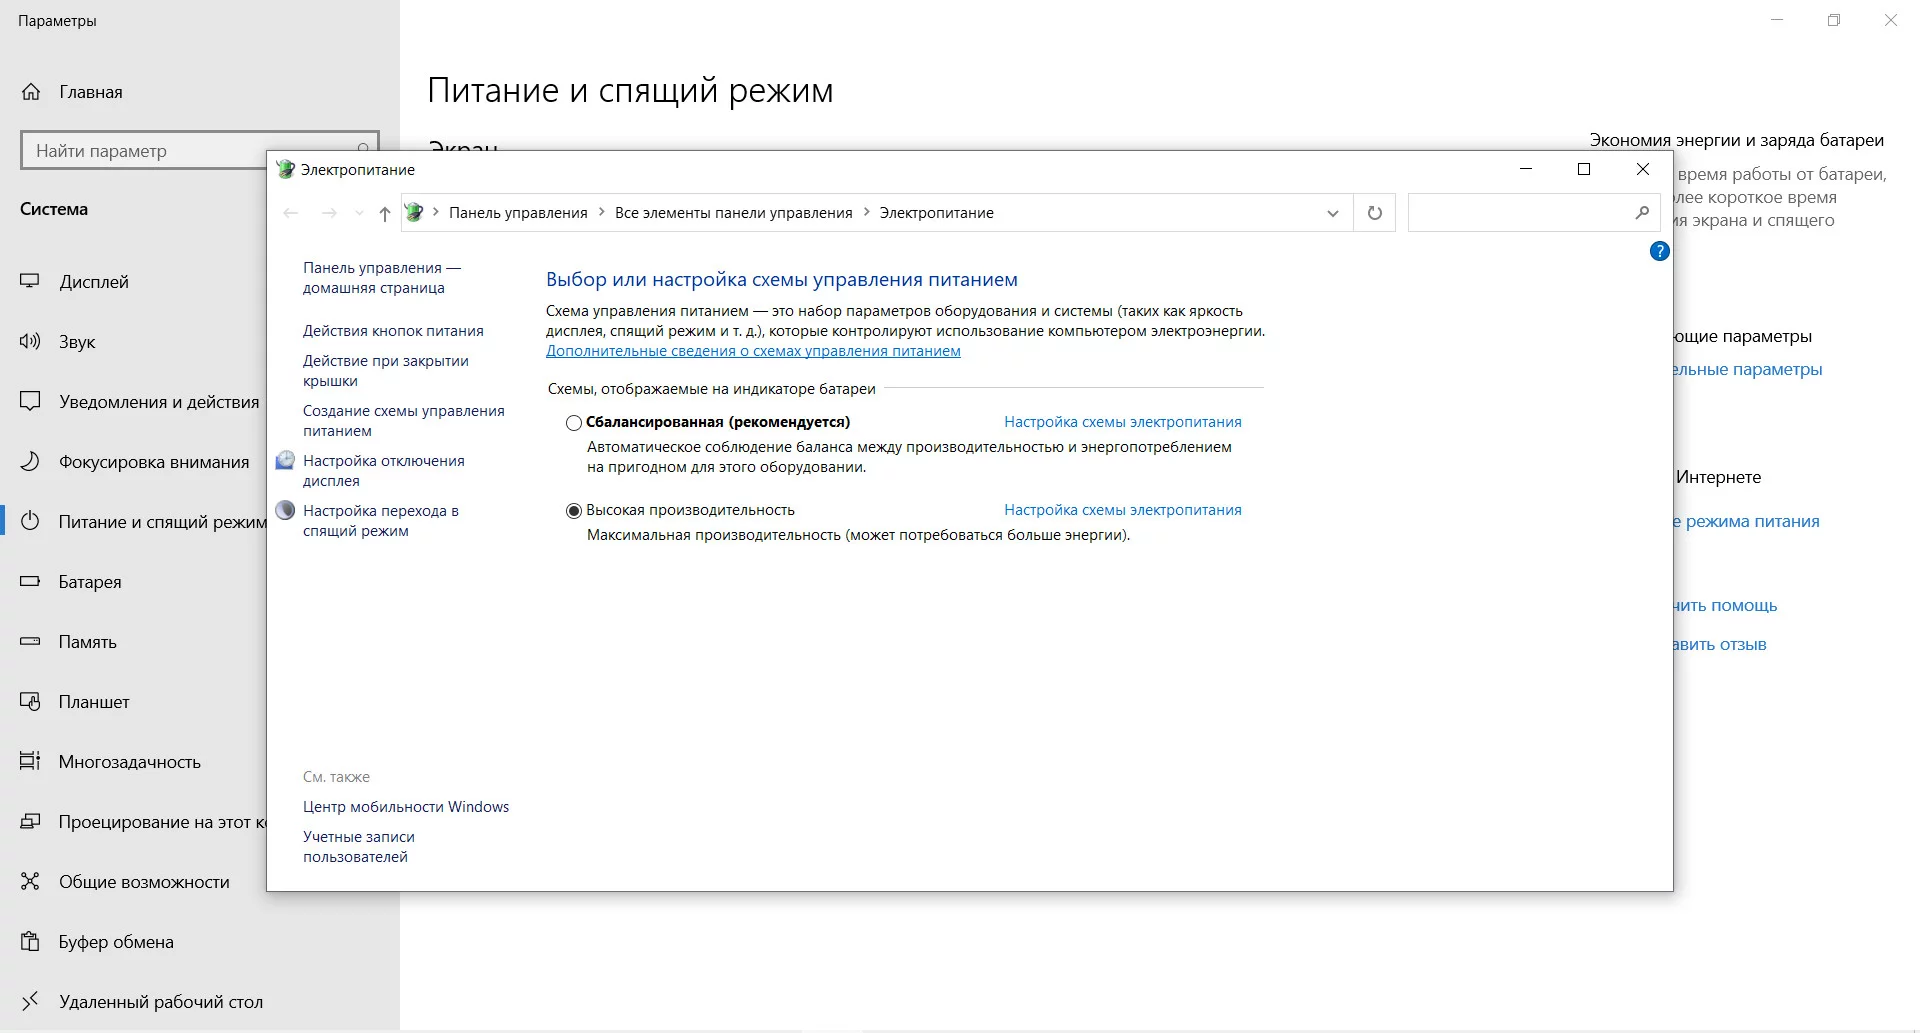
Most modern PCs and laptops have three power consumption modes: performance, power saver, and balanced. If you want to increase the computer's performance, feel free to choose performance.
On Windows 10, in the Settings window on the Power & sleep tab, there are Additional power settings. Select High performance.
If you have Windows 11 installed, the sequence of actions is roughly the same. Open Power & battery in the system settings, click on Power mode, and select the Best performance option. If the mode is unavailable, you can create it yourself using fine-tuning of power settings.
For laptops, you can also change the power scheme through the Windows Mobility Center.
How to disable background apps
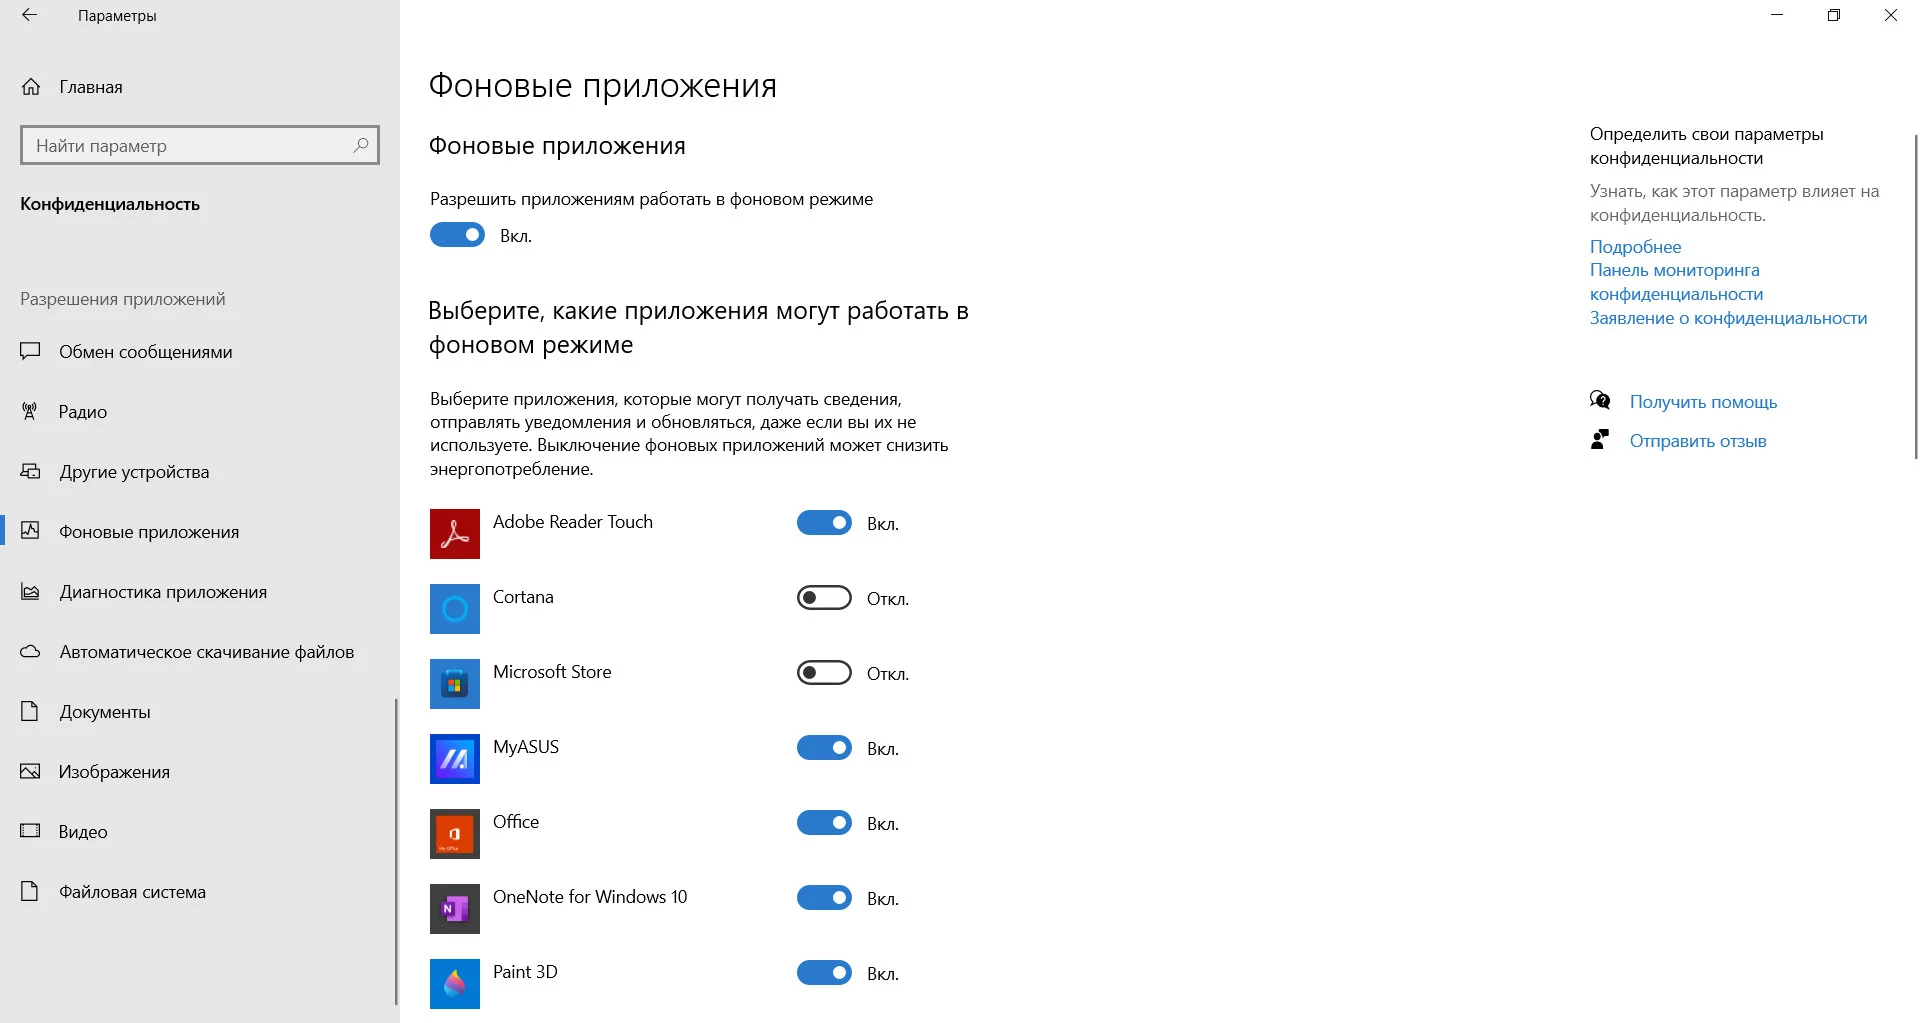
Background processes always affect the PC's performance. To disable them, open the Start menu — Settings — Privacy. Find the Background apps tab at the bottom and remove everything unnecessary.
It is important to note that after major Windows 10 updates, some programs will start running in the background again, so check this setting more often.
Unfortunately, in Windows 11, the function to disable all background processes en masse has been removed. To prevent apps from such activity, you will have to open each one separately and view their settings in the Apps & features section. To do this, hover over the three vertical dots to the right of the app — Advanced options. Note that not all apps will have these options available.
You can disable all background processes through the registry or group policy editor, but these methods are not very reliable and can lead to system problems.
How to disable visual effects and transparency
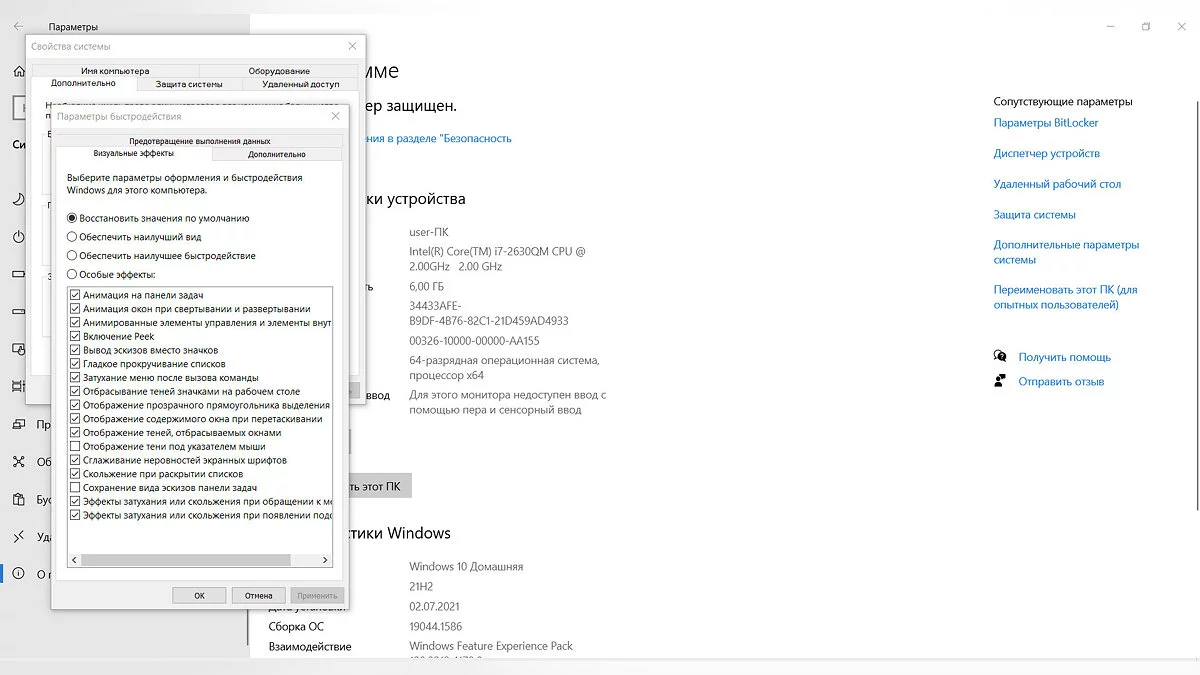
If you are firmly aimed at increasing speed, it will not be superfluous to disable various visual effects. To do this, you will need to open System Properties. As always, this can be done in several ways.
The first is to use the Win+R combination and enter control /name microsoft.system without quotes.
The second way:
- Open System through settings and select About (About system in Windows 11) — Advanced system settings.
- In the window that appears, again select Advanced and Performance.
- Set the option to Adjust for best performance.
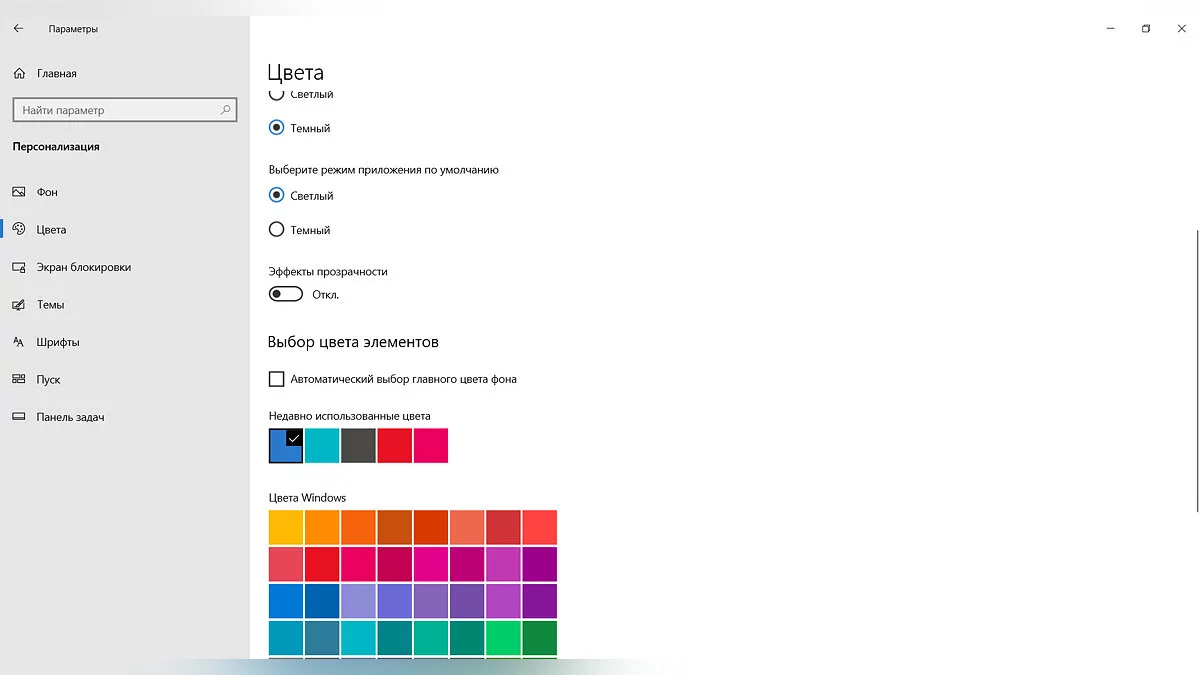
Additionally, you can disable transparency effects in the Colors section by selecting Personalization.
How to disable sleep mode
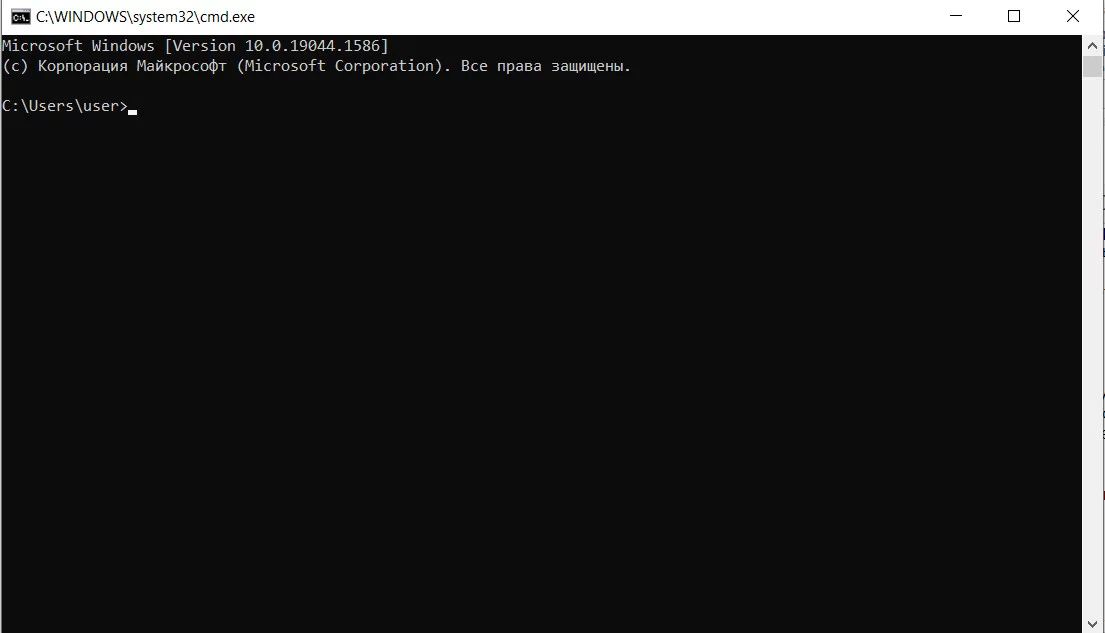
In sleep mode, the operating system uses minimal resources but continues to operate. Most often, this mode is only useful for laptop owners. Sleep reserves a large amount of disk space and, naturally, consumes system resources. The easiest way to disable it is through the command line. Press Win+R and type cmd. The command line will open, where you need to enter powercfg –h off without quotes and press Enter.
There is a less radical way as well. In the System section, open the Power menu. There you will find sleep mode settings — it is better to disable it by setting the value to Never.
How to disable notifications and the Tips and suggestions function
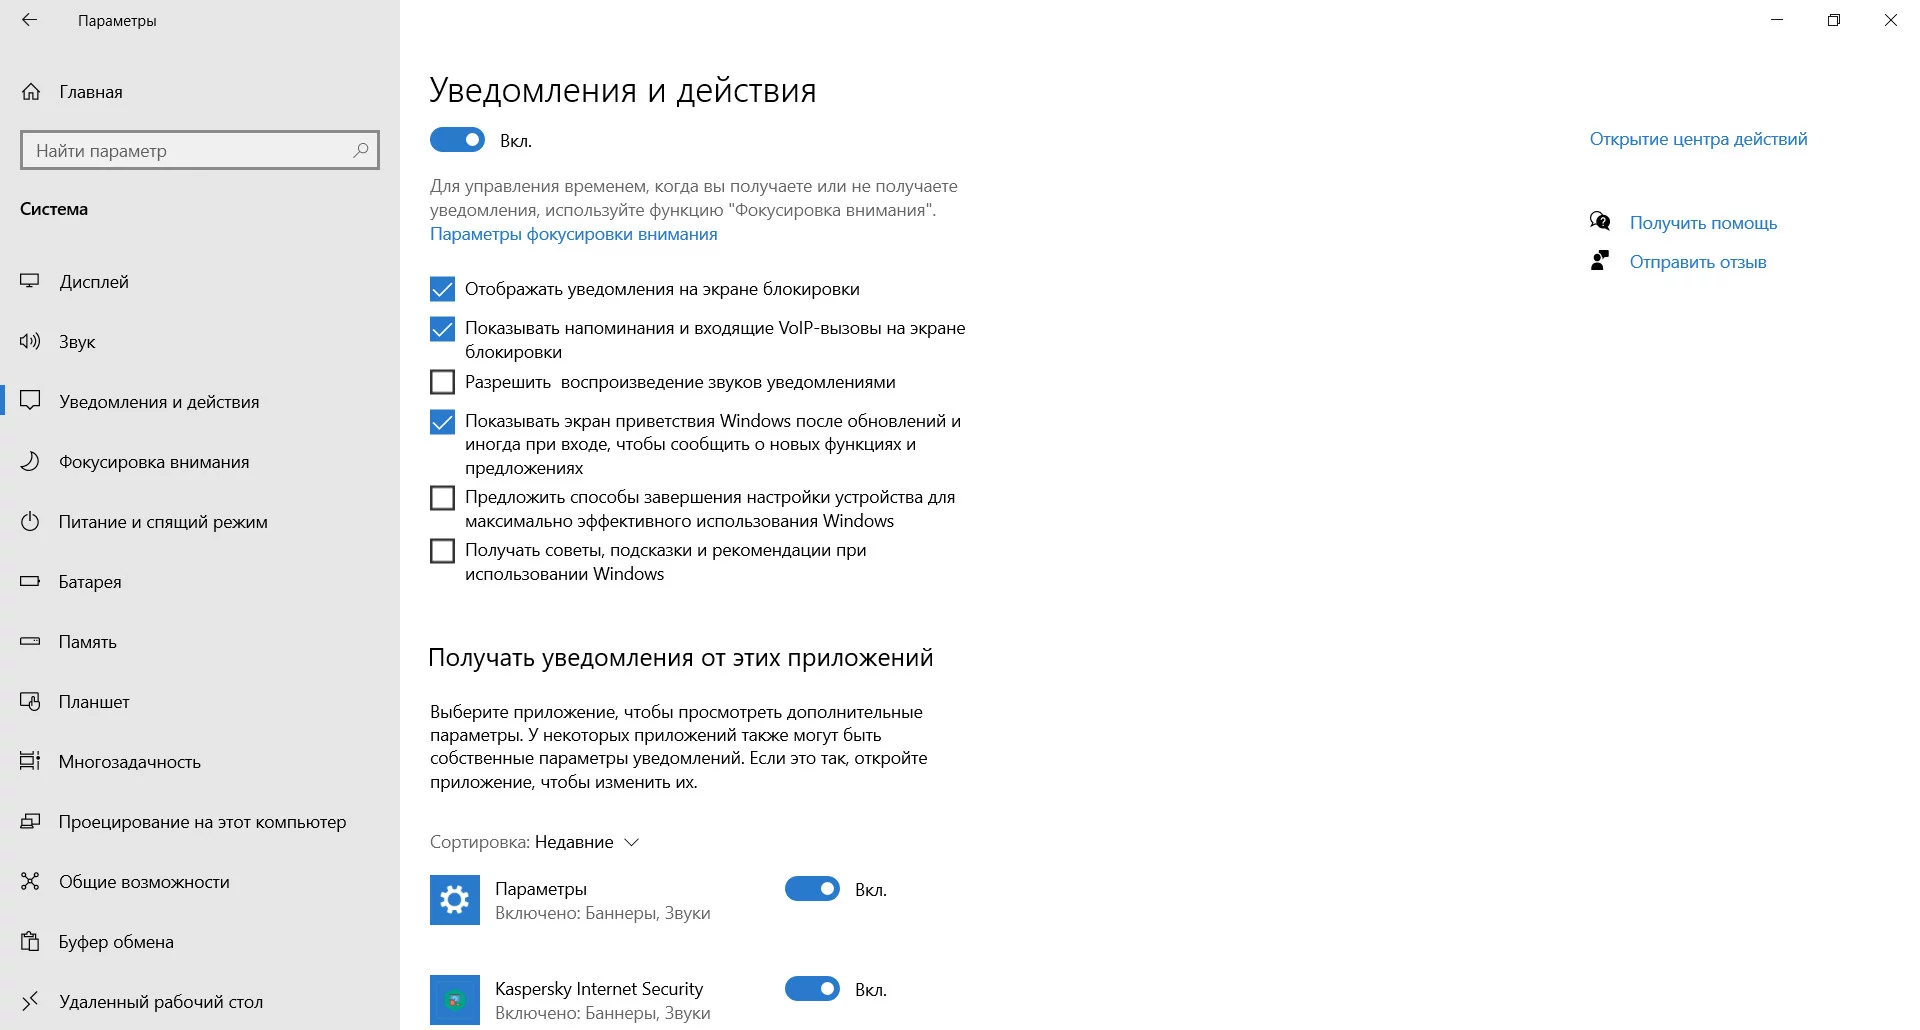
A large number of notifications from various applications not only irritate but also load the operating system. Fortunately, on Windows 10 and 11, it is equally easy to disable them. Open System, then the Notifications section. Consider which messages you do not want to see, otherwise, you risk missing something important.
In the same Notifications, you can find the Get tips and suggestions as you use Windows item. When this function is active, the computer will periodically initiate scanning, which, naturally, will affect system performance.
How to disable disk indexing
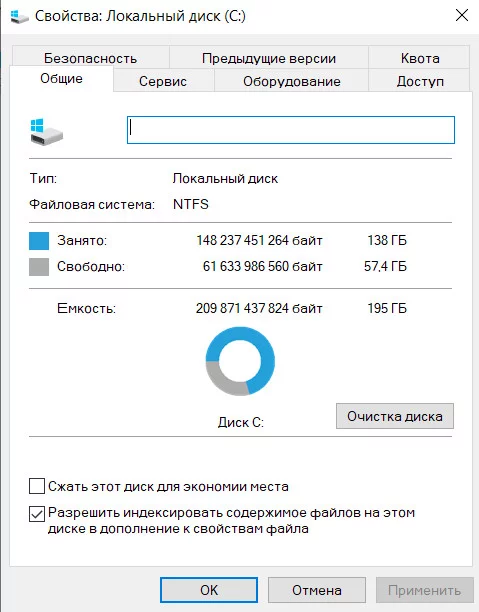
Disk indexing is necessary for faster searching on the hard drive. If you disable this service, searching for a photo, document, or any other file will take a bit longer, but the system itself will become faster.
To disable it, open Computer and right-click on your disks. In the context menu, select Properties and uncheck Allow files on this drive to have contents indexed.... In the subsequent dialog box, select Apply changes to this folder only.
How to disable system restore
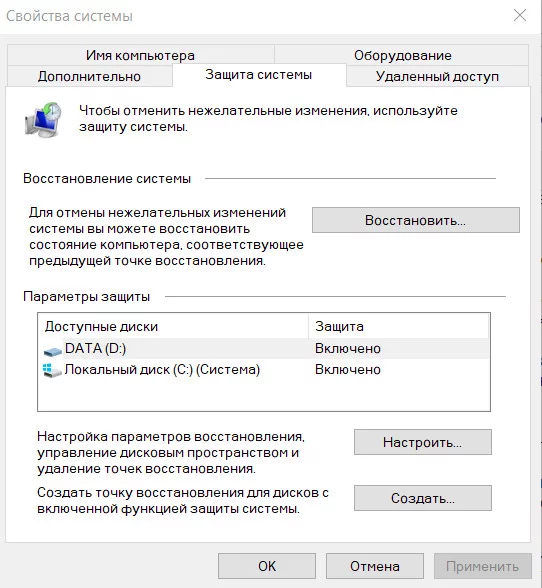
This option is not suitable for everyone. By disabling system protection, you effectively lose a safety net in case of critical failures. Open System — About (About system in Windows 11) — System Protection.
In the window that appears, click on the Configure button and select Disable system protection. Here you can also delete previous restore points by clicking the corresponding button.
How to disable OneDrive startup and synchronization
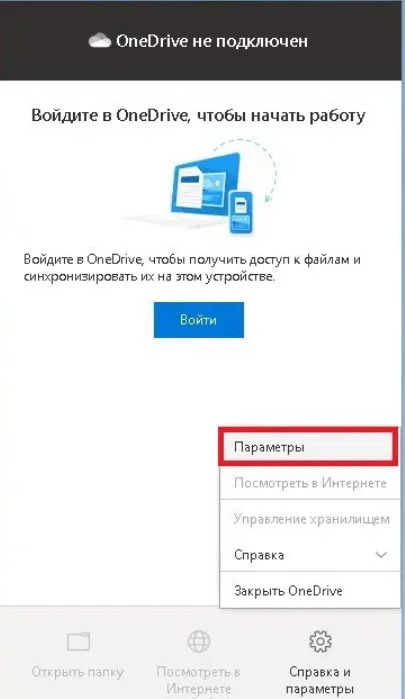
OneDrive is a cloud storage service from Microsoft that allows synchronizing selected files on Windows devices. If you only have one computer, this function is pointless.
By default, OneDrive appears as a cloud icon in the hidden icons area at the bottom right of the desktop. Click on it and select the Help & Settings option, then Pause syncing. Set the desired time if you want to do this for a certain period.
To completely disable OneDrive, click on the Settings item in Help & Settings in the app. In the settings panel, go to the Account tab, then click Unlink this PC. You should also uncheck the Start OneDrive automatically when I sign in to Windows option.
How to regularly defragment and optimize disks

Hard disk space is not static and requires defragmentation and optimization over time. If this is not done regularly, Windows' interaction with the disks will be hindered.
Usually, the defragmentation process occurs automatically and does not require regulation. However, sometimes it is worth checking the settings. Go to System. Then click on the Storage section. Select Other storage settings, then Optimize Drives.
In the window that opens, the status of the hard disk optimization and frequency will be displayed. If Scheduled Optimization is disabled, click the Change settings button at the bottom of the panel. Check the Run on a schedule (recommended) option and choose the frequency. The optimal option is Weekly.
You can apply defragmentation to each available disk. This will take some time.
How to disable User Account Control (UAC)
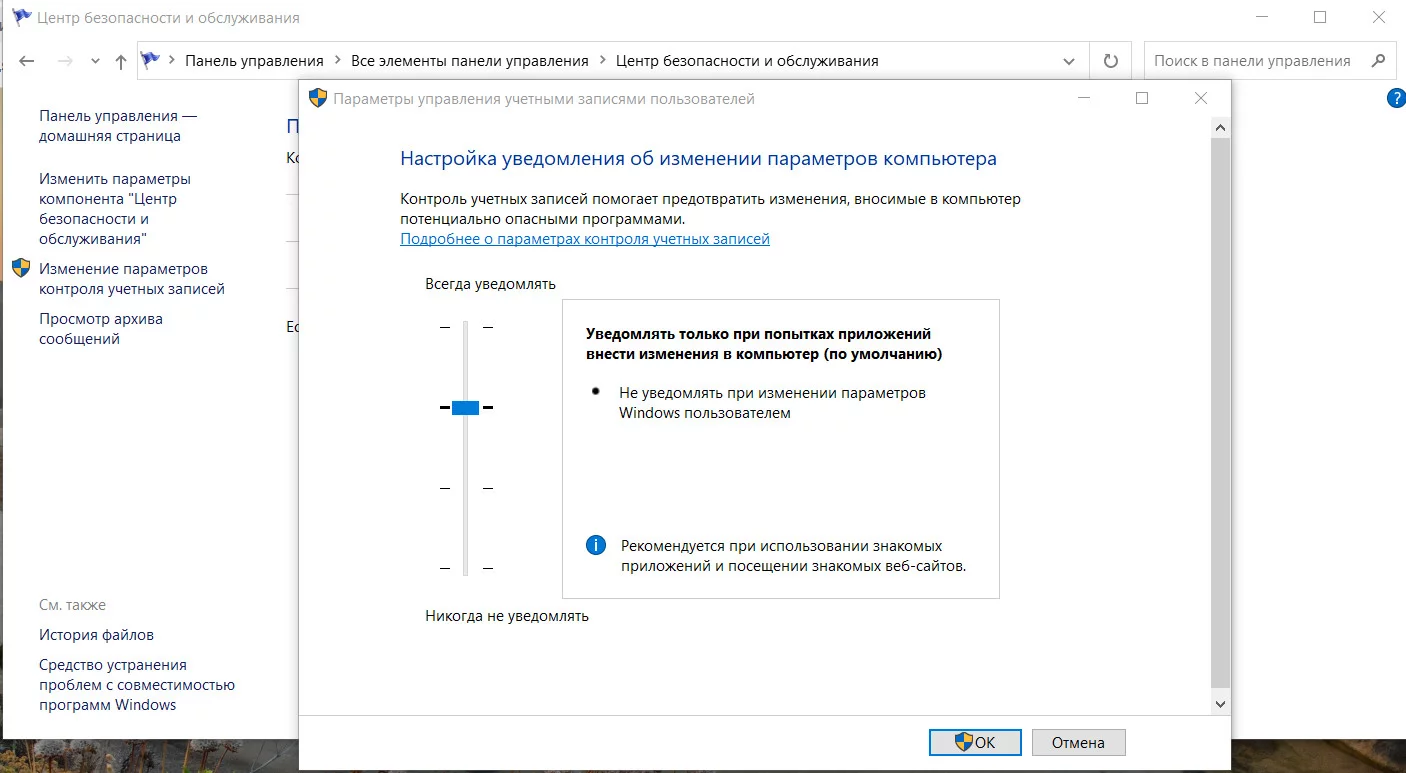
User Account Control, or UAC, enhances user security and restricts access for third parties. The system regularly asks if the user is sure about opening a file.
For home use, most people only need antivirus software, and extra notifications are just distracting. To disable UAC, type Control Panel in the search menu and then click Security and Maintenance. Find Change User Account Control settings. A window with a slider will appear, which you need to move down and click OK.
How to disable Enhanced Search
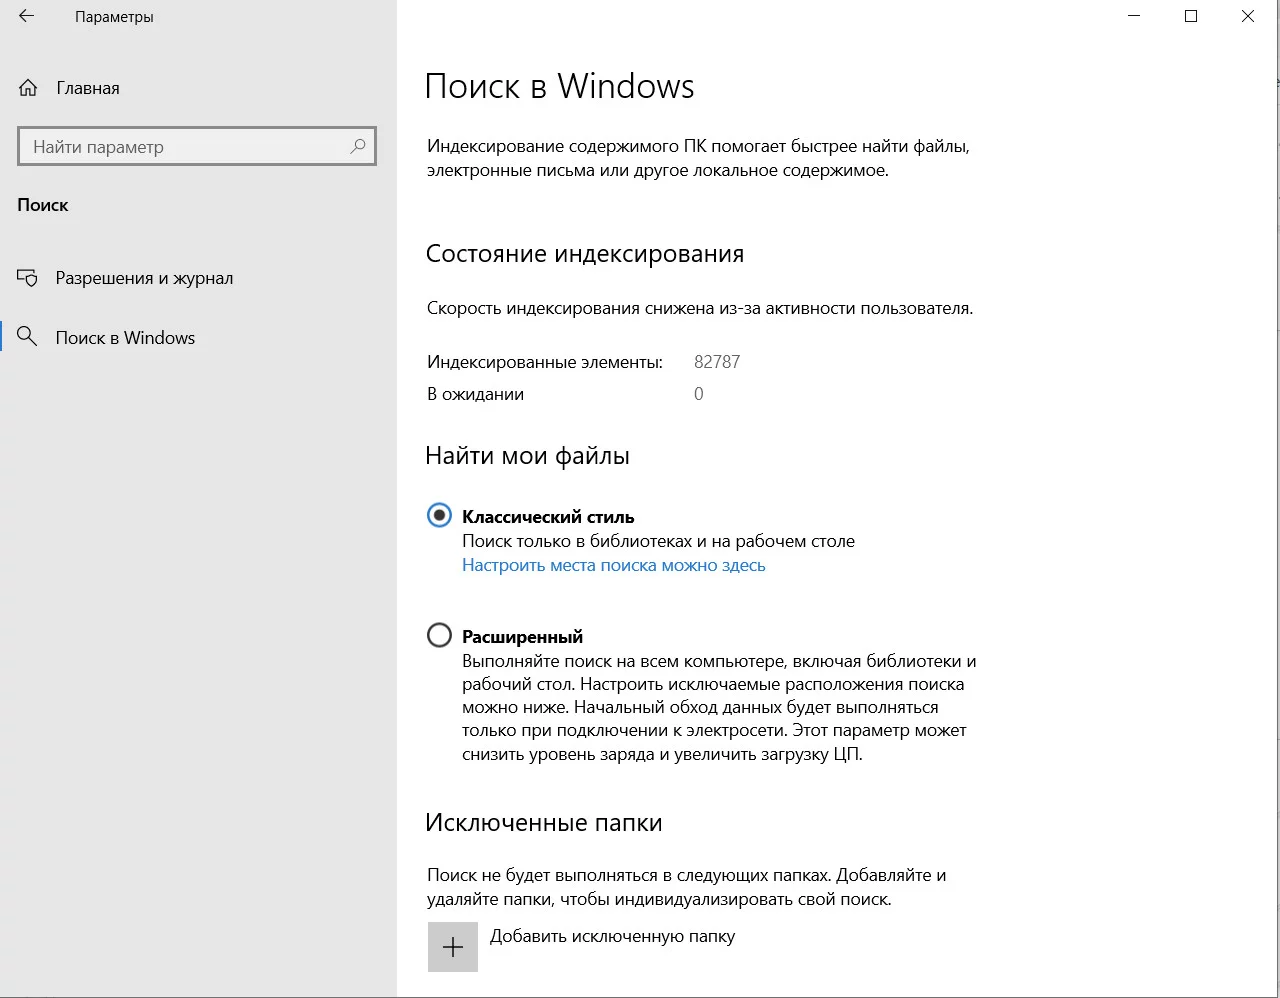
Searching for the desired file by keyword is a very useful feature. However, when this process is running, the system consumes additional resources. To solve the problem, you need to disable Enhanced Search. This works the same in both Windows 10 and Windows 11. Disabling it does not mean that you will not be able to use the feature at all. Search will be performed only on selected disks and folders, which will positively affect performance.
To disable Enhanced Search, open Settings and select Search — Searching Windows. Now click on the Classic option in the Find My Files section.
In this mode, the Documents, Pictures, Music folders, as well as files and icons on the desktop, are enabled by default. You can also add your own folders for search by clicking Customize search locations. The more different folders you have, the more the processor is loaded during the task.
How to disable Xbox Game DVR and Game Mode
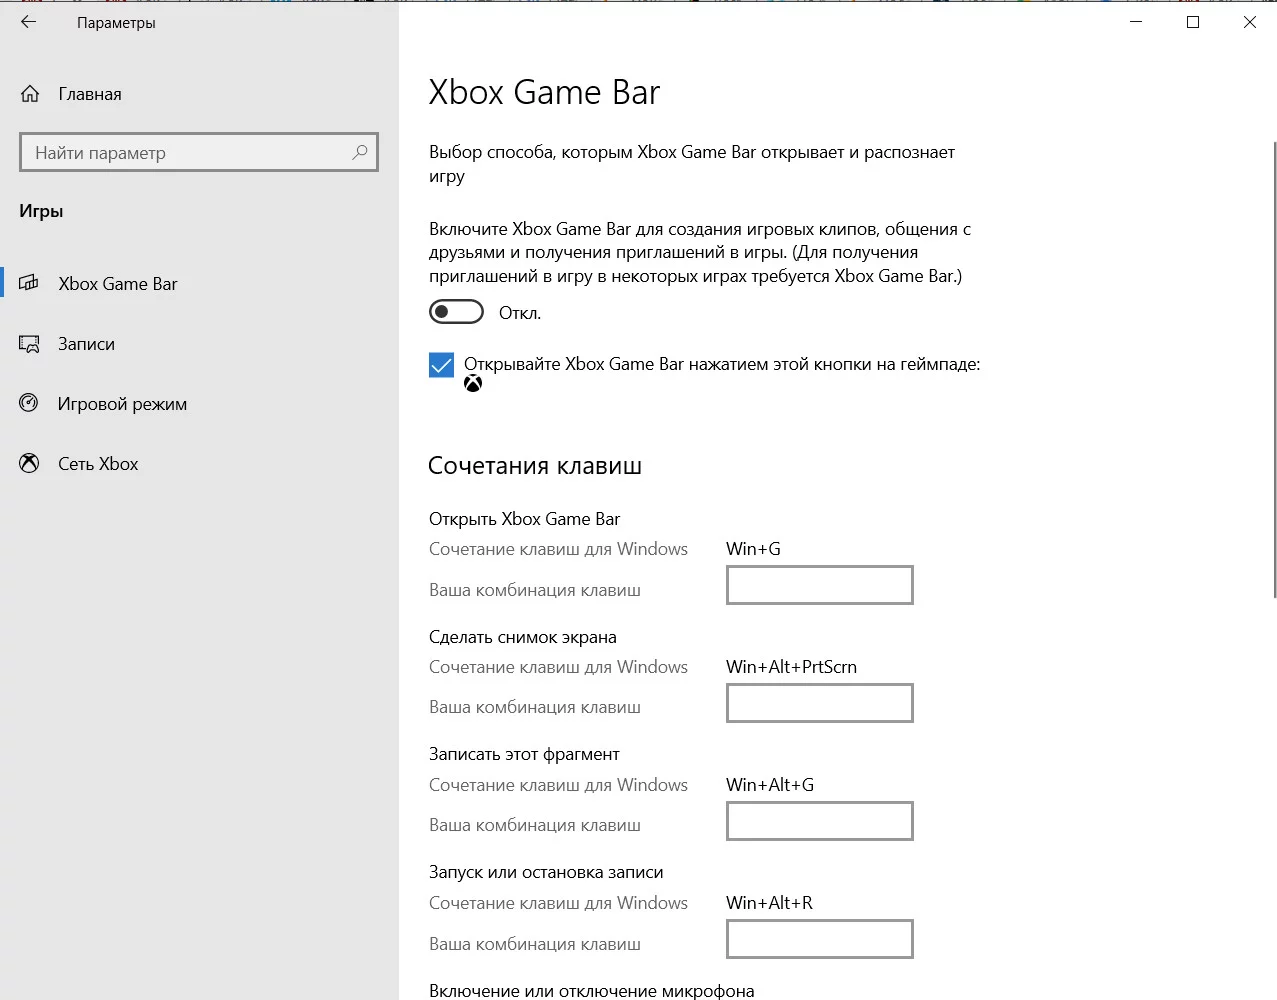
The built-in Game DVR app allows you to record gameplay videos automatically, significantly reducing performance.
Open Settings, then the Gaming section. Find Xbox Game Bar and turn off the Record game clips, screenshots, and broadcast using Game Bar option. This is a temporary solution and the feature may be reactivated after the next update.
For reliability, you can also make changes to the registry, but we warn you that such manipulations can lead to system errors, so proceed at your own risk.
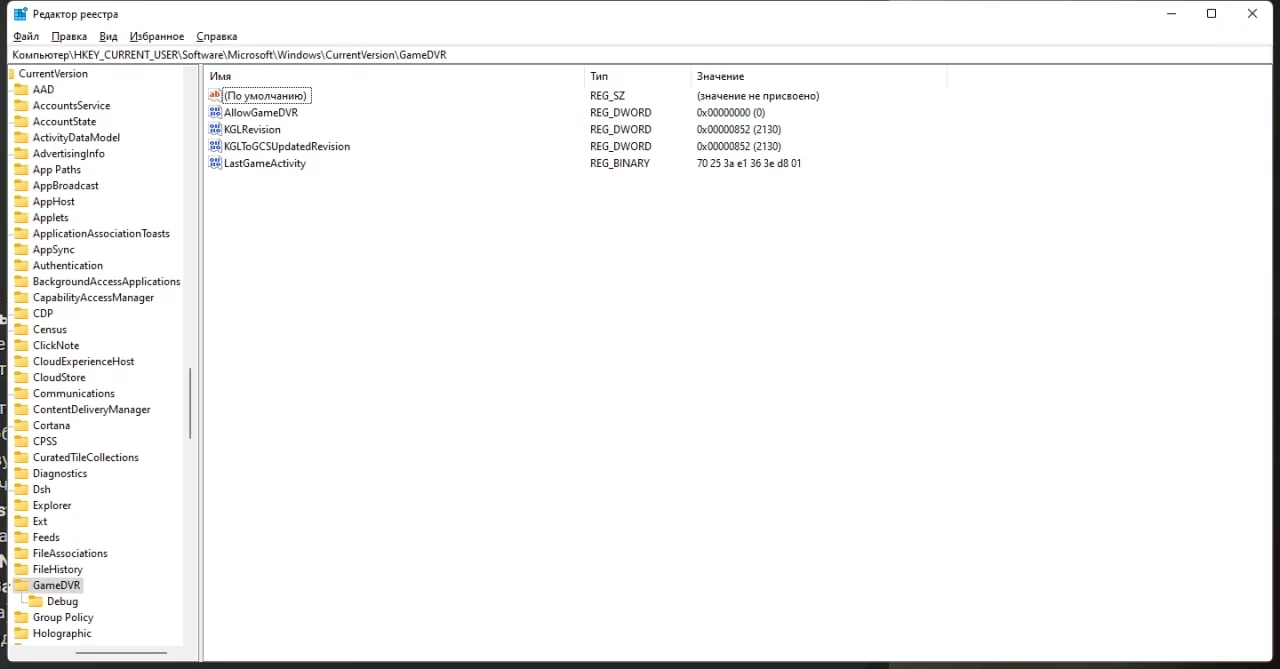
Press the Win+R keys and enter the regedit command to access the registry editor. Navigate to the HKEY_CURRENT_USER\System\GameConfigStore branch and set the GameDVR_Enabled parameter to 0.
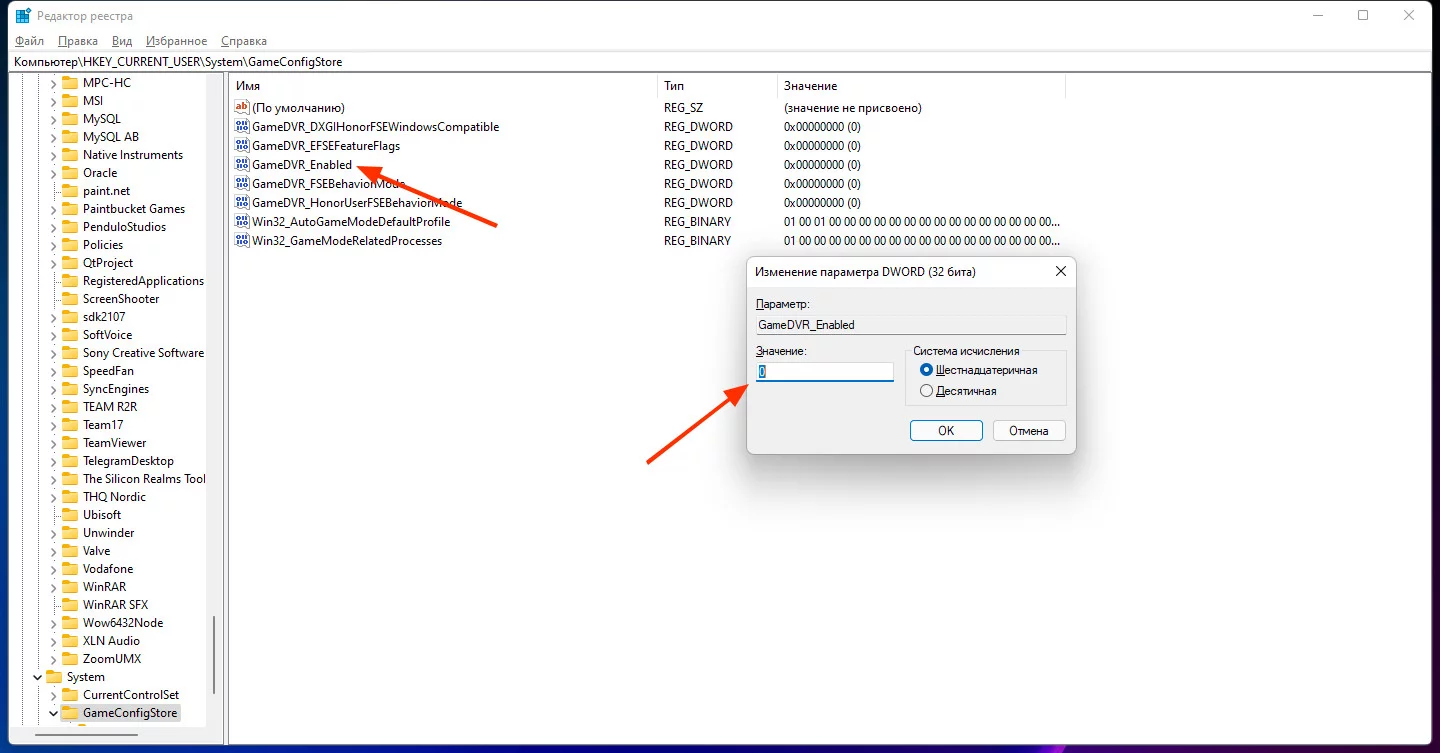
Then, navigate to the HKEY_CURRENT_USER\Software\Microsoft\Windows\CurrentVersion\GameDVR branch. If there is no GameDVR section, create it. In it, also create a DWORD (32-bit) parameter, name it AllowGameDVR and set the value to 0.
Enabled Game Mode directs most of the computer's resources to performance in specific processes, such as speeding up downloads or screen recording. However, the overall performance of the operating system decreases.
Open Settings and find the Gaming section — Game Mode. Just turn off the necessary switch and the problem is solved.
How to disable antivirus

This method is not very useful for the computer but will help significantly speed up the operating system's loading. When the antivirus is completely disabled, it is not recommended to go online or visit unknown sites. It is important not to enable multiple antiviruses at once. The programs will start to conflict, causing users to encounter crashes and errors. To disable protection, open your antivirus menu and select Pause protection. This can usually be done temporarily or permanently.
- Eine Lösung für den Zwischenablageverlauf-Fehler in Windows 11 24H2 online gefunden
- Blauer Bildschirm in Windows 10 und 11: So beheben Sie es
- Wie man einen USB-Stick richtig formatiert