
Kingdom Come Deliverance 2: Reckoning Walkthrough
 Vladyslav Shamshurov
There's no more time to wait, so Jan Zizka tasks Indro and Shmuel with heading to the village of Suchdol. Their mission is to procure horses and personally deliver an important message to the lords of Lipa. However, this task is not easy, as the village is literally swarming with Praguers. In this article, we will tell you how to complete the Reckoning quest in Kingdom Come: Deliverance 2.
Find out where Shmuel is
This is an optional task, but it directly affects the game's ending. If you leave Shmuel in the village, you will find his hanged body near the castle in the final quest.
Shmuel is located in a small barn in front of the stable building. Before heading to rescue him, we recommend visiting the tavern and talking to the dying Marquart. How to do this, we have detailed in the next section.
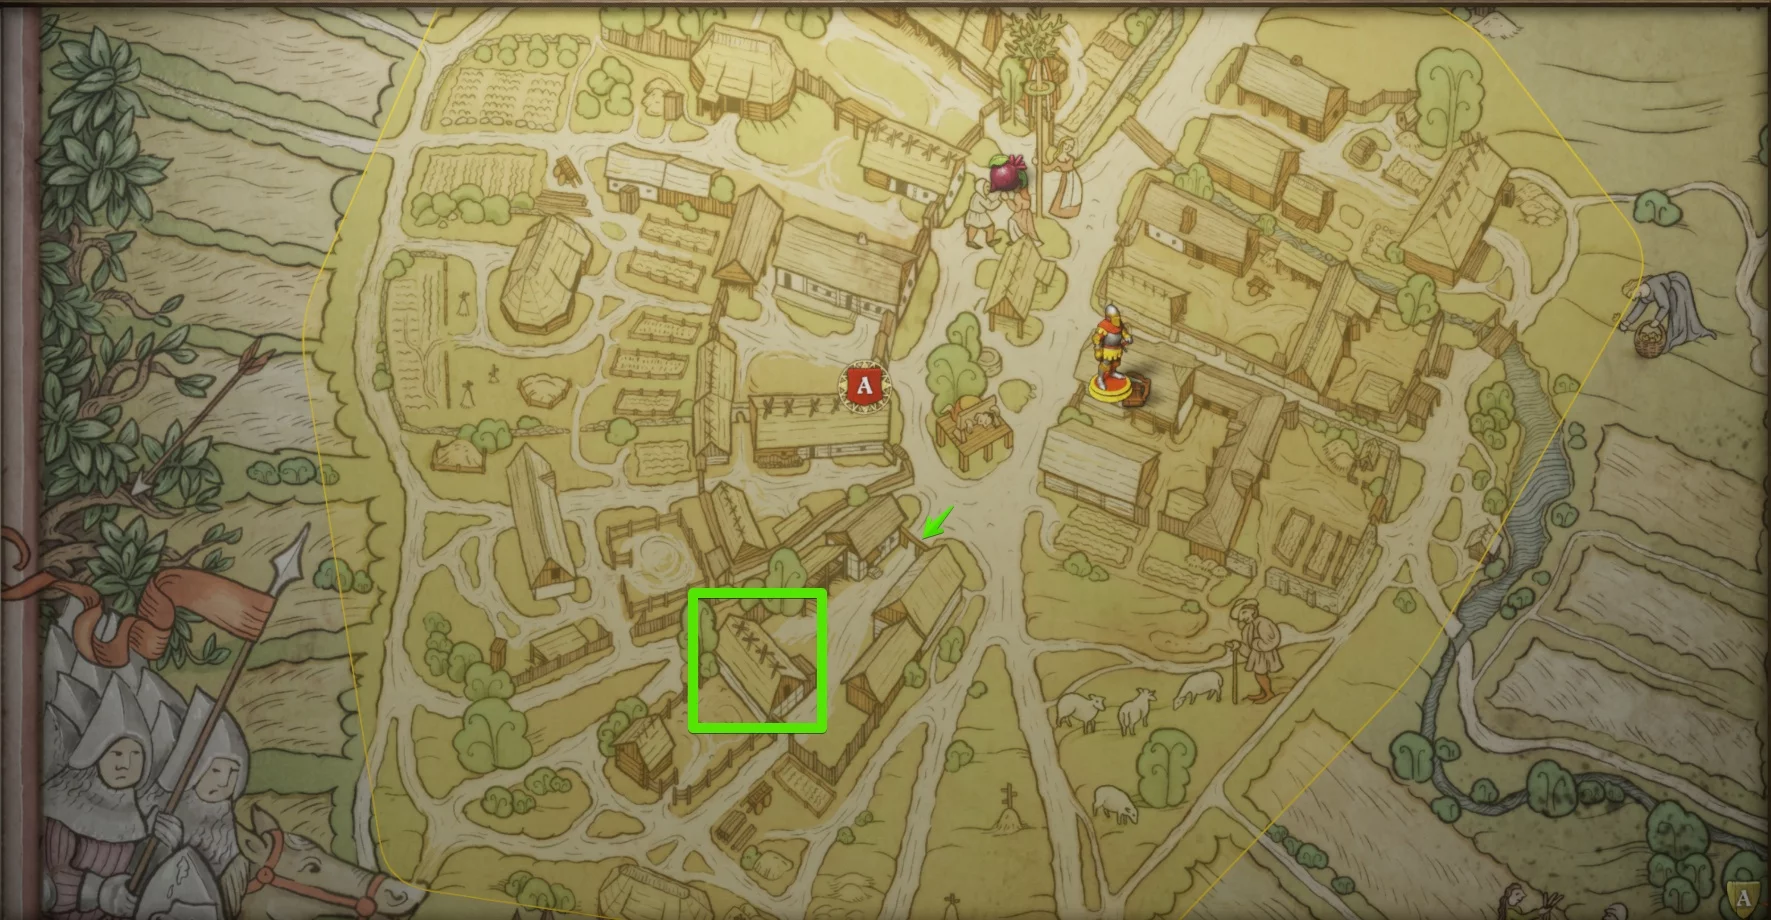
If you have already found Aulitz and are moving from the tavern side, go around it and pass through the tent. There will be several guards here, but they constantly move around, so you just need to get to the other side of the road and enter the yard. However, first distract the enemy here, then kill them. None of the enemies patrol this area.
To get into the barn, use the ladder on the left side. You will also have to choose whether to kill Brambart or spare him. If you choose the latter, he will immediately run for reinforcements and raise the alarm. As soon as you descend from the attic, we recommend making a few headshots to kill him immediately.
Untie Shmuel and decide what to do: leave him or take him with you:
- If you leave him, he will be hanged. In the final quest, you will be able to find his body.
- If you take him with you, in the concluding task, he will fight alongside Indro and other friends for the fortress of Suchdol.
Find von Aulitz in the camp
This is an optional action and initially won't even be on Indro's task list, but completing it will earn you a rare achievement  "Face to Face". You can also choose what to do with this character: kill him (choose the method of killing) or leave him to die. If you leave him to die, in the final quest, another task to find Aulitz's corpse will be available.
Moreover, you will be able to open chests in the room where Aulitz is located and find expensive armor. This is, of course, not very important if you have already completed the entire game, but still a nice bonus.
As we noted earlier, Marquart can be found in the tavern, which is well-guarded. Entering through the main entrance to the courtyard won't work — there are two armed guards here. It's best to get inside through the back entrance. In this case, you will have to deal with two enemies (it's not necessary to kill them, you can distract them with stone throws), then steal the key from the only enemy in the tavern courtyard. If you don't do this, you will have to pick a very difficult lock on the building's door.
Head to the eastern part of the settlement and reach the back entrance to the tavern courtyard. There will be a small barn with several guards—one sitting by the fire and another patrolling the area. You don't even have to deal with them since you can climb up the ladder into the barn.
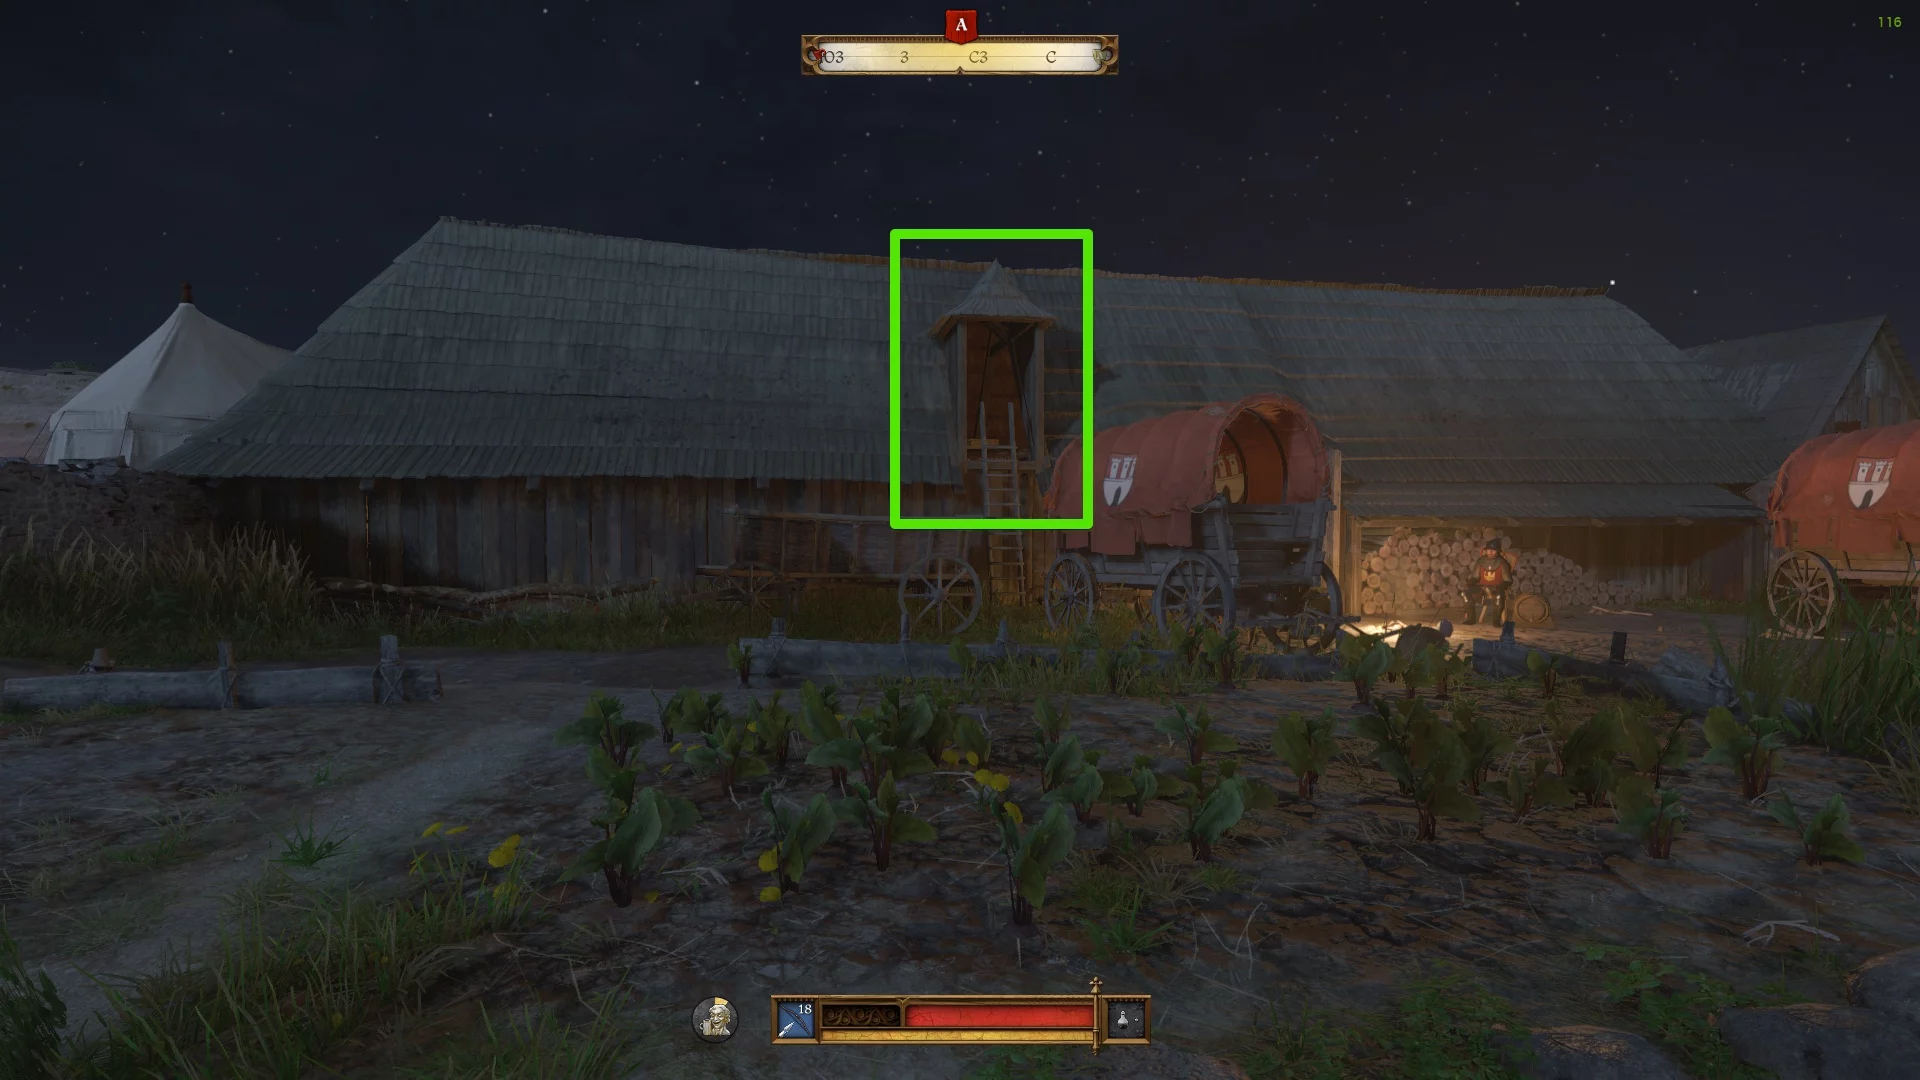
If you climbed to the attic of the barn, go to the right side and jump down. Here you will see a tent with a guard sitting in front of it holding a key. Kill him and take the key, or you can try to steal it, which is much riskier.
Enter the building and open the door on the left. A lengthy cutscene will begin, after which you can ask Aulitz a few questions and pass skill checks, then choose how to proceed:
- Kill with dignity.
- Kill like a dog.
- Leave to die.
As we noted earlier, if you leave him to die, a task to find his corpse will appear in the final quest. It's better to end his life now.
Don't forget to pick the locks on the chests and collect valuable items, especially the expensive armor!
Find a horse and ride for reinforcements
The stables are located behind the building where you found Shmuel. However, reaching them quickly won't be possible, you'll first need to clear the path. You can take Shmuel with you and leave him to distract or kill enemies—the patrols won't react to his body.
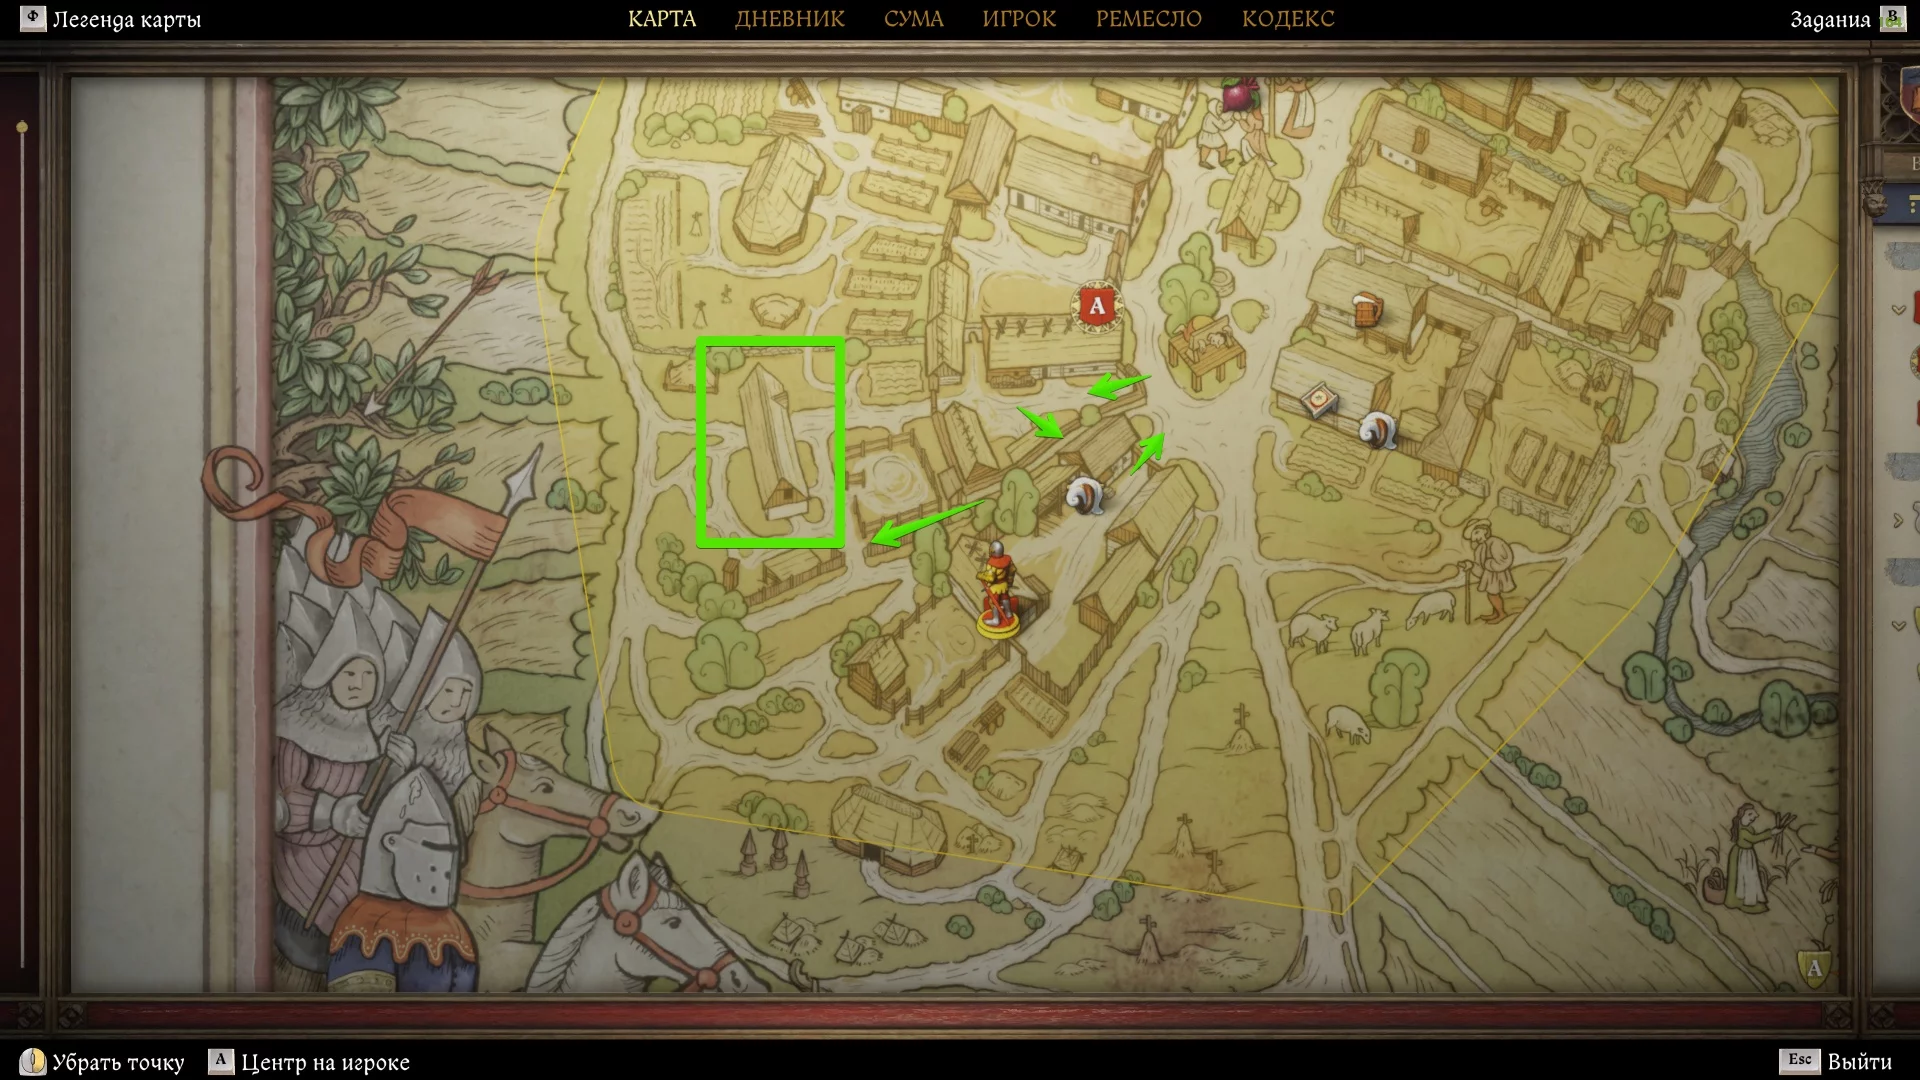
You need to exit this courtyard, turn left, and enter the nearest yard. Here, too, one enemy will be patrolling. You can, of course, kill him with a headshot since he doesn't wear a helmet, but this will definitely attract the attention of nearby enemies—they will gather at the cries. We recommend throwing Shmuel behind the tent, killing the patrol, hiding his body, and then proceeding with your friend into this yard.
Once done, use the passage in the wall on the left to enter the alley that leads you to the stables. There is only one enemy here, so you can get rid of him and interact with the horse.
Once done, the task will be completed.
Next Quest: Last Rites
Walkthrough of Main Quests in Kingdom Come: Deliverance 2
- Kingdom Come Deliverance 2: Last Rites Walkthrough
- Kingdom Come Deliverance 2: Easy Riders Walkthrough
- Kingdom Come Deliverance 2: Fortuna Walkthrough
- Kingdom Come Deliverance 2: Laboratores Walkthrough
- Kingdom Come Deliverance 2: Wedding Crashers Walkthrough
- Kingdom Come Deliverance 2: For Whom the Bells Tolls Walkthrough
- Kingdom Come Deliverance 2: Back in the Saddle Walkthrough
- Kingdom Come Deliverance 2: Necessary Evil Walkthrough
- Kingdom Come Deliverance 2: For Victory! Walkthrough
- Kingdom Come Deliverance 2: Divine Messenger Walkthrough
- Kingdom Come Deliverance 2: The Finger of God Walkthrough
- Kingdom Come Deliverance 2: Storm Walkthrough
- Kingdom Come Deliverance 2: The Sword and the Quill Walkthrough
- Kingdom Come Deliverance 2: Speak of the Devil Walkthrough
- Kingdom Come Deliverance 2: The Devil's Pack Walkthrough
- Kingdom Come Deliverance 2: Via Argentum Quest Walkthrough
- Kingdom Come Deliverance 2: Taking French Leave Walkthrough
- Kingdom Come Deliverance 2: The King's Gambit Walkthrough
- Kingdom Come Deliverance 2: The Feast Walkthrough
- Kingdom Come Deliverance 2: Exodus Walkthrough
- Kingdom Come Deliverance 2: The Lion's Den Quest Walkthrough
- Kingdom Come Deliverance 2: Dancing with the Devil Walkthrough
- Kingdom Come Deliverance 2: Oratores Walkthrough
- Kingdom Come Deliverance 2: The Italian Job Walkthrough
- Kingdom Come Deliverance 2: Civitas Pragensis Walkthrough
- Kingdom Come Deliverance 2: So it begins Walkthrough
- Kingdom Come Deliverance 2: Besieged Walkthrough
- Kingdom Come Deliverance 2: Hunger and Despair Walkthrough
- Kingdom Come Deliverance 2: Reckoning Walkthrough
- Kingdom Come Deliverance 2: Last Rites Quest Walkthrough
- Kingdom Come Deliverance 2: Judgement Day Walkthrough
Other guides
- Kingdom Come: Deliverance 2 Mysteria Ecclesiae — Weapon Locations and How to Obtain Them
- Kingdom Come: Deliverance 2 Mysteria Ecclesiae — How to Find Slavek’s Purse
- Kingdom Come: Deliverance 2 Mysteria Ecclesiae — Devilish Pain Quest Guide: How to Help Madla
- Kingdom Come: Deliverance 2 — Mysteria Ecclesiae DLC Walkthrough Guide
- Kingdom Come: Deliverance 2 — How to Access and Start the Mysteria Ecclesiae DLC
- Kingdom Come: Deliverance 2 — Chiaroscuro Quest Walkthrough
- Kingdom Come: Deliverance 2 — Source of Inspiration Quest Walkthrough
- Brushes with Death DLC in Kingdom Come: Deliverance 2 — How to Start and Complete All Quests
- Kingdom Come Deliverance 2: A Sketchy Situation Walkthrough
- Kingdom Come: Deliverance 2 — Fixing High Toll Quest Issues
-
 Kingdom Come: Deliverance 2 — Source of Inspiration Quest Walkthrough
 -
 Kingdom Come: Deliverance 2 — Fixing High Toll Quest Issues
 -
 Kingdom Come Deliverance 2: A Sketchy Situation Walkthrough
 -
 Kingdom Come: Deliverance 2 — Chiaroscuro Quest Walkthrough
 -
 Brushes with Death DLC in Kingdom Come: Deliverance 2 — How to Start and Complete All Quests
 -
 Cyberpunk 2077 Romance and Sex Guide: Judy, Panam, River, Kerry, and Joytoys
 -
 Palworld 1.0 Best Pals for Early Game, Combat, Bases, and Mounts